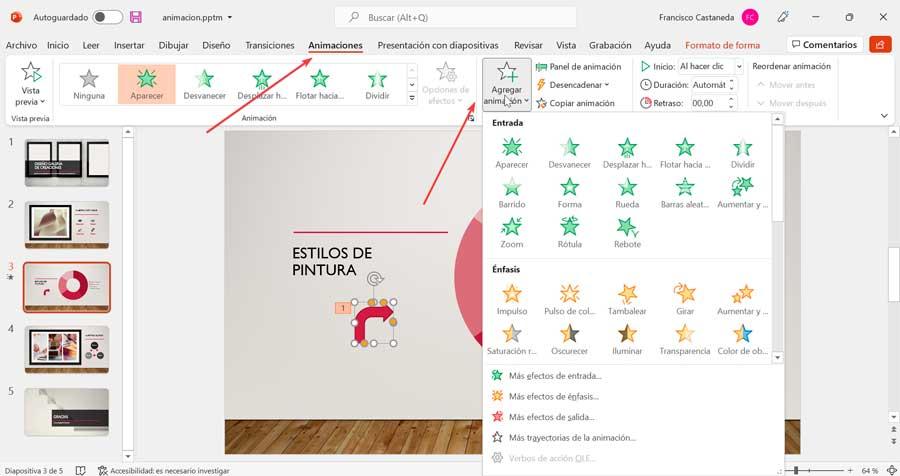
Within these effects we find entry and exit effects. A entry serves to attract something onto the slide while the Exit it will move it out. In this way they can complement each other so that we can make an object enter, exit or move between different points on the slide. We also find effects of emphasis that allows you to highlight important details to attract attention, as well as moving routes with which you can move text along a set route.
Of course, this option should not distract us from the main objective of the presentation, so the first thing we should always do is make all the content with the idea we want to convey. Once completed, this is where these effects and animations come into play, as they will help us create a much more attractive aspect of the subject matter.
Add and remove animation effects
To start, we need to add the object that we need to animate to our presentation. To do this with the application open, click on the “Insert” tab. From here we can add shapes, icons, graphics, 3D models, etc. For example, click on “Forms” and select the desired one to add it to the slide.
Later we click on the “Animations” tab that we find on the navigation ribbon. Later we click on the button «Add animation». This will bring up a menu with input, output, and emphasis animations.
We proceed to choose an effect from the list, and it is even possible to apply more than one effect at the same time. For this, it will always be necessary for us to carry out the operation from the “Add animation” button, because if we do it differently, what it will do is replace one effect with another.
Manage the order in which they are displayed
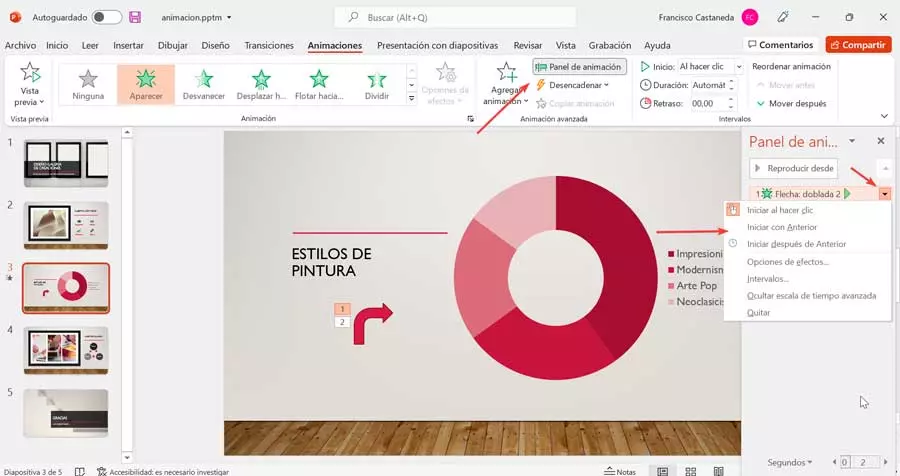
It is also possible to manage these animations, so that we can organize how they are started. This is something we can do from the “Animation Panel”. If we click on the down arrow, we have the option to start on click, which causes it to start when the slide is clicked. Also, there is the option of «Start with previous», so that it is played at the same time as the previous animation. And finally, we can “Start after the previous one”, so that it starts just after the previous one ends.
In this way, it allows us to play with the order in which the animated objects will occur throughout the slide. Likewise, from the “Intervals” section, we can configure both the duration and the delay, so that it always goes in line with our exposure rhythm.
Delete an animation
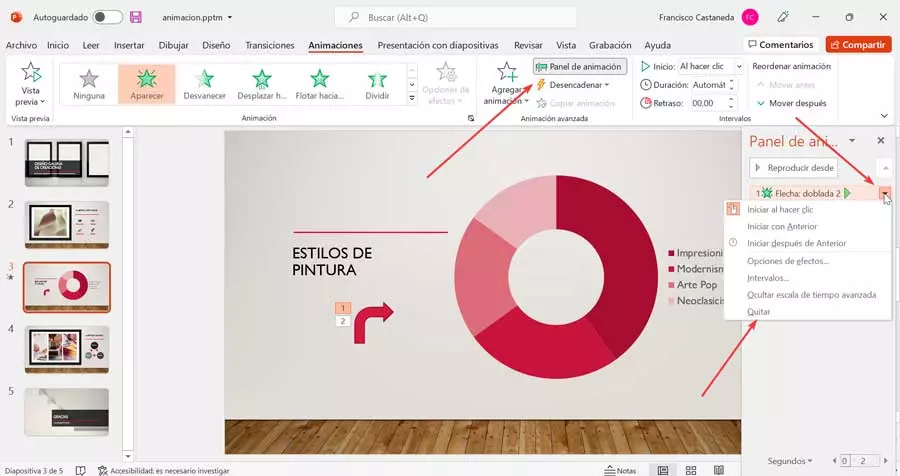
Maybe when the time comes we decide that an effect that we have introduced is no longer necessary or simply introduce another in its place we can delete it. If we want to eliminate an effect, we must also use the button «Animation panel» within the section of «Advanced animation». This will open a panel on the right side in which we must select the animation effect that we want to remove. Later we click on the down arrow, which will open a drop-down menu, and click on «Remove».
Create animation paths in PowerPoint
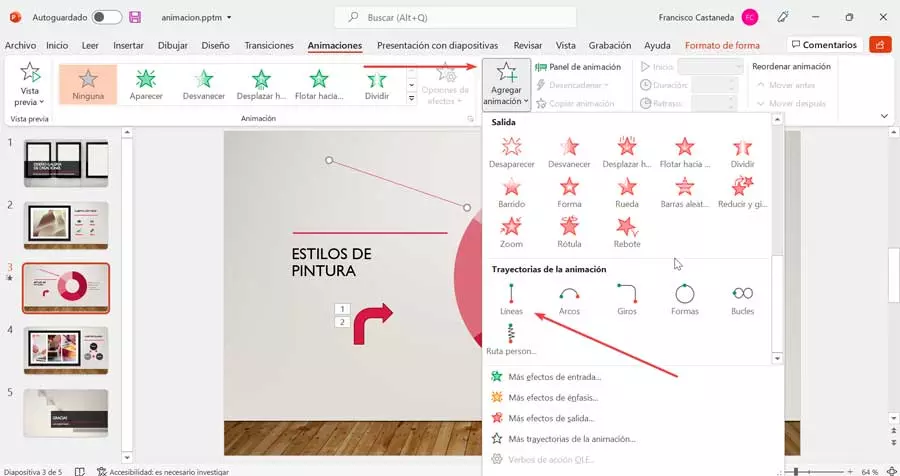
PowerPoint allows us to create animation paths to an object, allowing us to move objects within a sequence that we can use to tell a story. It can be applied to objects, such as shapes, text and images. To do this, we must start by clicking on the object that we want to animate on the slide. Subsequently, click on the “Animation” tab and then, in the “Advanced animation” section, click on “Add animation”.
Within the menu that opens we move to the bottom where we find the section of “Trajectories of animation” and we select one of them. If we choose the custom route, we can draw ourselves the movement that the object makes to our liking, which will be drawn in the form of lines. To finish drawing we press the ESC key and we will check the movement that we have created.
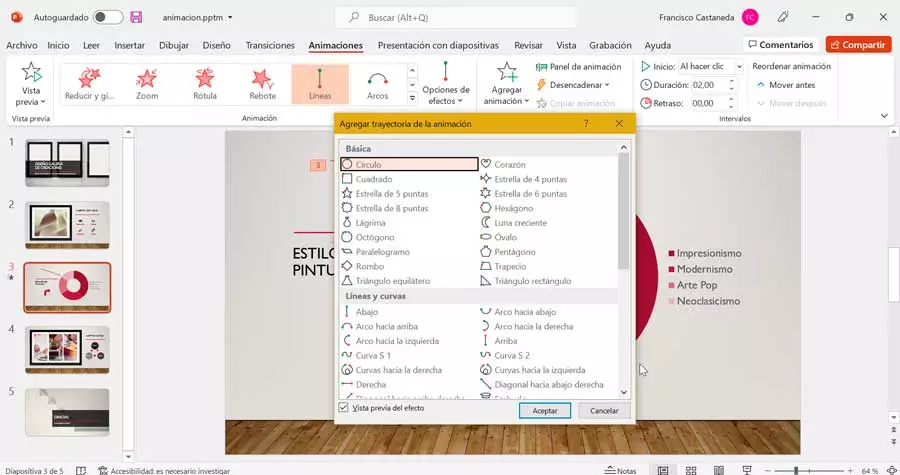
We can also add more animation paths. To do this, click on «Add animation» and then at the bottom we click on «More trajectories of animation». This will open a new panel where we can choose new animations, organized into “Basic” (square, heart, rhombus, etc), “Lines and curves” (arc up, arc down, curves to the right, etc) and ” Special »(peanut, bean, cross, etc). We select the desired one and click on «Accept». Now by clicking on the «Preview» button that we find on the left side of the toolbar, we can check how the effect is applied.
From the “Effects options” section that we find within the “Advanced animation” group, we can change the direction of the movement path, edit it or block it so other users cannot change or unlock the animation. If we want to delete an established route, we can do it from the “Animation Panel” tab. Here, we choose the animation and click on it. Later we click on the triangle downwards and from the list we select the option «Remove».
