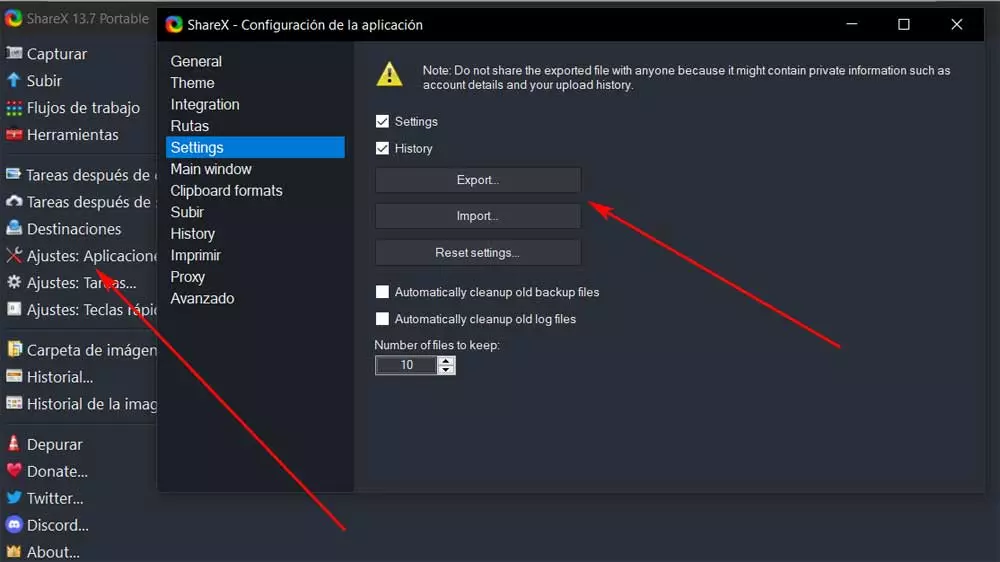
The screenshot function is used almost automatically in our operating systems, whether it is Windows or Linux. This is something that we can do by simply pressing a key on the keyboard and saving the content of the screen to the Clipboard. But we can also use third-party applications to extend this useful functionality. Serve as a clear example of all this the ShareX app.
This is a open source software that has not stopped gaining followers in recent times. While the screenshot function that we find, for example, in Windows is quite limited, this program opens up a wide range of possibilities. And it is that after downloading and installing this software we find all kinds of operating modes related to this task. The truth is that this functionality sometimes we do not give it the importance it really has.
In many cases we will not miss it until it stops working or we need expand its usefulness. That is precisely where these external applications developed to offer us everything we need when it comes to capture the content of our monitor. In this sense, one of the options most loved by most users is the aforementioned ShareX. In addition, we must bear in mind that this is a program that we can use for free to benefit from everything it offers us.
So much so that many of you have been using this screen capturer for years. This means that over time you have adapted its multiple parameters and settings to your needs or tastes.
ShareX helps you migrate PCs and keep your settings
With all this, what we want to tell you is that, if let’s change computers, reconfiguring this program to the way it was in the old one can be an annoying and boring task. The developers of this open source project are fully aware of all this we are telling you, which is why they love us facilitate such migration to another computer.
Thanks to a functionality of the program, we will be able to export all the configuration and history of our ShareX in order to be able to use it on the new computer. Obviously, just as we found a export function, we have another import to add that file with all our configuration when installing the program from scratch. For all this that we tell you, the first thing we do is start the screen capture in a conventional way before uninstalling it.
Now we are going to export the configuration of this and save the file that is created for example on a USB stick. We achieve this by clicking on the Settings section: Applications, where we are in Settings.
Precisely here we are going to meet the export and import buttons to generate or add our ShareX configuration file. In addition, at the top of this same window we see that we have the possibility of adding, or not, both the record Like the parameters personalized. We will also have the possibility, if we have already created that backup copy of the configuration, to delete all the customization that we have made here and leave the program as newly installed.
