However, there are users who are not particularly attracted to the use of this tool, as this implies that the file has to be deleted twice before it has been completely erased from our hard drive. Although its use can be of great help for greater security when deleting data, we may not be interested in its use, so we are going to see different ways we have to delete files and folders directly without going through the Recycle Bin.
Delete files without going through the Recycle Bin
Whether we want to delete files or folders automatically without having to go through the Recycle Bin, we have several ways to do it. Either with a keyboard shortcut or using the Command Prompt tool. Likewise, we can omit the use of the trash by configuring it from its properties.
Use Shift + Del key combination
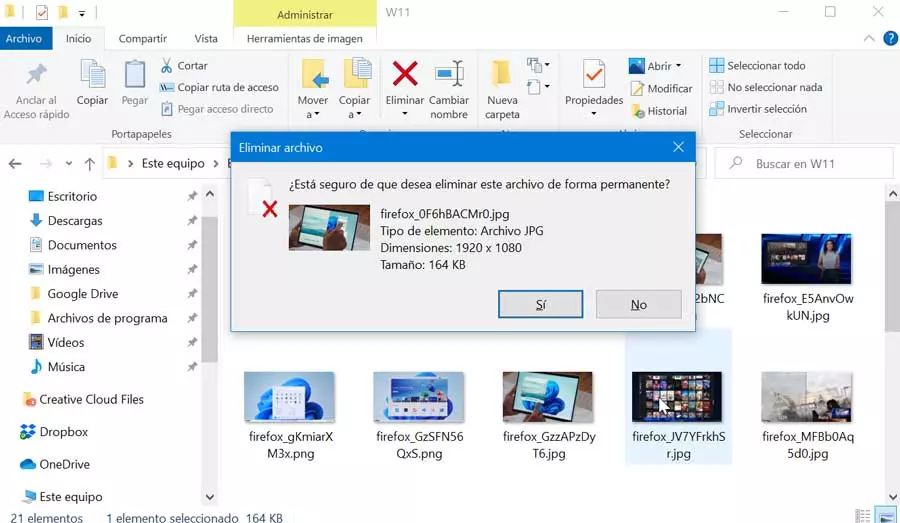
The simplest way we have to delete files without going through the recycle bin is through the File Explorer. Once we have it open, we simply have to select the file that we would like to permanently delete. Later we press the keys Shift + Del. Alternatively, we can also right-click and hold down the Shift key while clicking the Delete option.
Next, a message will appear indicating if we are sure that we want to delete the file permanently. Click on “Yes” to confirm, and it will be permanently deleted without having to go through the Recycle Bin first.
Use Command Prompt
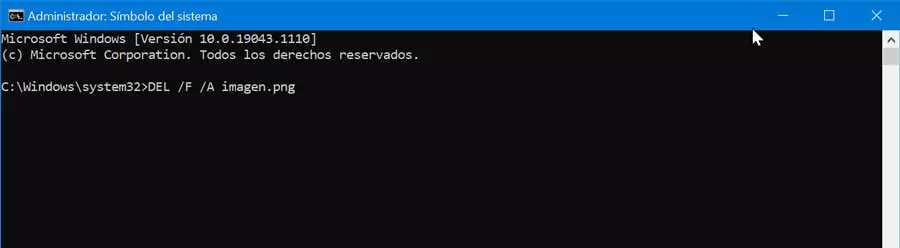
The command line utility of the Command Prompt in Windows will also allow us to delete any file or folder without going through the recycle bin. For this we will write cmd in the search box next to the Start menu and run it with administrator rights.
Delete file
If what we want is to delete a file we will use the DEL (DELete) command. To do this, then we write the following command:
DEL /F /A <archivo.extension>
For example, if we want to delete the windows.png file that is inside our user folder, we must access the folder and write:
DEL /F /A imagen.png
Delete folder
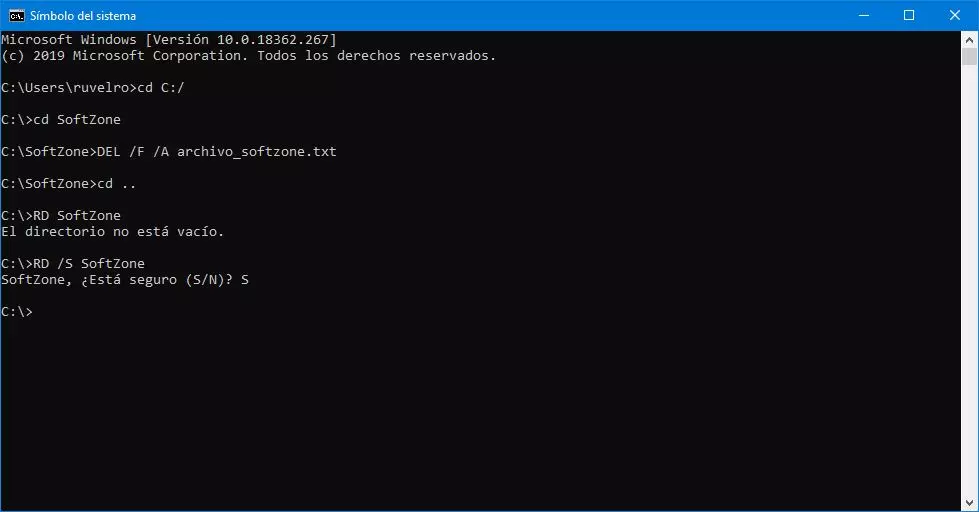
If what we want is to delete a folder, in this case we will use the RD (Remove Directory) command. To do this, we will go to the folder that contains the folder that we want to delete and execute the command:
RD /S <carpeta>
In this way, if we want to delete the content of our SoftZone folder, we will write:
RD /S SoftZone
Skip the Recycle Bin
Another option that we have available in case we do not want to permanently use the Recycle Bin, we can make the following change.
Right click on the Recycle Bin icon. This will make a contextual menu appear where we must select the «Properties». In the new window we must select the unit for which we want to modify the properties of the Trash. Next, we check the box for «Do not move files to the Recycle Bin. Remove files immediately upon deletion ».
We must also make sure that the “Show delete confirmation dialog” box is checked. In this way, we will receive a confirmation message to prevent us from accidentally deleting any file or folder.
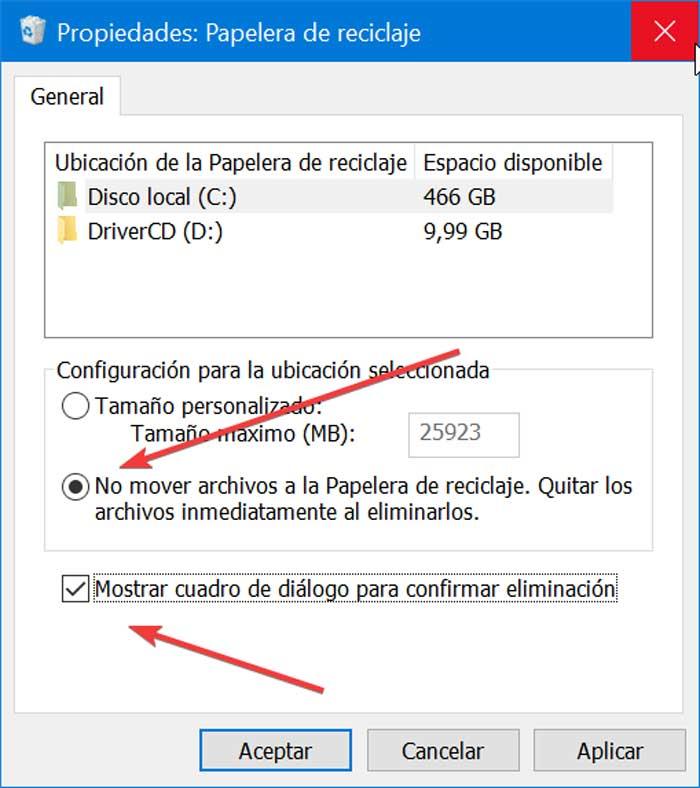
We can repeat the previous step for other units where we want the files to be deleted without going through the Recycle Bin. If, for example, we have two drives, C: and D :, and we only perform the steps for drive C :, when we delete files from drive D :, they will still be moved to the recycle bin. Finally, we only have to click on «Apply» and «OK» so that the changes are saved.
With these simple steps, from now on, every time we delete a file from any Windows drive, the file will not go to the Recycle Bin, but will automatically be permanently deleted, so it will not be necessary to delete them by Double match. Of course, we lose the option of being able to recover them, at least in a simple way.
Automatically empty the Recycle Bin
If eliminating the option of being able to delete any file or folder without going through the Recycle Bin seems a bit excessive, we can also use another interesting option. And it is that Windows 10 offers us the possibility of being able automatically empty the trash after a specified number of days. In this way we avoid accumulating the trash of unwanted items for an excessive time, while we can always continue to recover the most recent deleted items.
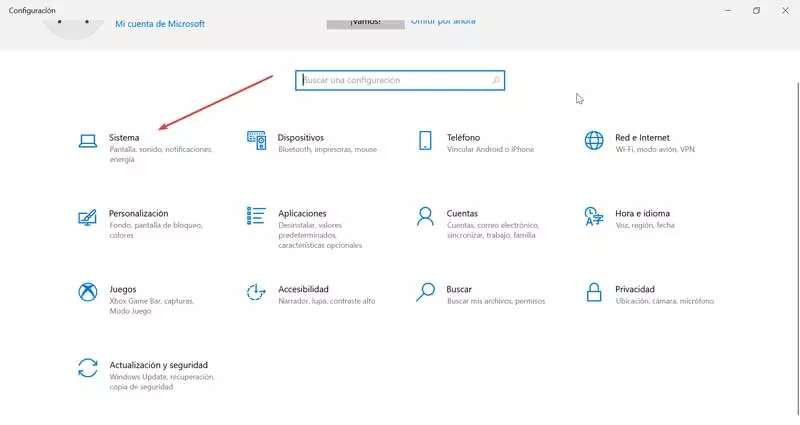
By default, the Recycle Bin is configured to be emptied after 30 days, but this is something that we can customize from the Windows Settings menu. To do this, just press the Windows + I keyboard shortcut, which will take us to the «Settings» menu, where we will select the «System» option.
Later in the column on the left we select the option “Storage”. Here on the right side we deactivate the “Storage Sensor” button, which will prevent it from being able to free up space automatically if files that we do not need are deleted, such as temporary files and the contents of the recycle bin. Now, click on «Configure storage sensor or run it now».

This will make a new window appear where we find the Temporary Files section. In its first section we can select if we want to delete the files from the recycle bin after a certain time. If we click on the drop-down menu, we can choose periods of 1 day, 14 days, 30 days or 60 days. In addition, it also has the option of Never, in case we do not want the files to be deleted from the trash automatically.
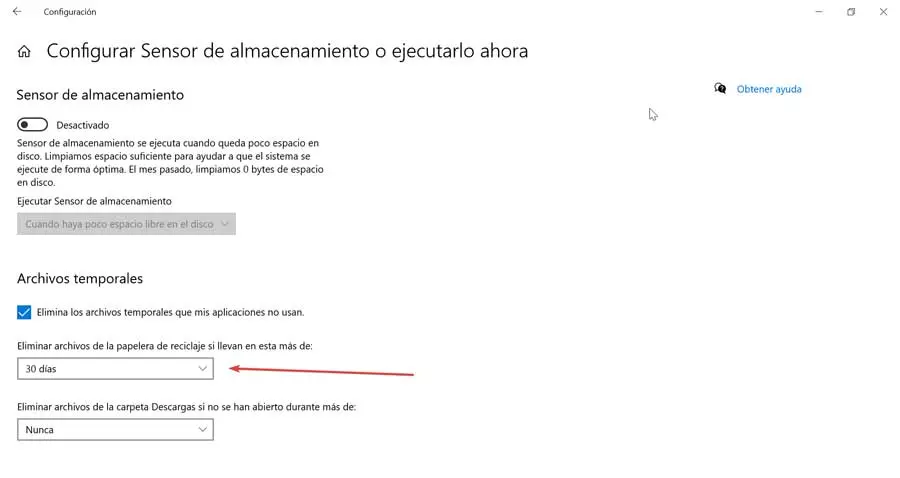
In the next section we will also have the possibility to delete the files from the Downloads folder if they have not been opened for a certain time: 1 day, 14 days, 30 days, 60 days. We also have the option of Never available but we want them to be deleted automatically from time to time.