Microsoft’s new operating system, Windows 11, has been with us for several weeks now. The possibility of installing it is gradually reaching users through the Windows Update function. While many users stay working on the new software, others decide take a step back and go back to Windows 10.
The reasons for this decision can be many, which is why Microsoft tries to make the move easy for us. That is why it proposes a specific function for it and thus facilitate the return to the previous version of the system. For this we have a period of 10 days to make the decision to return to the previous version. But sometimes these are not enough. 10 days to decide if we stay on Windows 11.
Precisely for all this, below we are going to show you how to extend this time to 60 days. The first thing we need to know is that the feature we are referring to allows us to go back to the previous version of the operating system after updating to the new one. This is useful if you find that the latest version is unstable or has bugs. But in most cases we will only have 10 days to roll back this update.
It must be said that Microsoft reduced the previous limit from 30 days to 10, but if we wish we have the possibility of extending that period to 60. This is precisely what we are going to show you next so you can see how simple it is to make this change to go back to Windows 10 from Windows 11.
Extend the time to go back from Windows 11 to Windows 10
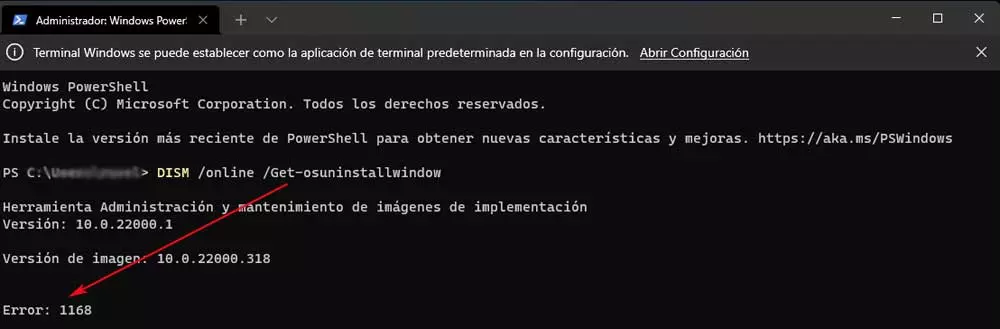
For all this that we tell you we are going to use Windows Terminal and the DISM or Deployment Image Servicing Management command. This, as we told you, will allow us to extend the trial period from 10 to 60 days. The first thing we do here is use the key combination Win + X and we click on WindowsTerminal with administrator permissions. It is worth mentioning that this function uses PowerShell to execute the commands that we will introduce next.
On the screen we now have to write the following command that allows us to see the current time limit:
DISM /Online /Get-OSUninstallWindow
By default at first we find the value of the 10 days that we mentioned. In the event that a message appears Error 1168, it means that we no longer have the possibility to return to Windows 10.
Therefore, to extend the time limit we will use the following command here:
DISM /Online /Set-OSUninstallWindow /Value:NUMERO_DIAS
Obviously we must replace NUMBER_DAYS with the amount that we want to establish in addition to the 10 mentioned, for example, in this case 50 to add the 60 days that we mentioned.
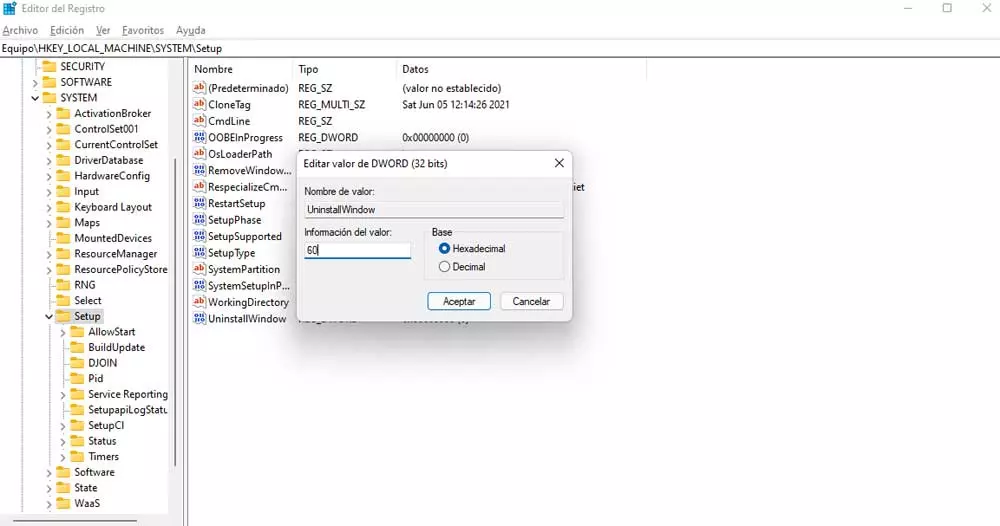
Use the registry to change the day limit
This is something that we can also carry out through the system log, all using the regedit command to access its editor. Once we have it on the screen we will have to go to the following route:
HKEY_LOCAL_MACHINE/SYSTEM/Setup
In the right panel we locate the value UninstallWindow, but if we don’t see it, we create it as a DWORD (32-bit) value. Now we only have to assign the number 60 in the Value information field to extend the term to 60 days.