Many are the users who, instead of paying for a VPN to have privacychoose to use one of the different proxies free available through the internet. These proxies have a series of limitations, like any free service of this type, so the first thing to check is whether it really works or is having a problem.
The platforms that offer proxy services, both free and paid, include a link to the operation of the platform from their website where we can check first-hand if the platform is working correctly or if it has any problem that may be causing the problem that we have with Chrome.
Check that our internet connection works
Whenever we have a problem related to an application that needs the Internet, the first thing we must do is make sure that our connection works correctly. To make sure that our connection works correctly, we must look at the icon on the taskbar that informs us about the type of connection we use to connect to the Internet, either via Wi-Fi or through an ethernet cable.
By placing the mouse over the icon, the name of the connection will be displayed and it will inform us if the network to which we are connected has Internet access. If you do not have an internet connection, we have already found the problem and, instead of continuing to look for the solution to the problem on our computer, we should look for it on our router or in our operator.
If we have an internet connection, but it is very weak, a fairly common problem when we connect to 5 GHz networks due to its limited range, we must get closer to the position of the router in order to receive the signal in a cleaner way and avoid possible interference. on the sign. If we are connected through a Wi-Fi repeater, we must turn it off and reconnect it, since sometimes these devices get blocked and stop working despite showing their correct operation through the lights that they incorporate.
Restore Windows Proxy Server Settings
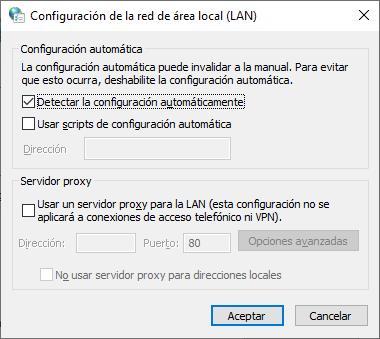
If our internet connection works without problems, we should try to restore the Proxy configuration through Windows. To access the Proxy configuration, we must access the Internet Options section through the Windows search box and click on the tab connections.
Within this section, click on LAN settings. Next, we uncheck the Use a proxy server for the LAN box and restart the computer. Next, we access the same section again and enter again in the Proxy server section the address that we usually use to make Internet connections, including the connection port.
Disable proxy
Another possible solution to this problem is to disable the Windows proxy. In theory, the easiest solution is to uncheck the box Use a proxy server for the LANwhich is located in the Internet Options section, in the Connections – LAN Settings box.
Another option is to access the Windows registry and disable it directly through the following address
Equipo/HKEY_CURRENT_USER/Software/Microsoft/Windows/CurrentVersion/InternetSettings
Next, we select all the records that include the word Proxy and remove them from our team. Finally, we must restart the computer so that Windows detects the changes and applies them automatically when the computer restarts.
Update Chrome
With each new Chrome update, Google solves the problems of operation, performance and bugs that the previous version presented. To ensure that all users are always using the most up-to-date version of Chrome, the browser automatically checks for a new update each time we open it. However, just like in computing, this verification process can fail.
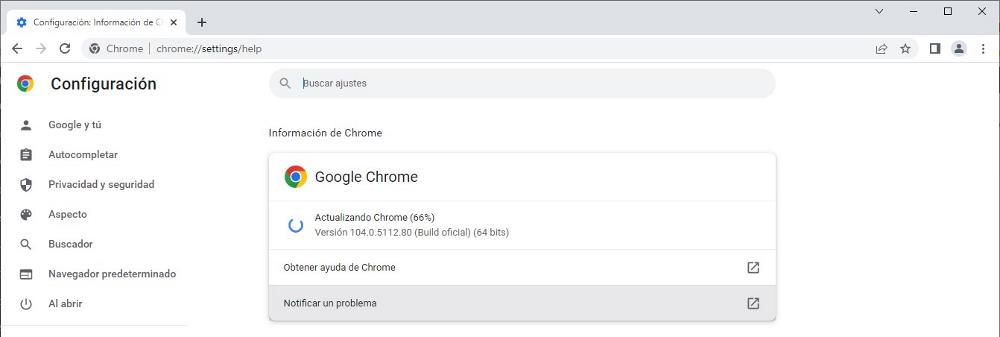
To make sure that we are using the latest version available in Chrome, click on the three vertical points located in the upper left corner of the browser and access the configuration options. Next, in the left column, click on Chrome Information. In the section on the right, it will be shown if we are using the latest version. If not, the browser will automatically download the latest available update.
Restore Chrome Defaults
Another possible solution to this problem is to restore Chrome’s default values. Restoring Chrome to default will remove any settings we’ve changed that may be affecting how your computer works. Restoring Chrome will offer us the same result as if we deleted it from our computer and reinstalled it.
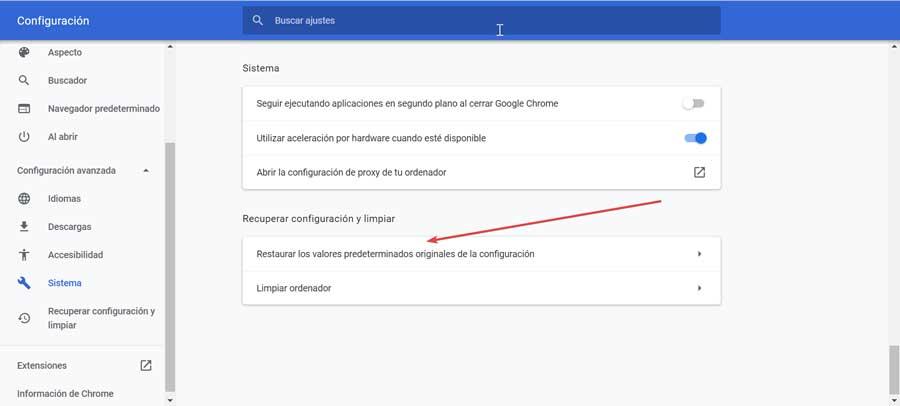
To leave Chome with the default settings, we access the Chrome configuration options by clicking on the 3 vertical dots located in the upper right corner of the application. Within the configuration options, click on Recover configuration and clean. In the section on the right, click on Restore Original Defaults of the configuration and confirm the process in the pop-up window that is displayed. History, bookmarks, and passwords will not be removed from your computer.
Install pending Windows updates
Just as Chrome updates fix performance, operation, and bug issues, as well as add new features, Windows updates have the same goal, so when faced with any problem with Windows or any other application, we must always make sure that we Have the equipment updated to the latest version available.
In Windows 10, to check if we have any pending update and install it, we must access the Windows configuration options (Win + i) and click on Updates and security and in the left column click on Windows Update. In the section on the right, click on Search for updates. If any update is shown, click on Download and finally, we restart the computer.
To check if we have any pending update to install in Windows 11, we access the configuration options (Win + i) and click on Windows Update located in the left column. In the section on the right, click on Search for updates.
Go back to a previous restore point
If after carrying out all the steps that we have shown you in this article to solve the Chrome proxy error, we cannot find the problem, we can restore the version of Windows to a previous point, a point at which it worked without problems.
Windows automatically creates a restore point automatically every time we install an application, install an application or make a major change to the system, as long as we have not disabled this feature to save disk space.
To access the restore points that Windows creates automatically, we access the Windows search box and enter the terms Create a restore point. In the window that appears, click on system restore inside tab system protection.
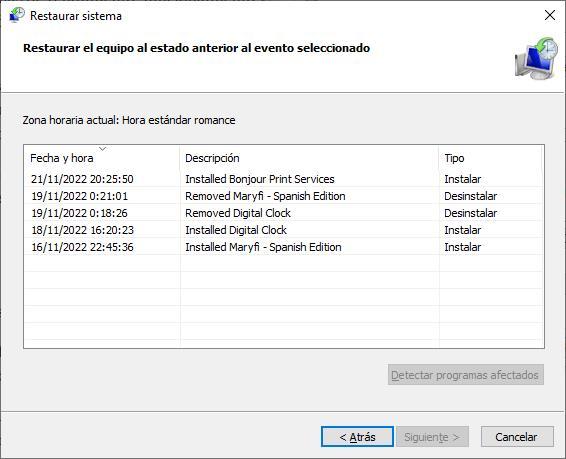
Windows will recommend us to restore Windows to the last copy it made of the system, along with the date and time so that we can identify it. If we are not very clear on whether the equipment was working correctly on that date, click on Choose another restore point and we select the one we want to restore based on the date.