The shortcuts, on the other hand, are a type of file whose main objective is to immediately open the file to which it is linked. This file can be an image, a folder, an executable, etc. These can be created anywhere, and we can differentiate them because, although the icon can be customized, it incorporates a small square with a date on top.
add icons
On the Windows desktop we have the possibility to add them. This is something that we can do with any program that we use or with system functions such as the Control Panel or the Settings menu. This is something that is done in a similar way for both Windows 10 and Windows 11.
Desktop Icon Settings
If we don’t see the desktop icons, they may be hidden, so we must activate them. This is something that we can do in a fairly similar way in both Windows 10 and Windows 11.
On Windows 10
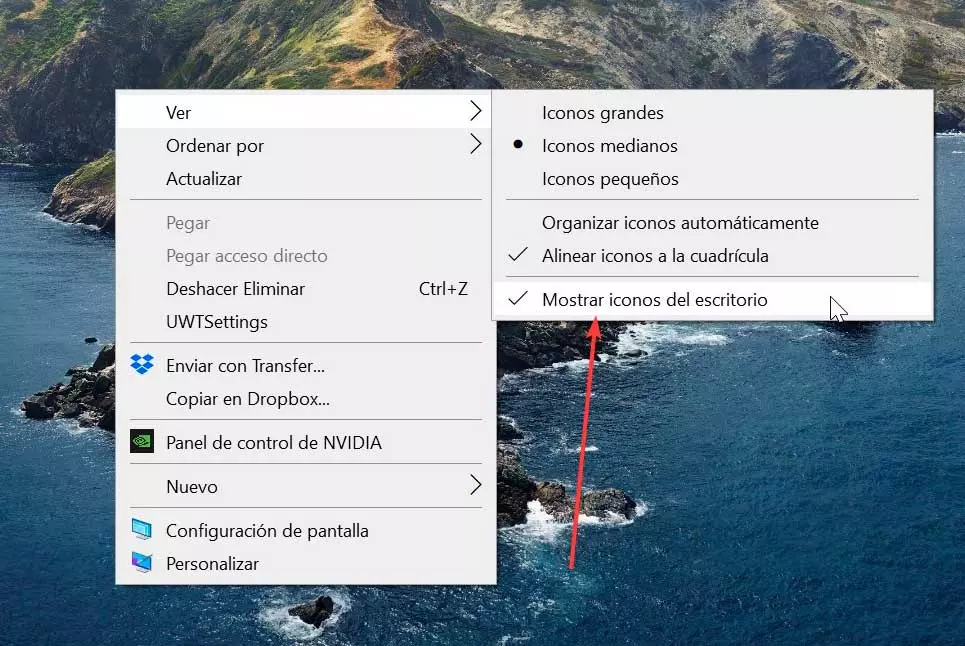
This process is very simple, since it will only be necessary to click with the right button on a blank space on the desktop. This will open the context menu where we select «View» and then “Show desktop icons”. With this we enable elements such as the Recycle Bin, network, among others, to appear.
In order to configure them, we must press the keyboard shortcut “Windows + I”, which will open the “Configuration” menu. Then click on “Personalization” and “Themes”. On the right hand side, click on the “Desktop Icon Settings”, which we find within the “Related Configuration Options” section.
This will open a new window where we can select items such as This computer, the user folder, Network, and the full and empty Recycle Bin. If we click on the button “Change icon” we can choose another different appearance that we consider more appropriate for a specific element. Optionally we can check the box “Allow themes to change desktop icons” if we want them to be able to adapt to any new theme we choose. Otherwise they will not change their appearance.
Once we have finished, we only have to click on Apply and Accept to save the changes.
On Windows 11
In the event that we are using Windows 11, the process of displaying the icons is very similar because basically what is going to change is going to be the design of the menus. In this way, we right-click on the desktop, move the pointer over the “View” option and in the menu on the right we select “Show desktop icons”.
Later we can configure them by pressing the keyboard shortcut “Windows + I”, which will open the “Settings” menu. Next, click on “Personalization” and “Themes”. At the bottom we click on the section of “Desktop Icon Settings”, which we find within the “Related Configuration Options” section.
Now a new window opens where we can select items like This computer, the user folder, Network, and the full and empty Recycle Bin. If we click on the button “Change icon” we can choose a new appearance. Optionally by checking the box “Allow themes to change desktop icons”, these can be adapted to any new theme that we have added to change the appearance of it. In case we uncheck them, the icons will remain unchanged and will show the same appearance, even if we change the theme.
Turn system icons on or off
When we talk about system icons we are referring to those that are displayed in the system tray and that we can both enable and disable in Windows 10 and Windows 11
On Windows 10
These icons include Clock, Volume, Network, Power, Input Indicator, Location, Action Center, Touch Keyboard, Windows Ink Workspace, Touchpad, Microphone, and Meet Now.
By default, Microsoft keeps all of these activated so that at any time we can use it quickly. Likewise, we have the possibility to enable or disable them as we are interested, all from one place.
To do this, press the “Windows + I” key combination and access “Settings”. Later, click on “Personalization” and “Taskbar”. In the menu on the right we scroll to the bottom and within the notification area we select “Turn system icons on or off”.
This will make a new window appear where we see a list of all the system icons, so we will only have to click on its button to activate or deactivate them every time we need it. It is important to note that in the case of disabling the location system icon, we are not disabling the location of our computer. By configuring this section to our liking, we manage to stop showing unnecessary elements that can distract us, so we gain in productivity.
On Windows 11
The new Microsoft operating system Notification Center is located on the right side of the taskbar. Here, icons that we use often like battery, Wi-Fi, volume, Clock and Calendar and notification center are included. In addition, it is responsible for providing status and notifications about other sections such as incoming email, system updates and network connectivity.
If we want to change how the icons and notifications appear, we must right-click on an empty space on the taskbar and select “Taskbar Settings”. Later, in the Corner Icons section of the taskbar, we can activate the ones we want to appear and deactivate those we don’t want to see.
Add program icons to the desktop
If we want to add program icons to the desktop, we must click on the button with the Windows button that we find on the left side of the taskbar. We write the name of the program that we want to add to the desktop. Later we can perform one of the following actions:
- Drag the icon from the Start menu to the desktop.
- Select the program icon and right-click on it. Subsequently, the context menu appears where we select “Send to”, and finally we click on “Desktop (create shortcut)”. Finally, the program icon will be visible on the desktop.
- Drag and drop the executable from the folder to the desktop.
- Right-click on the file and click on “Copy” or press the shortcut «Ctrl + C». Then we right-click on an empty section of the desktop and select “Paste” or “Ctrl + V” from the keyboard.
In any of these ways we can add it to our desktop. Of course, we must try not to abuse them, because we can end up creating too much disorder in it.
Change the default icon
It is possible to manually and quickly change any default icon that we do not like, whether it is a Windows feature or a third-party program.
To do this, we must click with the right mouse button on the icon. This will open a context menu where we select the “Properties” option. Within the “Direct access” tab, we click on the “Change icon” section that we find at the bottom.
This will open a new window where you can select another icon from the list or click on “Browse” to select another one that we have saved in another location. Once finished, click OK twice and the changes will be applied.


