Apparently it is an error in the operating system that adds a black background to the folders, achieving a rather unpleasant appearance, so we will surely want to fix it as soon as possible.
Why does the background appear black?
The black background behind the folder icons can be quite annoying. Although it is not a big problem, since it is simply a graphical error that does not cause any damage, neither to the contents of the folder nor to the files, they are capable of spoiling our experience while we are working with the operating system.
The most likely causes of this failure may be related to some error due to damage and corruption in the registry of Windows. It may also be because the thumbnail cache of these icons is outdated. Also, this graphical glitch may be due to the presence of outdated graphics driversyes Given that there may be several reasons for the problem, we must try possible solutions until we find the one that is appropriate.
Troubleshooting steps
Next, we are going to see different actions that we can carry out to put an end to the problem that makes it show the black background right behind the folder icons in File Explorer. These can be carried out in both Windows 10 and Windows 11.
Restore default icon
A simple solution is to restore the icon back to its default values again. This is something very simple to do because we will only have to right-click on the folder where we have the problem and click on “Properties” in the context menu. Later we select the “Personalize” tab and click on the button “Change Icon”.
![]()
Now we must select any icon and click OK and again OK to apply the changes. We return to the “Customize” option and this time we click on the button “Restore Default” that we find in the “Folder Images” section. Once we have clicked OK, the default icon will be restored, thereby solving the black background issue.
![]()
Use Disk Cleanup
One of the available options to eliminate the annoying black background is to use a tool that Windows incorporates by default, such as Disk Cleanup, with which you can eliminate the thumbnails of the files.
![]()
To run it, just type cleanup in the Start menu search box and click on it to open the tool. Then we select the unit where we have the system installed. It is or will start the scanning process and then we mark the option «Miniatures»within the list of files that we want to delete and click on “Clean system files”. Finally, we restart the system and check if it has been solved.
Clear thumbnail cache manually
We can also try resetting the thumbnail cache manually. To do this, press the keyboard shortcut “Windows + E”, which will open File Explorer. Later we must mark the checkbox of “Hidden Items” inside tab “Watch”. Once marked we can see all those files and folders that are hidden in the system.
Next, we navigate to the following location:
C:/ Users / nombre de usuario / AppData / Local
It is important that we do not forget to change “username” to the actual username that is displayed in Windows.
Later we move to the bottom of the folder, select the file IconCache.db and press the DELETE button to remove it.
![]()
Next, we navigate to the following location:
C:/ Users / nombre de usuario / AppData / Local / Microsoft / Windows / Explorer
Here, we use the key combination “Ctrl + A” to select all the files and press the DEL key to delete them. Once this is done, we restart the computer.
![]()
Update graphics card drivers
In the event that the above does not solve the problem, we can try updating the drivers of our graphics card, in case they were the cause of the appearance of the black background behind the icons.
To do this, we will press the keyboard shortcut “Windows + X” and access the Device administrator. We display the “Display adapters” section, select our graphics card and click on it with the right mouse button. Later we select the Update driver option and choose “Search for drivers automatically” and we complete the entire process so that our graphics drivers are updated.
![]()
If Windows is not able to find updates automatically, we can also perform the update manually. To do this, we must download the drivers from the NVIDIA page or from the AMD website, depending on the manufacturer of our graphics. Later we update the device again, but in this case we choose the option of “Browse my PC for drivers”. Then we select the downloaded drivers and let them update.
Restore the system to an earlier point
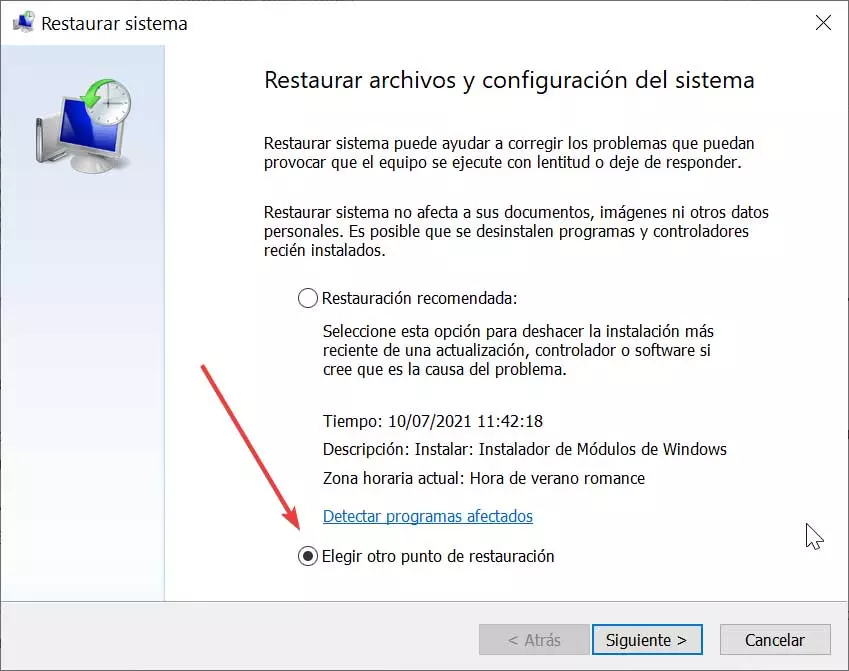
If none of the previous possible solutions has managed to get rid of the problem of the black background in the icons in File Explorer, we can choose to restore the system to a previous version where everything works correctly. This is something that we can do without fear of losing our data unexpectedly, because during the process we can choose whether to keep it or delete it.
![]()
To get started, we typed restore into the Start menu search box. This will bring up a new window where we select “Open restore Sistem”. This will open a new window where we click on “Choose another restore point”, which allows us to access the last available date where this error had not yet appeared. We select it and let it run.
Once finished, the system should work properly again and the icons should display correctly without the black background.