When a new version of this kernel is installed, it is usually automatically configured to function optimally on our computer. However, a configuration problem, whether internal to our PC or to one of the parts of the kernel, can make everything stop working. And the system can begin to experience some behavioral problems (with graphics, sound, performance, etc.) until, directly, it becomes totally unusable.
When errors are critical, that’s when we usually see the «Kernel panic«, The equivalent of the blue screen of Windows operating systems.
Luckily, Linux is prepared to deal with these kinds of problems. And it is very rare that we cannot recover from a critical system error related to the latest kernel we just installed.
Linux always saves old kernels
When we download a Linux kernel update, the system performs some basic configuration tasks to get it up and running. Normally, it usually compiles and configures it to work with our hardware and usually launches a bootloader configuration (GRUB) so that, the next time we start the system, we load this latest version by default.
But it does not delete by default the old versions of the kernels, all of them are usually saved on the hard disk. And, in addition, they are registered in GRUB to be able to start from any of them in case you need to open an old version.
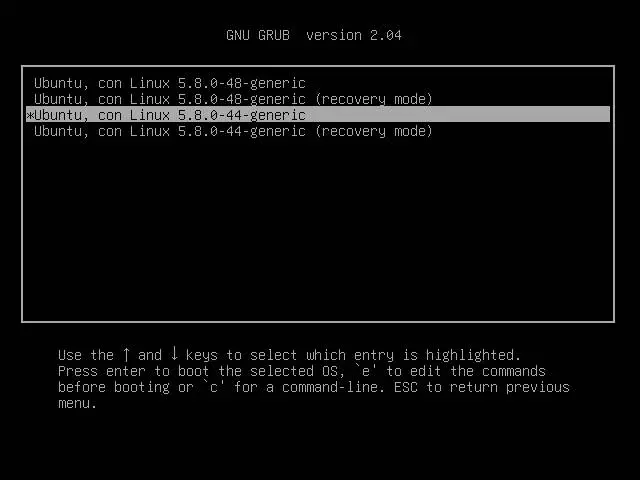
To enter these old versions, what we must do is select the entry “Advanced Options” within the GRUB boot menu, and here we will see all these old versions. In case the bootloader does not appear, because we have configured an automatic start, we can show it holding down the Shift key while turning on the PC.
In this section we can find at least two different cores: the last one installed, in normal mode, and the last one in recovery mode. The longer we have been with the system installed, the more entries we can find for each of the versions that have been installed.
We simply have to use the keyboard arrows to select the version of the Kernel that we want to start, and press Enter. Instead of booting the system with the default kernel, it will do so using the chosen version of the kernel.
Change the default boot kernel
When we install a new version of the Linux kernel, it is configured as the main version, to boot by default, and leaves the other versions in second place within the section «Advanced Options«. What we cannot do is, every time we turn on the PC, keep an eye on GRUB to choose the different version. Therefore, if we do not want to use the last one, and we want to use another specific version of the kernel, we will have to change it by hand.
We can use a program called “Grub Customizer”, which we can install with the following commands:
sudo add-apt-repository ppa:danielrichter2007/grub-customizer sudo apt-get update sudo apt-get install grub-customizer
And, once opened, we can see the entire list of entries registered at this start.

What we have to do is simply choose the version that we want to start as default from this program. We can also organize these entries as we want, eliminating those that we do not want to appear at startup and placing, outside the “Advanced Option” group, those that we want to have more at hand.
Remove outdated or corrupt kernels
Once we have confirmed that a specific kernel version works without problems, then it is time to make it primary. And after that, we must remove all other versions of this kernel to avoid getting confused and using a version that we do not want, and, incidentally, free up space on the hard disk.
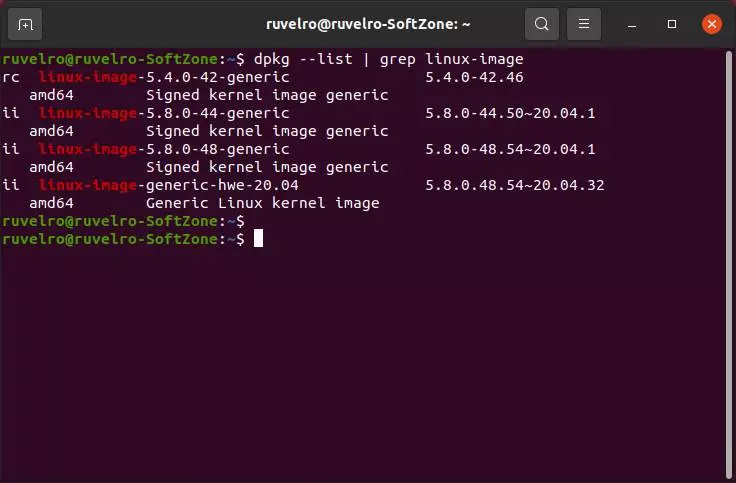
This can be done in several ways, depending on the distribution we use. In the case of Ubuntu, and other distros based on it, we must see the list of installed kernels by executing the following command in the console:
apt list --installed | grep linux-image
In this list we will see all the versions of the Kernel installed.
Now, what we will do is point the name of the kernel, up to the slash / that appears, and execute the following command to delete said kernel:
sudo apt remove [nombre_kernel]
We confirm the deletion, and wait for the process to complete. We will have to repeat it as many times as we want, one for each core we want to eliminate.
For distros based on Arch, we will have to remove these cores in a similar way, but using the Pacman package manager as follows:
sudo pacman -S kernel-name=x.x.x kernel-name-headers=x.x.x
Same as in Fedora, we will have to do it with RPM:
rpm -qa kernel-core sudo dnf remove kernel-core-x.x.x-xxx.fcxx.x86_64
Lastly, the one that makes it easier for us is Linux Mint. This Ubuntu-based distro comes standard with a series of tools designed to make life easier for users. And, among them, the most interesting is the operating system update manager. Within this update manager we will find a section specially designed to configure the cores, choose the one we want to use, and eliminate those that we are not going to use.