However, as many of you already know, the space on these discs is limited, so sometimes we have to take certain measures. Here for example we refer to the use of external drives that we connect to the computer via USB. In fact, this is one of the best solutions to save certain content. By this, what we mean is that we can use an external hard drive or a USB memory to store multimedia files that we do not use regularly.
If we have a huge number of photos, videos or music, these external drives will help us save space on the internal ones. But these external drives are somewhat delicate, so we must take certain precautions. For example, when disconnecting them, we should eject them with the corresponding function of the operating system.
Why use safe removal of USB drives
However, on certain occasions we can go away with some problems related to this safe extraction function. These are faults that can occur suddenly when ejecting a HDD external in Windows. and it is that we must bear in mind that, when disconnecting a hard drive from the Windows computer, it is advisable to remove it safely. Otherwise we risk the device itself being damaged, negatively affecting the stored data.
Even in the worst case all the files and folders we have here could remain inaccessible. That is why the function we are talking about, the safe extraction of USB disks, is actually more important than it seems. Thus, in the event that we find that we cannot eject external hard drive safelyLet’s see some solutions to carry out.
In addition, these will not be equally useful in the event that the option mentioned to me is grayed out. This will not allow us to carry out the extraction in the recommended way, and there may be several causes for this. For example, it may be that the hard drive is still in use and you will not let us remove it. It may also be the case that the drivers for this are out of date. Be that as it may, let’s see how we can fix the failure and eject the disk in a convenient way.
Fix problems ejecting USB disks in Windows
Of course, before getting more complicated, the first thing we have to try is the most common solution on Windows computers. Specifically, we refer to restarting the PC, for example, from the Alt + F4 key combination, before force extraction from the USB drive. That way we can solve the problem without risking the saved data.
Use Task Manager to end the process
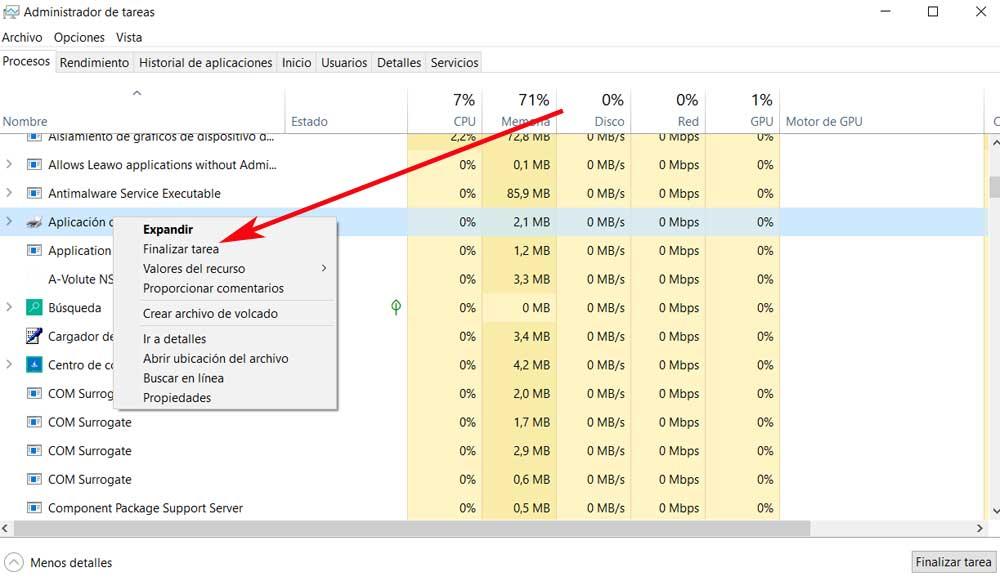
It may be the case that some of the processes or programs that are running at that moment in Windows have blocked some system functions. It may also be making use of the different units and the RAM of the computer. Therefore, the best we can do is access the Task Manager to locate this process and end it.
This should free up the USB drive safe removal functionality so that we can disconnect the drive properly. We can access this section using the key combination Ctrl + Shift + Esc. Once in the new window we locate that process that is consuming a large amount of resources and click with the right button. We can now choose the End task option to close and release the unit.
Use CMD to directly eject the USB drive
As we have already commented on many occasions, Microsoft does not stop improving the graphical user interface to make things easier for us. However, we also have a command prompt or CMD window that allows us to perform multiple functions in a more controlled and advanced way.
The problem here is that we need to know a series of commands and their corresponding parameters, which is not liked by all users. But as is the case in the present case, the windows command line It will be able to be of great help to us to eject that unit that at first we cannot extract. To do this, we open a window of this type by typing cmd in the search box.
One in the window that appears on the screen, we will only have to type the command that we expose below:
RunDll32.exe shell32.dll,Control_RunDLL hotplug.dll
Run the Device Troubleshooter
In order to fix potential bugs that can occur in Microsoft’s operating system, Windows has a series of functions for this. Specifically, we refer to the so-called Troubleshooters that are responsible for fixing these bugs by themselves. In the configuration application that we access with the Win + I key combination, in the Update and security section, we find several of these Solvers.
However, the one that we are not going to see is one specific to storage devices, but that does not mean that it does not exist. Therefore, if we find the failure that we are talking about now, we are going to execute a Problem solver more concrete. To do this, we open a command prompt window again, as we saw before, and now we execute the following command:
msdt.exe -id DeviceDiagnostic
Configure Windows Device Removal
If this problem we are facing now is common, we can always configure the corresponding device removal policy. To achieve this, we are commenting on the first thing we do is access a window of the File Browser and right-click on the faulty drive. In the context menu we select the Properties option.
After that we go to the tab called Hardware and in the All disk drives section we select the one that is causing the problem. Click again on Properties which will open another window and at the bottom we select Change settings.
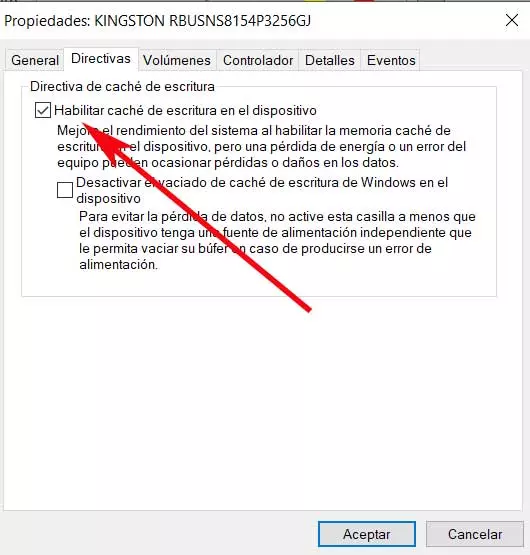
Now we only have to go to the Directives tab where we can Enable the device’s write cache.