Microsoft has introduced a new feature in Windows by means of which it allows us to scroll the windows that are inactive using our mouse. Previously, if we wanted to use this function, it was necessary to select a window to activate it and to be able to scroll over its content. Now we can scroll through its content, even if it is inactive, just by hovering the mouse pointer over it. This is something that can be an advantage or a disadvantage depending on the type of each type of user.
Scrolling through inactive windows: advantages and disadvantages
As we have mentioned, when we interact with Windows 10, we will always do so through different windows. These can be active or inactive. It is said that a window is found activated when we have it running in the foreground and we can work on them. Instead, we mean windows inactive when, although they are activated, they remain minimized in the taskbar, so they work in the background and we cannot interact with them directly until we maximize them again. We also find active and inactive windows although both are open in the foreground. For example, if we open the Notepad and then Google Chrome, it is the latter that is in the foreground and we can interact with it, while the Notepad would become inactive in the background.
Microsoft decided to add a new feature to improve interaction with windows that are inactive. For this, this function allows scroll through the content of the inactive window when we hover the mouse pointer over and using the scroll wheel. This is something that can be beneficial for users since they can see and interact with the content of each window without having to be in the foreground. But it can also be annoying if we are working with different documents at the same time, with the risk of accidentally moving over a document open in the background.
This controversial feature is enabled by default in Windows 10. Fortunately for many users, it is possible to deactivate it, so that it limits the movement of the mouse only through the windows that are active. Therefore, below, we are going to see the different ways that Microsoft offers us to be able to deactivate the scrolling function through inactive windows in Windows 10.
Disable scrolling of inactive windows
If we want to disable scrolling over windows that are inactive in the background, we will have two ways to do it. We can choose to disable it from the Windows 10 Settings menu or by accessing the Registry Editor.
From Windows 10 Settings
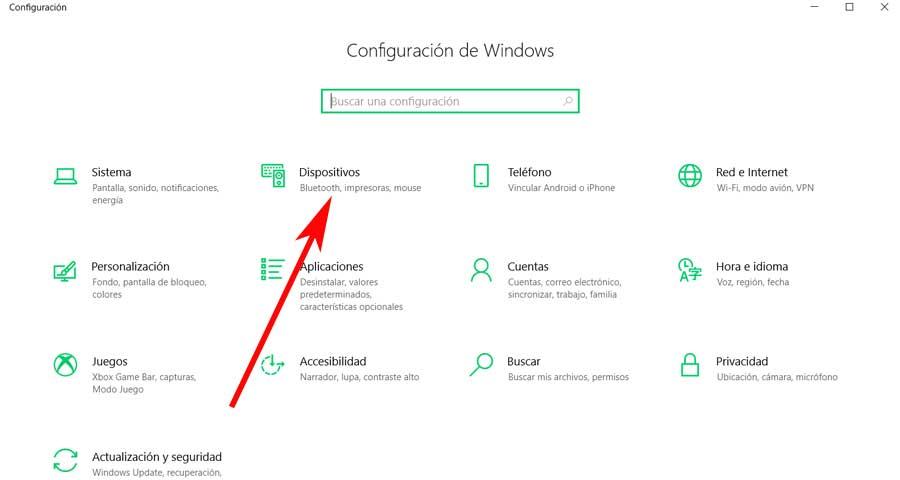
In order to disable the scroll of inactive windows in Windows 10, we can do it easily from the Settings menu. To access it, the easiest way is to press the Windows + I keyboard shortcut. Once we have accessed it, we must click on the Devices section.
Once inside the Devices section, we look at the left column where we must click on the «Mouse» section. On the right side, all the corresponding configuration options will be located. Here we will find the option of “Scroll inactive windows when hovering over the mouse”. We will only have to click on the blue button so that it becomes deactivated.

If at any time we wish to reactivate this function from the Settings menu, it will only be necessary to carry out the same steps and click again on the option to Move inactive windows when hovering the mouse over it, so that it is marked as Activated.
From Registry Editor
Another option we have available to disable scrolling over inactive windows in Windows 10 is to use the Registry Editor. It is a very powerful application, so it should only be used by users who know how to handle the application well, since any erroneous change can lead to stability problems in the system.
To access the Registry Editor we must press the keyboard shortcut “Windows + R” with which we will open the Run tool. Here we must write «regedit»And click on« Accept »or Enter. Once in the registry we must navigate through the following route in the left part of the window.
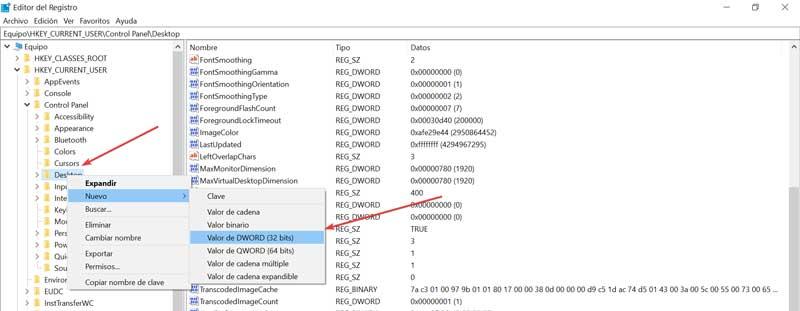
HKEY_CURRENT_USER / Control Panel / Desktop
Once we have accessed the Desktop folder, we will see how all the content is shown in the right part of the window. Here we must look for the file MouseWheelRouting. In the event that it is not found, it will be necessary for us to believe it. To do this, we will right-click on the Desktop folder to open a small menu, where we must choose «New» and «DWORD (32 bits)». Once this element is created we must rename it as “MouseWheelRouting”.
Once the «MouseWheelRouting» element is available we must double-click on it, or right-click and select «Modify». This will open a new window for us. Now we will go to the Value Information section. Here we must enter the value 0 to deactivate the scrolling function. In this way, when we hover the mouse over the inactive windows it will no longer scroll over them.
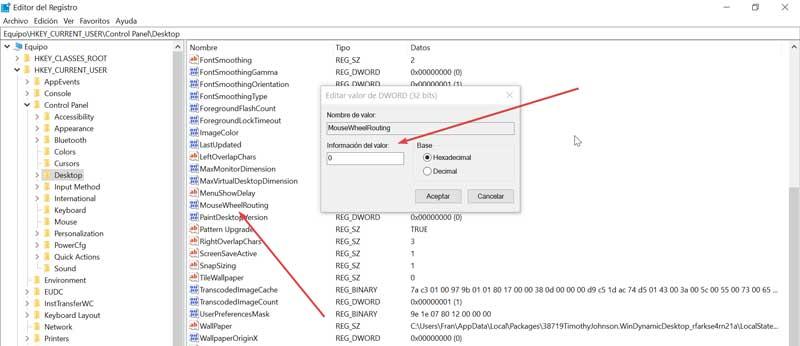
In the event that at any time we want to re-activate this function from the Registry Editor, it will only be necessary to follow the previous steps until we reach the Value information section where we must enter the value 2.