This is a worldwide known application owned by the software giant Adobe and that has not stopped growing in recent years. Although at first it may seem like a program focused mainly on professional environments, the truth is that it adapts to all types of users. This is an application that also allows us to carry out somewhat more basic tasks, as well as learn to use more advanced functionalities.
Perhaps the biggest drawback that we are going to find here is that, unlike many others, this is a payment solution. But depending on the type of use that we are going to make of this program, we may be interested in making that financial outlay. As we say, Photoshop is capable of covering all kinds of needs, as will be shown below. And it is that in these same lines we want to show you the easiest way to reduce the size of an image with the Adobe application.
This is a change that can be of great help to us when, for example, sharing those personal photos over the internet. At the same time, this reduction will help us if we want to create a library of images but that does not occupy a large amount of disk space.
When do I need to reduce photos in Photoshop
At this point, it is worth mentioning that on the internet we can find very simple applications dedicated to this type of task. In fact, they are able to reduce the size of our photos almost automatically, without us having to do anything. However, just as simply, we may want to have some control over the process. Precisely all this is what the aforementioned Adobe program offers us, reducing photos without complications, but in a totally personalized way.
It may be the case that we need to reduce the size of an image with this program because its resolution is too high to publish it online. We can also find ourselves with the situation that the size of the file is too big to send it by mail or that we simply want to have a reduced sample to save it.
Upload the image to the Adobe program
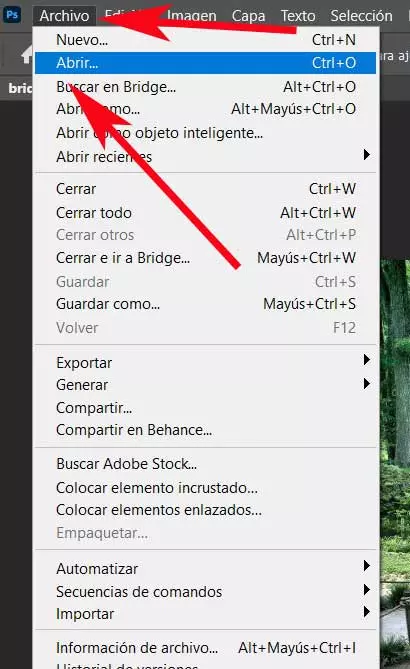
As is usual in this type of photo editing applications, for any type of treatment that we want to do on our images, the first thing we need is to start it. Next, we load the file as such with which we want to work. We have different ways of achieving this that we tell you, although one of the most common is through Menu file.
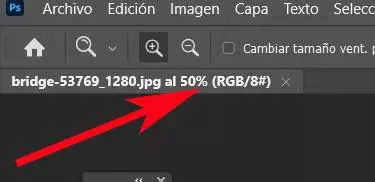
Here we go to the Open option, so that we already have the possibility of selecting the corresponding image from among the disk units of the PC. Next to the title of the same photo we see the percentage that corresponds to the size that we have at this moment on the screen. For example, if we see 100%, we are seeing the photo in its actual size. But if it is displayed at that moment at 25%, we can still enlarge it four times more.
Use the program’s resize function
Once we have loaded the file with which we are going to work on the Photoshop desktop, we can start with the editing tasks. We can do this by simply clicking on the Image menu of the program’s main interface. Of all the options that we are going to see here, the one that interests us in this case is Image size.
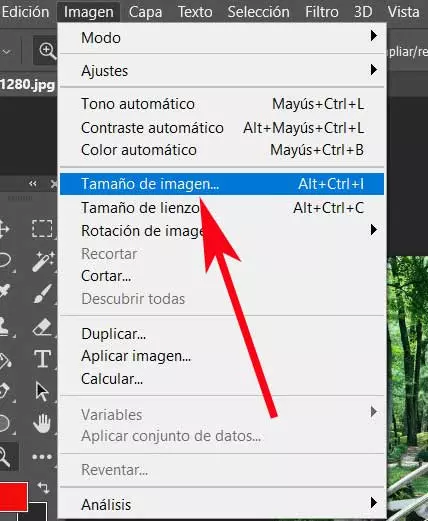
At that time, the screen will appear in the corresponding window that will allow us to resize, both up and down, the image loaded before. The first thing we see in the fields that will be delivered in this window, are the original measurements and resolution of the photo we are working with. The fields we are talking about are width, height and resolution.
Therefore, it is not difficult to imagine that at this point we only have to enter the new values, both for width, height or resolution. It is worth noting here that in most of the fractions we will try to maintain the proportions. This means that, if we modify any of the three values, the proportions they will be switched automatically in the other two. We achieve this by simply keeping the Resample option activated.
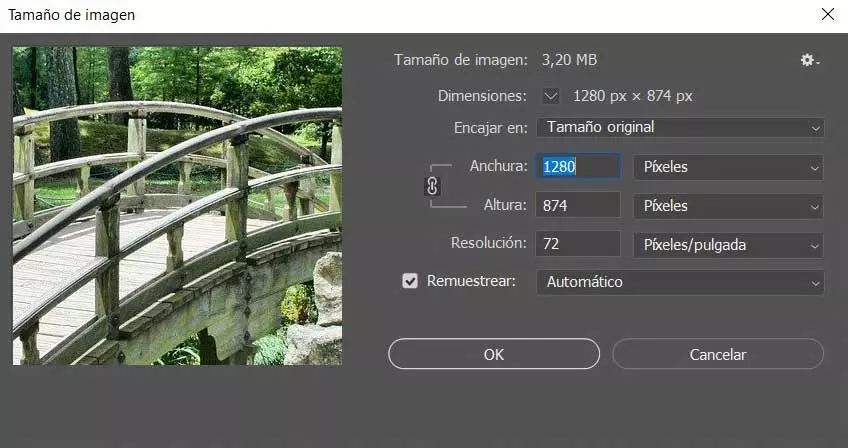
Suppose we have an image that has a resolution of 300 points and we want to share it through Internet. Thus, we uncheck the Resample option and lower this value to 72 points. After accepting the changes, we go to the same window and reactivate this commented option. From there we can specify the width or height that we want to establish so that it is reduced to the dimensions we need.
Take advantage of defaults
As we mentioned before, thanks to the fields offered by the Image Size option, we have the possibility to resize it manually. This will give us more control over this process whether we use the resample function or not. But if we do not want to complicate ourselves too much or we are clear about the resizing that we want to carry out, Photoshop does not want to facilitate it.
With this what we want to say is that we will have the possibility to choose between some of the predefined values In this sense that the program presents us. These are found within the drop-down list of the field Fit in. Here we can see first-hand the predefined measurements with their three corresponding fields that the Adobe application offers us. In fact, it is interesting to know that these correspond to some of the most common when we have to carry out a process of this type.
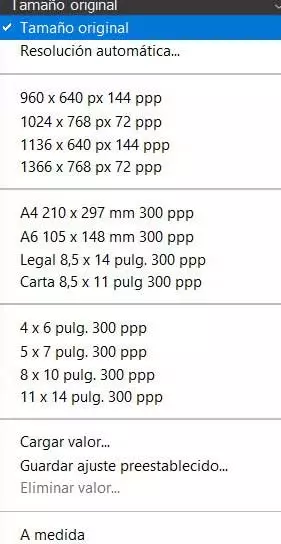
But that’s not all, but also from this section we have the possibility of speeding up the resizing process with custom dimensions. By this, what we mean is that from this same drop-down list we have the possibility of establishing our own predefined values by simply clicking on Save preset setting. In the same way, if we have several already created previously, we just have to click on Load value so that it is applied to the image loaded in the job desk.