Once you register and pay for Nintendo Switch Online, your games will begin to be copied automatically to the cloud. If for some reason you are not interested in making a backup of a specific title, you can decide which games can copy data to the server and which ones cannot. If you prefer to make a manual copy of your data, you should go to Settings > Data managements> Save data to the cloud and uncheck the automatic save of the ones you want.
The process to move your games to the new console is very easy. If you already have your console configured, you will need to link the Nintendo account in which you have saved your games and you have Nintendo Switch Online. If, on the other hand, you have not done the process yet, link your account during the setup process console initial.
Once you have the Nintendo account associated with the new console, you have to download the same games using the eShop. Within the store, tap on your profile thumbnail and select “Redownload.” Once that is done, you can return to the settings page that we mentioned earlier and recover your games individually.
Use two consoles and sync data
The great thing about Nintendo Switch Online is that you can keep your games on several different consoles and resume your games regardless of the device you use. This feature is exclusive for subscribers.
To do this you will have to go to Setting and then Data management and Saving data in the cloud. You will have to establish that your games are always overwritten with the most recent data. https://bellevuehealthcare.com/ Additionally you will have to set your new console as the main console (we show it to you at the end of the article step by step). You must also remember that you can play without problems on either of your two consoles as long as the secondary console is connected to the same Wi-Fi network as the main one. Otherwise it won’t work.
Method 2: If you don’t have Nintendo Switch Online
Without Nintendo Switch Online you can also transfer your games, but it will not be so easy. To do this you will need to have both consoles at hand, an Internet connection and access to your Nintendo account.
Your Nintendo account must be logged in only on the source console. If you log into the target console, the process will fail. The console itself will ask you for your login information when appropriate.
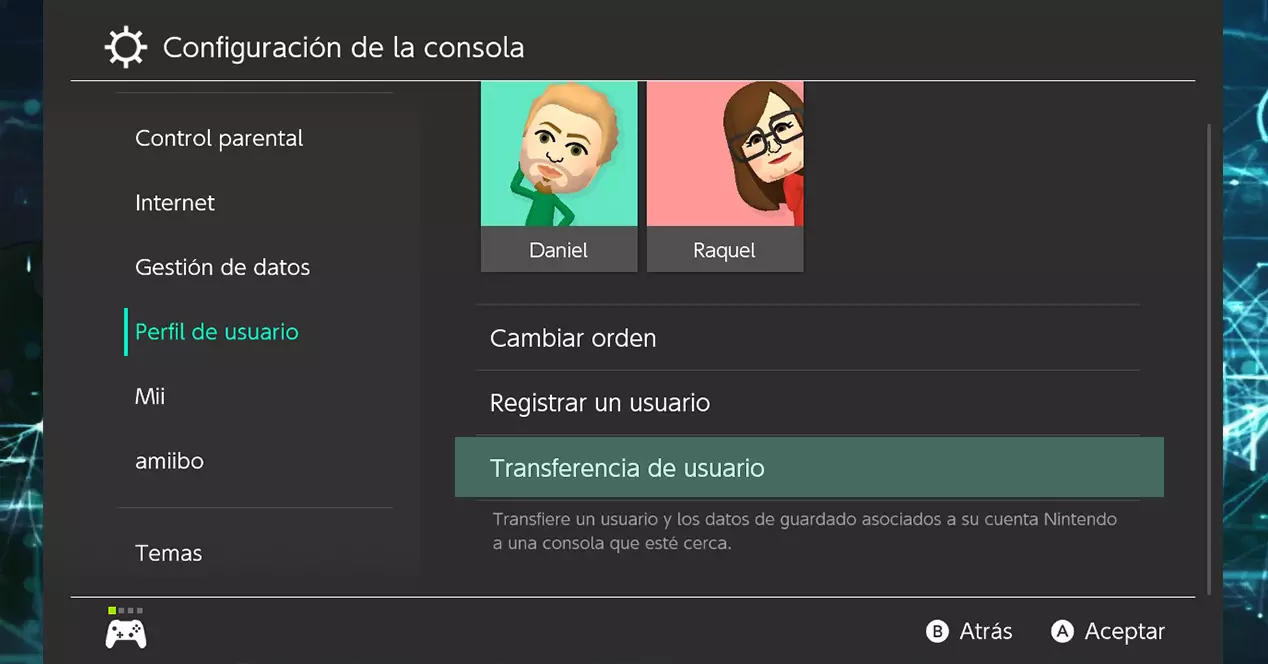
To carry out the process you must follow the following steps on the two consoles:
- Go to Setting from the console from the Nintendo Switch main menu.
- Enter Puser profile, located in the left sidebar.
- Choose User transfer.
- Click next. Connect the power adapter to the console and follow the steps.
- From this step, you will have to choose which console will be the source and what will the data destination.
- You can now start your Nintendo Account on the target console. Your Nintendo ID will now be associated with this console and the data will be transferred. The process will take a while, which will depend mainly on the amount of data that has to be transmitted from one console to another.
- Once the process is finished, you will have all your data in your new console.
Unfortunately, you will not be able to keep your data on both consoles. Your Nintendo Switch user will disappear from the source console. However, you can keep your games synchronized on two consoles if you use the Nintendo Switch Online payment service and follow the steps of the first method that we have explained in this article.
Finally, you should know that if on the source console you have several profiles and each profile is associated with a different Nintendo ID, you will have to repeat the process for each user. A somewhat cumbersome process, but so far it is the only option offered by the company to transfer data from one console to another without using the payment service.
Extra Step: Set Your New Nintendo Switch as Your Primary Console
Once you have finished transferring the data to your new console using either of the two methods that we have explained to you, it is convenient that you pass the title of main console to your new Switch.
Each Nintendo account can only be associated with a main console. However, the same console can be the main console for several Nintendo accounts. The main consoles have privileges compared to those that are not, such as, for example, they allow you to play downloaded games without the need for an Internet connection. The logical thing to do if you have transferred your data to a new console is to put the latter as the main console. The steps you must do are the following:
- Go to the console what do you want to place as high school and enter the Nintendo eShop from the Nintendo Switch main menu.
- Select your profile in the upper right corner.
- Navigate down to the section «Main Console». Touch where it says “Delete Record”.
- Go to your now new console and enter the eShop. As soon as you log in, your new console will have been established as the main one.