How to see the clients connected to the network
If we want to see and check all the clients connected to the local home network, either via cable or via WiFi, we can do it in two different ways. The first one is by directly accessing the WiFi router, here a complete list of all connected clients will appear at a certain moment. The second way is using specific programs for Windows, Android or iOS that allow us to see all the clients connected to the local network.
View clients from the router
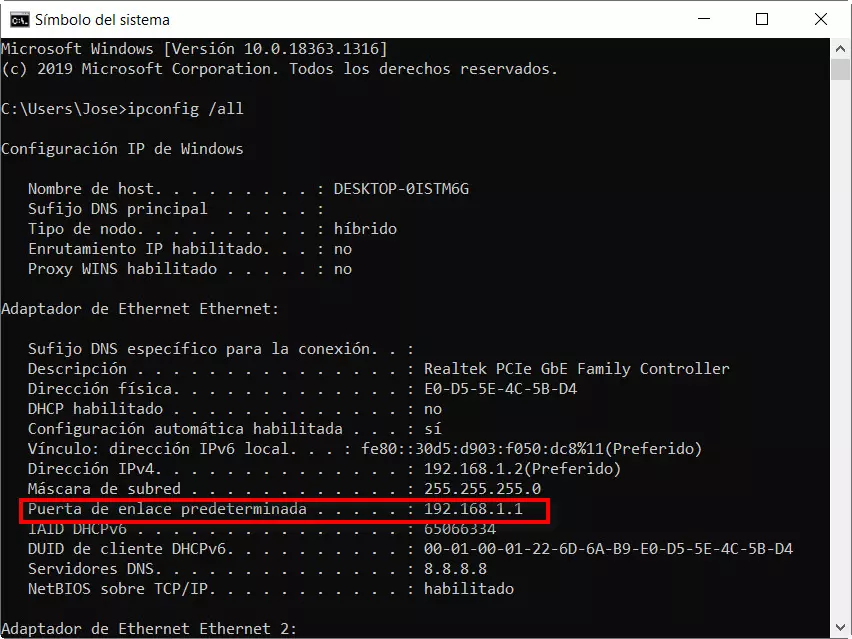
If you want to see clients from the router, the first thing you should do is log in through the default gateway. To find out the IP address of your router, you must click on the “Windows” button and search for “cmd” or “command prompt”. Next, you will need to enter the following command:
ipconfig
The default gateway will appear as follows:
In general, the IP address of home routers are usually:
- 192.168.1.1
- 192.168.0.1
- 192.168.2.1
- 192.168.50.1 (for all ASUS routers).
- 192.168.178.1 (for all AVM FRITZ!Box routers).
Once we have accessed the router, we can see the list of connected clients in the “Network” section. In the case of ASUS we have it in the main menu, in the “Clients” section we click on see the list, and each and every one of the clients that are currently connected will appear, along with the IP address, associated MAC, hostname and even if they are connected via WiFi or cable. If we go to the “System Log / DHCP Assignments” menu, you can see the DHCP server assignments with the MAC and also the host name.


Once we have the list, we will have to go team by team checking that they are our devices. As soon as there is a device that we do not have located, it is likely to be an intruder.
In the case of AVM routers, we have to go to the «Local network / Network«, in this menu we will see a complete list of all wired and WiFi clients that are connected. In this case, in the menu we will only see the name of the host, the form of connection, the IP address and the synchronization speed. If we want to see the MAC address we have to click on “Edit” which is on the right side. In this new menu we can see the MAC in “Information about the device”.


As you can see, checking which devices we have connected through the router is very simple, the only complicated thing is knowing if they are our devices or not.
Use programs to see all devices
Currently there are many programs to see what devices are connected to the local home network at a given moment, our recommendation is that you use Angry IP Scanner since it is one of the fastest, easiest to use and completely free. We download it from the official website and install it like any other Windows program, once installed, we open it and we will see a menu where we must put a range of IP addresses, this range of addresses must correspond to that of our router.
For example, if our router has the IP 192.168.1.1, then we can scan the entire network from 192.168.1.0 to 192.168.1.255. We click on “Start” and it will begin to scan all the devices that we have connected, we can also see the MAC address associated with each IP address, to locate if there is an intruder.

Other programs that are also free and that you can use are the following:
- Colasoft MAC Scanner: allows you to scan the entire local network by sending ARP messages, to check the connected clients, either via cable or WiFi.
- Advanced IP Scanner: this program is free and has the same features as the previous ones, it is just as easy to use, and it also allows you to customize the columns.
Once we have located the MAC address or addresses that we want to block, we have to get into the router to do so.
Methods to block a WiFi device
Current routers have several methods to block different wireless devices, however, depending on what we want to do, the approach to follow should be different:
- Do we have an intruder in the WiFi wireless network? If this is your case, then you should change the access password as soon as possible, and only the WPA2-Personal or WAP3-Personal password. Of course, if you have WPS (Wi-Fi Protected Setup) enabled, then you should disable it as soon as possible to be protected.
- Is it a device of yours that you want to block? In this case you can configure MAC filtering. The reason not to use MAC filtering on an attacker is because you can clone a legitimate client’s MAC address very easily, so it’s not a secure method.
MAC filtering allows us to configure a list of allowed or denied MAC addresses. In the case of creating a list with allowed MACs, all the MAC addresses that are not in this list will not be allowed to connect. In the case of creating a prohibited MAC list, all the addresses that are in this list will be blocked, and any other will not be blocked.
Once we have already thought about what scenario we are in, we are going to see how to configure it.
Configure MAC filtering with blacklist
All routers have MAC filtering, some models allow you to create a blacklist and a whitelist. In the case of ASUS routers, they allow us two MAC filter modes: accept or reject.
- If we select “Accept” all the clients on the list will be able to connect to the wireless network, and the rest of the WiFi clients that try to connect will be denied.
- If we select «Deny» all the clients on the list will not be able to connect to the wireless network, the rest of the clients will be allowed.
We simply have to register the different MAC addresses in the list, clicking on the “+” button and then on the “Apply” button.

We should only use this type of filtering if the devices to be blocked are ours, and we want to allow all but certain connected devices.
In the case of AVM routers, we do not have the possibility to create a black list of MAC addresses, we can only create the white list, and the rest that are not on the list are denied the connection.
Configure MAC Filtering Whitelist
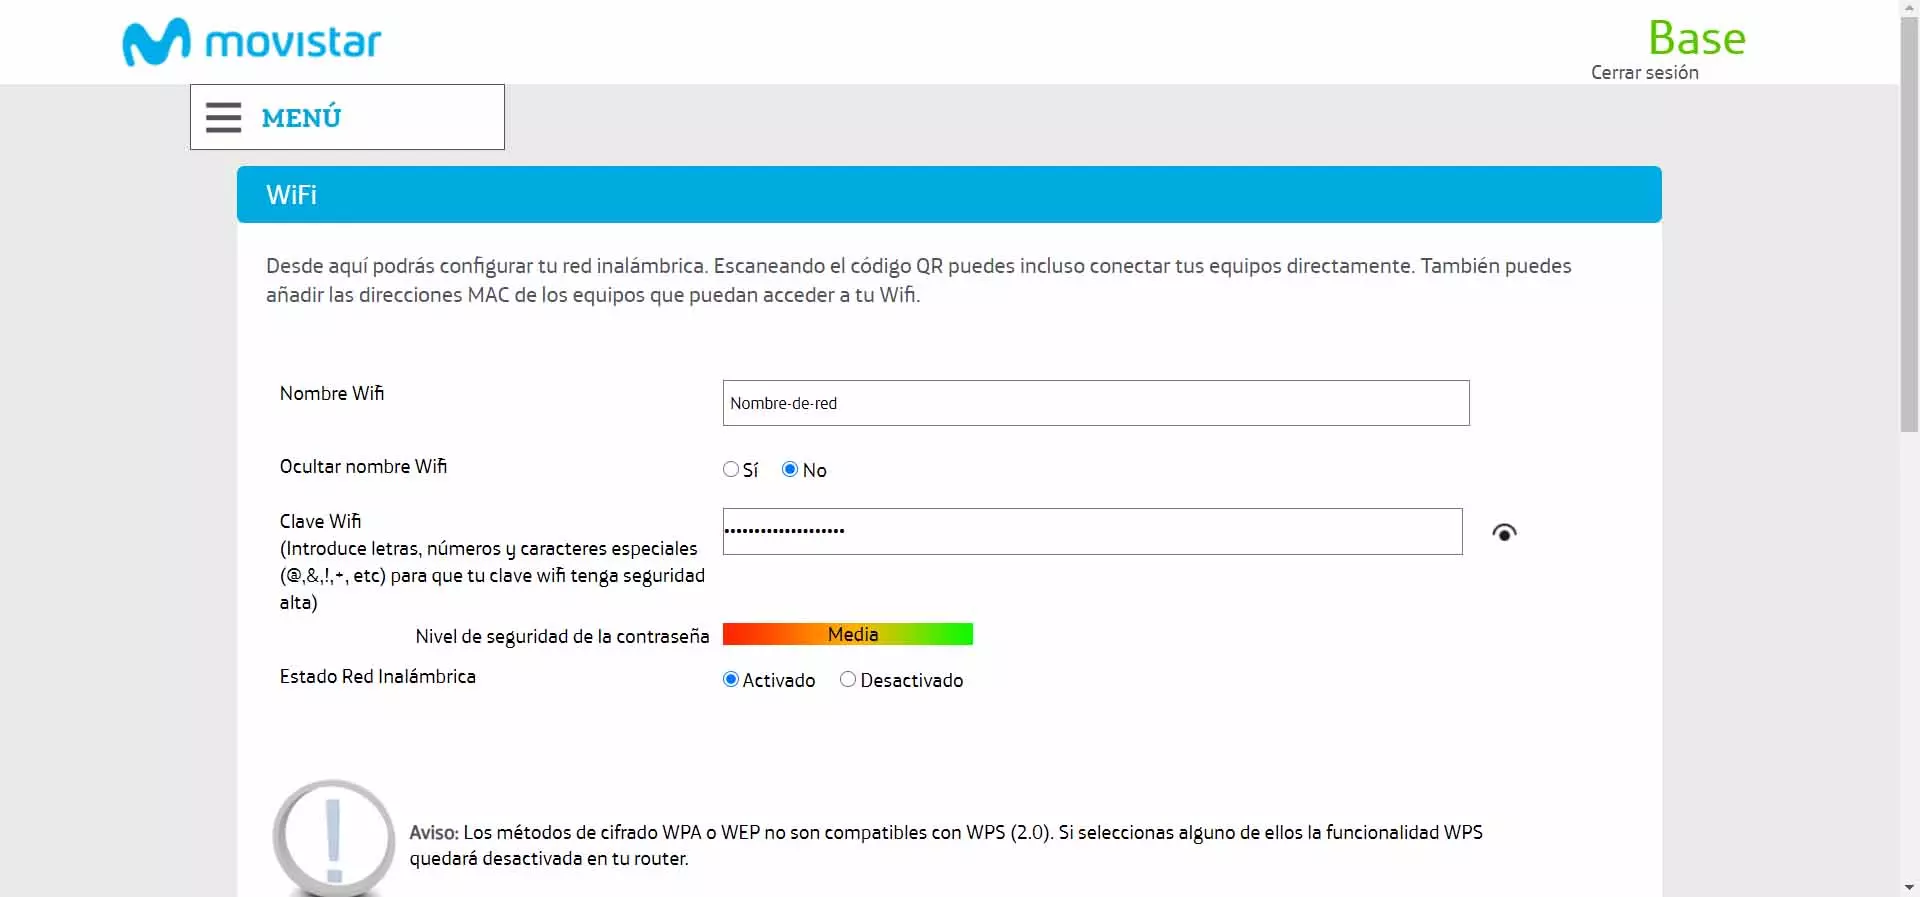
In the case of ASUS we can create the white list by choosing the “accept” mode as we have seen previously. In this case, the AVM routers do allow us to configure the white list, to do so we must go to the “Wi-Fi / Security / Encryption” menu and go to the bottom, where we will see the option “Only allow access to the network wireless Wi-Fi to known devices. In this way, all the WiFi devices on the list that we see just above can be connected, the rest cannot be connected until we manually register them by clicking on “Add a Wi-Fi device” and indicating the MAC address.

As you can see, the use of white lists is widely used to allow only certain devices on the list to connect, and deny the rest of WiFi clients. We must remember that this method is only recommended in case you want to block your own devices, because if you want to block an attacker, the best thing you can do is change the WiFi access password of the router, since an attacker could clone a MAC address. legit and connect.
Change Wi-Fi password
This is the most recommended option if you have intruders in your local home network, in fact, it is the only thing you can do along with disabling the WPS protocol to be protected. In this case it is necessary to verify that the type of encryption protocol is WPA2-Personal or WPA3-Personal, once we have verified that the protocol is robust, then we have to enter a secure key.
To set a secure key, it is recommended that you meet the following requirements:
- Be longer than 16 characters.
- Mix uppercase, lowercase, numbers, and symbols.
It is recommended to use a random password generator and then copy and paste the access password, in this way, we will have the best possible security.
All routers have a similar menu regarding changing the SSID and also the password, once the new password is entered we will have to apply changes. When changing the password, all connected WiFi clients will be disconnected, we will have to reconnect them one by one, be it the Smart TV, the TV Box, home IP cameras, smartphones and tablets, etc.
Block devices at certain times
If you want to block certain devices at a certain time, then you will have to use the parental controls of your router, if it allows you this possibility. Today many home routers have time-based parental control functionality, this means that at a certain time we will be blocking Internet access from a certain device. Even if you are connected to the local home network via cable or WiFi, you will not be able to go online because parental control prevents it.
In the case of ASUS and AVM we have parental control based on time and also on content, but what interests us is configuring parental control based on time in order to allow connected devices at a certain time, and block them at a different time. To do this, it is necessary to enter the router with administrator permissions and follow these steps in general:
- Activate parental control
- Create a time profile where access is allowed or denied.
- Apply this profile to the different devices that we want.
When we have applied the profile, if we are out of hours then we will not have an Internet connection, although we do have the possibility of communicating through the local home network, so we must bear in mind that parental control allows or blocks access to Internet but not to the local network.
Conclusions
Keeping under control the devices that we have connected to the local network is essential, especially the devices connected via WiFi because the wireless signal could reach our neighbors and have unwanted intruders. There are different ways to see the connected clients, either through the router itself in the DHCP menu, as well as through programs and even applications for Android and iOS mobile devices that perform this same functionality.
In the event that we want to block some devices that are under our control, using MAC address filtering is the most comfortable thing we can do. However, this is useless for an intruder because he could clone the MAC address really easily and quickly. If you want to block the WiFi connection from intruders, the best way to do it is to change the WPA2 or WPA3 password of your router and disable the WPS protocol if you have it activated.
In case of intruders, it is essential to kick them out as soon as possible, not only because they consume bandwidth from our Internet connection, but also because of the security and privacy risks that we will suffer if we do not do it quickly, since they could capture all the traffic of our Internet and even modify it, also stealing our email passwords, social networks and even bank details. An attacker with access to our WiFi network could also infect our computer with malware and even ransomware, so it is highly recommended to follow the instructions we have given you.