Maybe that important day we have not slept well, we are more tired than necessary and we do not pay too much attention to the meeting, so the recording can make let’s refresh the memory and pay attention to details that we may have overlooked.
By recording the video call we can create a transcript, which allows us to see the text in real time during the meeting or download it later. This is especially helpful for participants who are hard of hearing.
In addition, recorded meetings can be shared with other people who may not have been able to attend and can catch up, as well as boost engagement, as we can stay tuned and ask questions without constantly taking notes.
windows game bar
To be able to record the calls and video calls that we make in Windows 10 and Windows 11, we can use an integrated tool called Game Bar. Although it is an application specially designed to be used during our video games, the truth is that in this case it can also be very useful. Its strong point is that it allows us to record the call without the receiver knowing that we are recording him, as happens with other types of applications.
open game bar
The Windows game bar will allow us record video from any app. To do this, we only need to start the call with our favorite application (Zoom, Skype, Meet…) and start the conversation to start recording.
This application has several features that may be of interest to us, especially in terms of sound, being able to record our microphone or not, as well as manage different sound intensities during it. It is true that also has its limitations, since it does not allow switching between windows and only records what happens in the specific application from which we start recording. Also, it does not allow to record neither Desktop nor File Explorer.
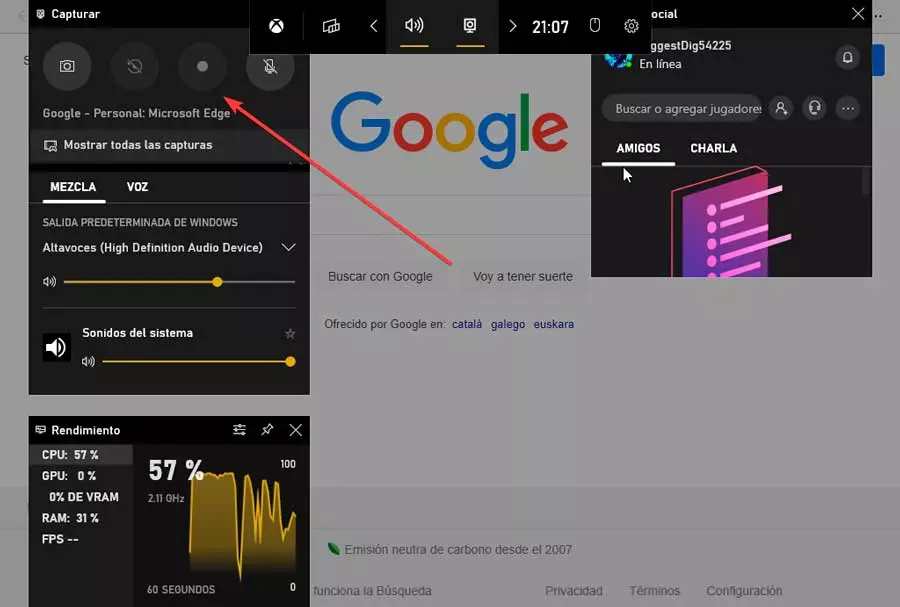
To start, the first thing will be to open the bar for which we press the keyboard shortcut “Windows + G”. Later we start the conversation to record, for which we can press the “Start recording” button that is located in the upper left or press the keyboard shortcut “Windows + Alt + R”.
Functions to perform
Once the recording has started, the application will capture both the image and the sound emitted by the application that we have selected. Of course, automatically, the sound of our microphone will be recorded. In case we want to change it, we must click on the icon “Activate microphone during recording” or press the key combination “Windows + Alt + M”.
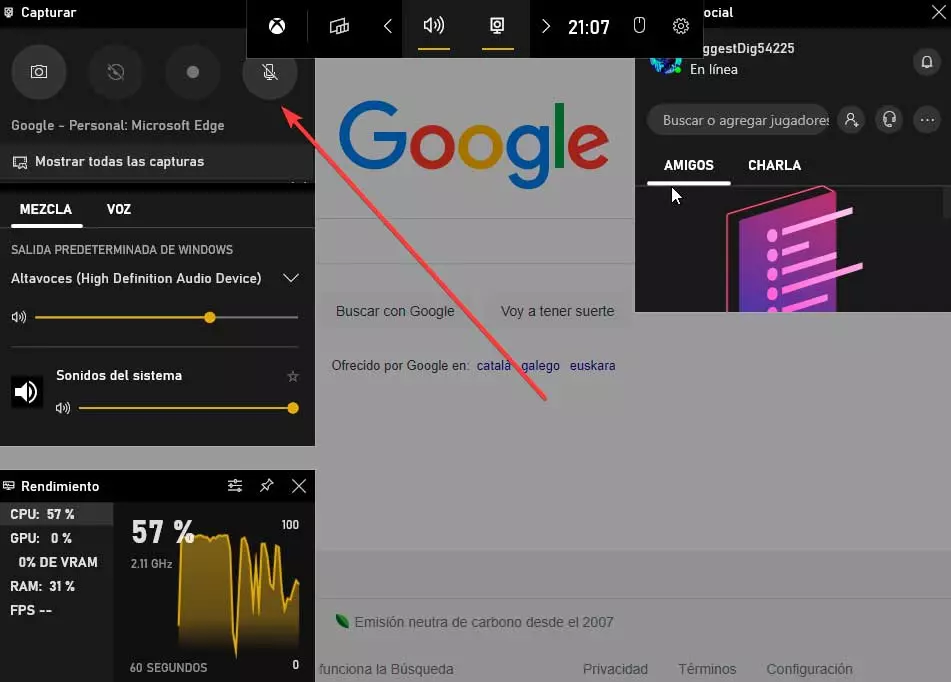
During the recording the bar will disappear and instead show a control window in the right corner. We can stop the recording at any time by clicking on the icon “Stop recording” or by using the keyboard shortcut “Windows + Alt + R”. When stopping it, a notification will appear, which by clicking on it will take us to the directory where it has been saved. In case we have not been able to give the notification, we can access the recording from the game bar by clicking on the “Show all captures” which we find in the upper left.
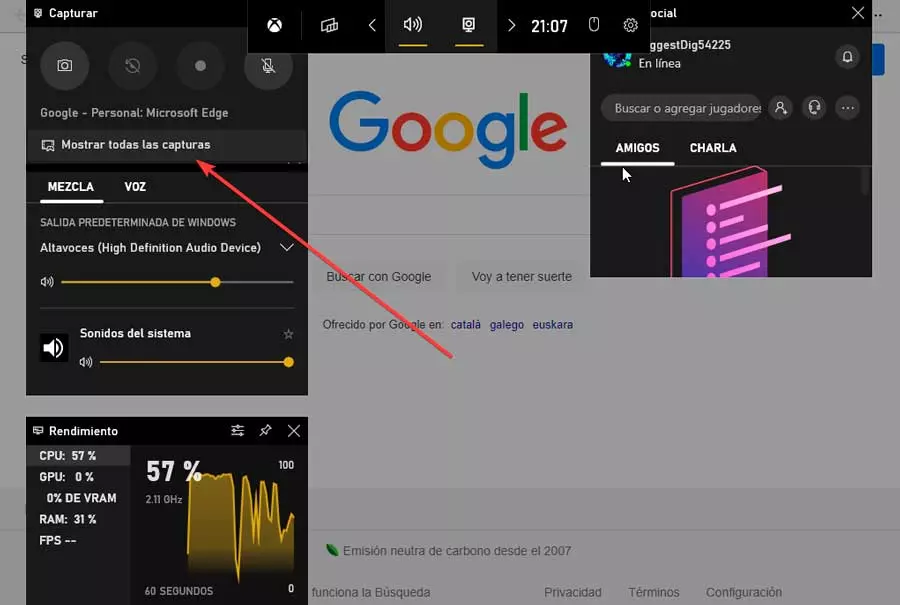
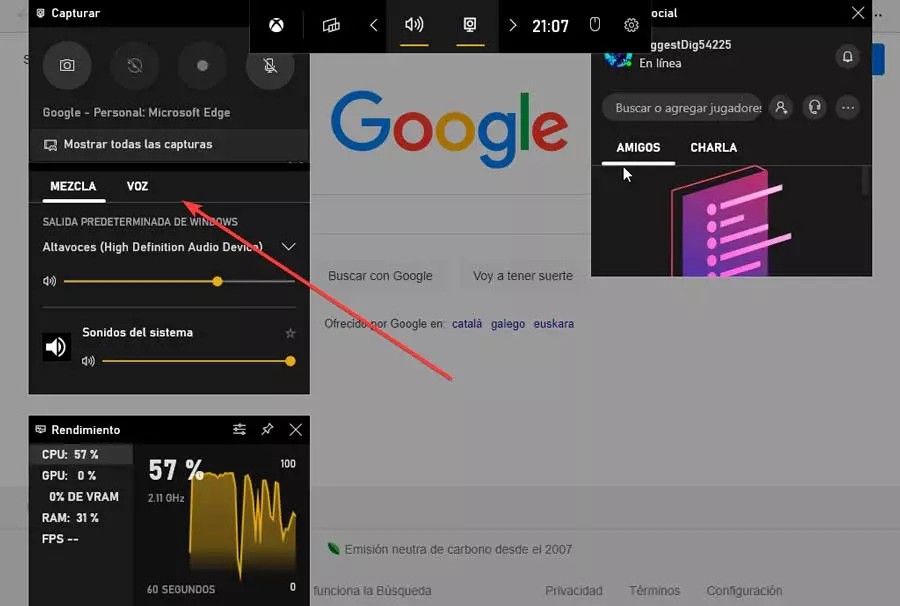
Another interesting function of this bar is the possibility of mixing the sound depending on where it comes from. This is something that we can see in the section on “Audio”where all the sound sources appear, and from where we can manage different intensities.
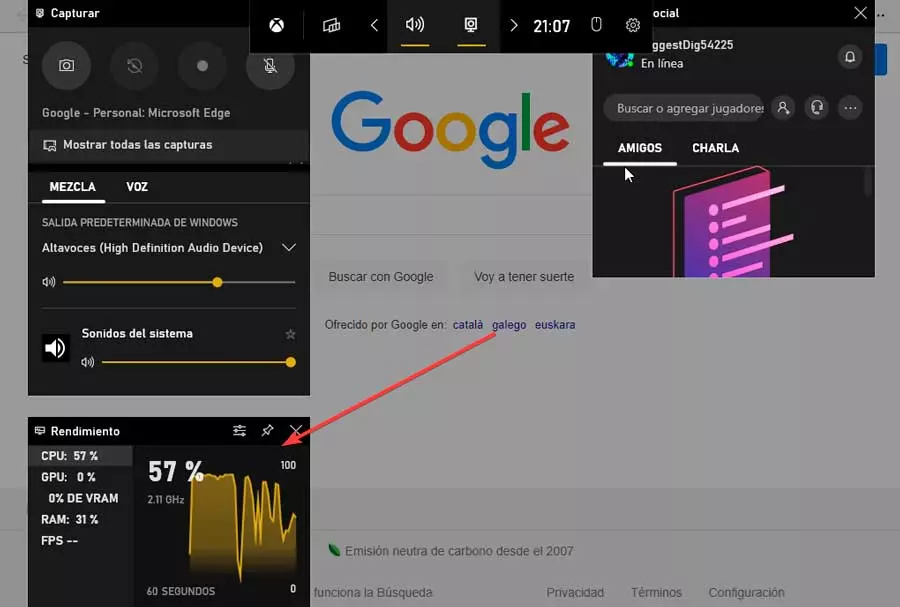
Finally, it is also worth mentioning that it has a window dedicated to the “Performance” to check how the performance of the equipment goes during the recording period.
Check the end result
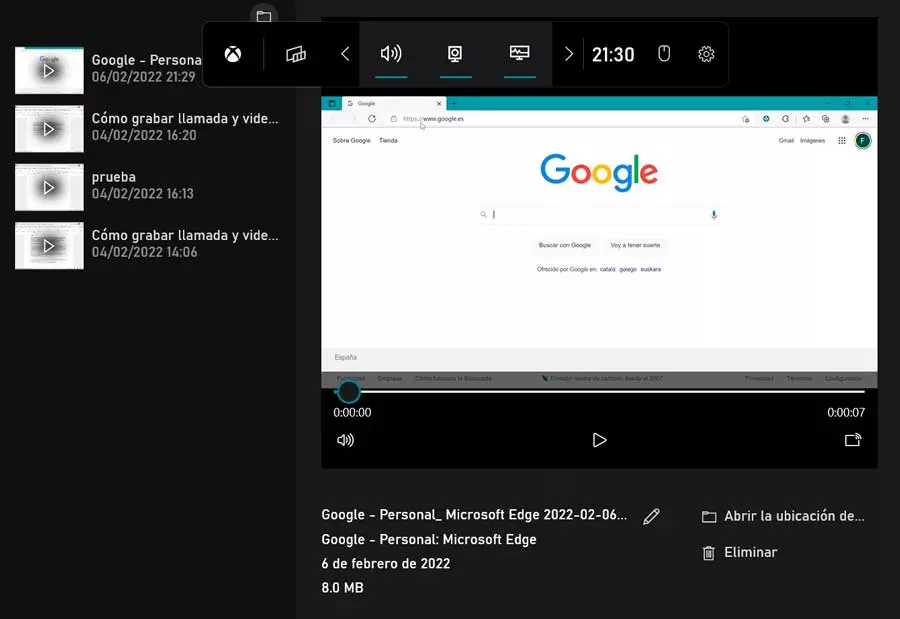
Once we have finished the recording, a pop-up notification will appear called “Recorded game clip”. If we click on it, the bar will appear with a new window called «Gallery» where all the recorded clips will appear. From here we can view and listen to all its content. We can also change the name of the recording, open the folder where the file is located, delete it if we no longer need it or even transmit it to another device via Bluetooth, to be able to see it on another screen.
Skype
One of the most popular video calling tools is Skype, which we can download from its official website. With it we can directly record the call, for which it is essential that the rest of the users know that they are being recorded. We should also know that if the desktop screen is shared during the call, it will be included in the recording.
The maximum length of a Skype call recording is 24 hoursso longer calls can be split into multiple files.
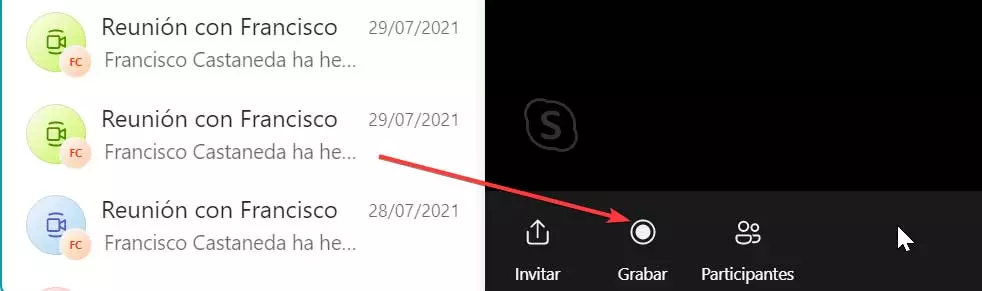
Once we have started the meeting, click on the icon “Engrave” that appears at the bottom left. This will cause a message to appear advising us that we can allow all users who have started the recording.
Once finished, the recording will be found available in chat for 30 daysbeing able to save and download to our computer at any time during that time.
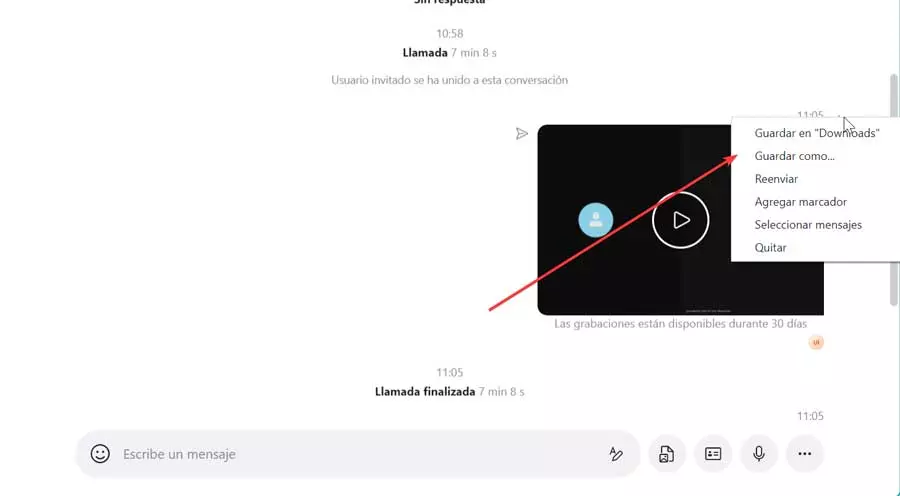
To save the recording on our computer we must click on the More options icon represented with three vertical dots located in the upper right part of the recording. Here we select “Save downloads” O well “Save as” to choose another place to save it. The file will be saved in MP4 format.
zoom
Another popular application with which to make calls and video calls is Zoom, which we can use for free by downloading it from this link on the developer’s website. It also allows local recording, allowing participants to record both audio and video of the meeting on our computer.
The recorded files can then be downloaded to a file storage website such as Dropbox or Google Drive, as well as a public streaming server such as YouTube or Vimeo. To do this, it will only be necessary to have a Zoom Basic account (free) or higher, as well as a Zoom 2.0 or higher client version.
Once the meeting has started, click on the “Plus”, which we find in the lower right. This opens a small dropdown menu where to select “Record on this computer”. Likewise, we can use the keyboard shortcut “Alt + R” to start the recording. Once the meeting is over, a File Explorer window will open with the location of the file that we have recorded in MP4 format.

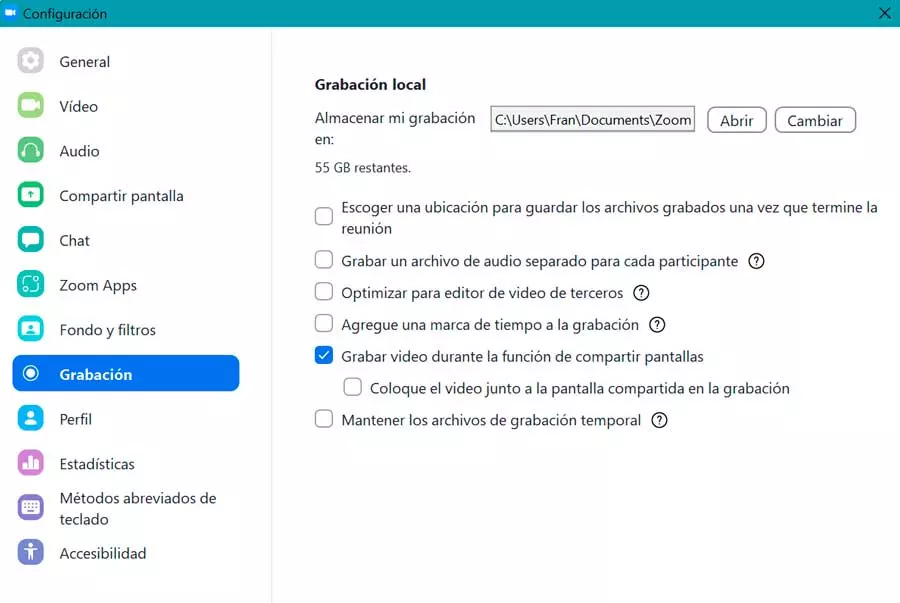
If we click on the “Configuration” section we can access the menu of “Recording«, from where we can perform a series of actions, such as choosing the default path where these will be saved. We can also have a series of options that we can mark or unmark to our liking:
- Choose a location to save the recorded files once the meeting ends, in this way it is not automatically saved in the default folder, but we can choose the desired path in each recording.
- Record a separate audio file for each participant.
- Optimize for third party video editor.
- Add a timestamp to the recording.
- Record video during screen sharing.
- Place the video next to the shared screen in the recording.
- Keep temporary recording files.
Microsoft Teams
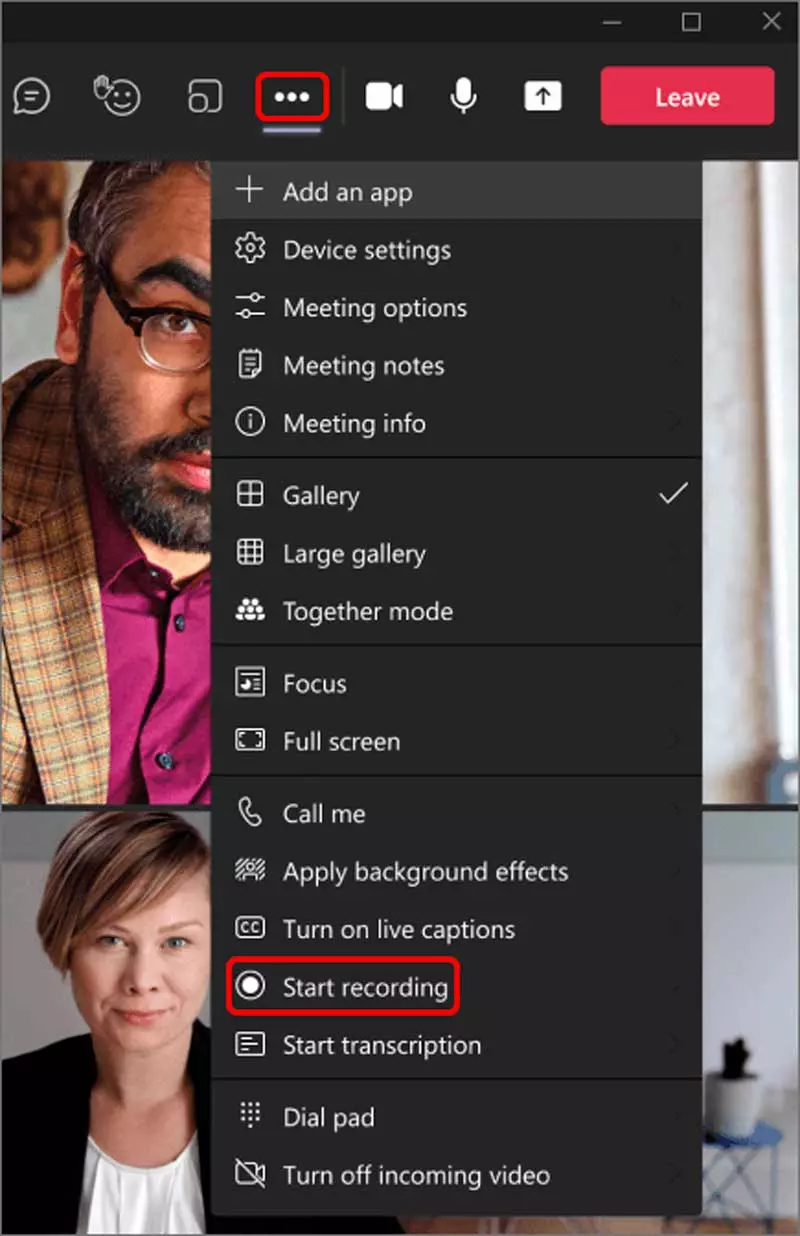
It is the tool to make calls and video calls from Microsoft especially aimed at professionals, and we can download it from the Microsoft website. To get started you need to be one of the moderators of the call. Click on the three buttons at the top and choose the option “Start Recording and Transcription” to start.
When clicking on the button it is sent automatically notification to all participants reporting the beginning of the recording, being able to stop at any time without the need for the meeting to have ended. Once finished, the recording is available for all participants to access it and obtain a copy if necessary. It will not be possible to make multiple recordings in the same meeting at the same time. As soon as a person starts recording a meeting, it will be stored in the cloud and will be available to all participants.
Once the recording is processed we will receive an email from Microsoft Stream once it is available and ready to watch. In the same way too will appear in chat or channel where the meeting was held.
The recording is processed and save to SharePoint in the case of a channel meeting or in OneDrive if it is another type of meeting. When it is a meeting recording, it will be shown in the meeting chat or in the channel conversation. Guests and external attendees will only be able to view the recording if it is explicitly shared with them. The administrator will be able to determine if (and when) the recording will expire. If the recording has an expiration date, a message will be displayed indicating that when the recording appears in the meeting chat after the meeting ends.
google-meet
This is Google’s tool for making video calls, which we can access by clicking on this link to its official website. Only the organizer of the meeting can have access to the recording with Google Meet, for which the participants of the meeting must give permission to the host so that he can start recording. Meetings can only be recorded during a maximum of 8 hours. After that time, the meeting will stop recording automatically.
This option is not available for home users but for those who have one of the following accounts:
- Essentials
- BusinessStandard
- BusinessPlus
- Enterprise Essentials
- Enterprise Standard
- EnterprisePlus
- EducationPlus
- Teaching and Learning Upgrade
- Individual Workspace Subscribers
Simply start or join a meeting and then click on the three dots. Of all the expanded options, we click “Record meeting”. We can also access it from the “Activities” section and then click on “Recording”.
All meeting attendees will need to click Accept when the “Ask for consent” notification appears, they will receive a notification as a recording is taking place. The recording files will be saved inside our Google Drive folder.