Setting the scale will allow us to measure specific areas while we edit, so that we can record the calculations we receive. That is why, on occasions, depending on the project we are working on, we must establish different measurement scales, either in pixels, inches or centimeters. Learning to establish and change them can be of great help when it comes to work.
Set the unit of measurement
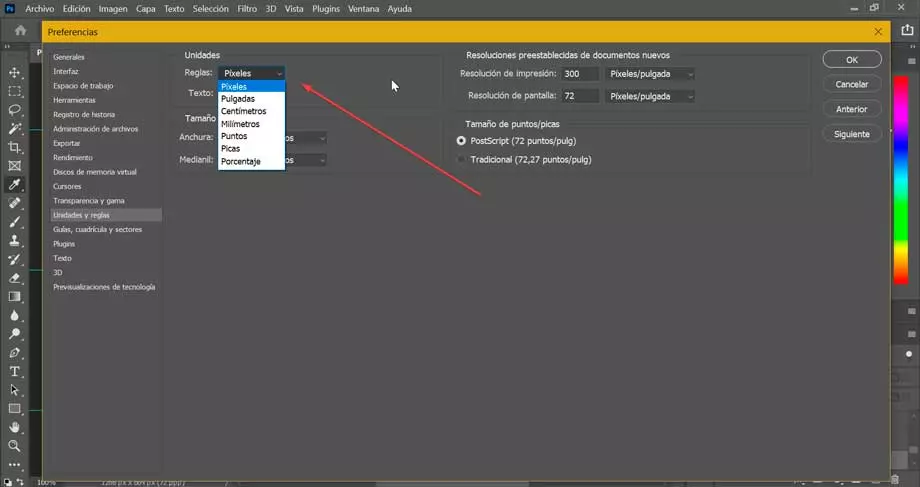
If we want change measurement units in PhotoshopAll you have to do is click on the “Edit” button that we find in the upper left corner. Later we select the «Preferences», which will make a drop-down menu appear where you can click on «Units and rules».
This will make a new window appear, we look at the section of «Units», in the upper left. Here we find both the “Rules” section, that if we display it, it offers us the possibility to choose between “Pixels”, “Inches”, “Centimeters”, “Points”, “Spades” and “Percentage”, so we can choose the one that best suits our measurement needs.
The unity of the «Text”Unless we need it especially, we do not have to change it. In case we need it, we can choose between “Points”, “Pixels” and “millimeters”. However, the unit of the rule is the one that will allow us to choose the standard units in which we will work on a regular basis.
Once this is selected, we no longer have to do anything else. We will restart Photoshop so that the changes are applied directly to the entire application. From this moment on, all the units with which we work will always be in the measure that we have chosen. Furthermore, it will be possible to change them without having to add “px” at the end, and if we want to use other units, such as “cm” or “inches” adding these suffixes, always keeping pixels as the default unit.
Change measurements
Photoshop offers us the possibility of being able to change the unit of measurement for both a new project and an existing one. This is something that we can do very easily.
Of a new project
When we create our project from scratch we can change the units to centimeters, millimeters, points or spades. For this we can create measurement presets.
We can open a new project by clicking on the “File” tab and then on “New”, or by pressing the keyboard shortcut “Ctrl + N”. This will bring up a window with the new document, from where we can select a preset size.
Next, in the right column we find the “Preset details”. From here we can edit the presets of this new document. Next to the Width section there is a drop-down menu where we can choose the measurement we need, either “Pixels”, “Inches”, “Centimeters”, “Millimeters”, “Points” and “Spades”. As we change the scale, the width and height values are adjusted automatically. Once finished, click on «Create», located in the lower right part.
For an existing project
It is also possible to change the measurements of an existing project for which we must click on the “Image” tab and then click on “Image size”. From here it is possible to change one unit to another. For example, if we have an image that, as a base, has a width of 10 inches and we want that, if the size changes to 720 pixels, regardless of the size to which those inches correspond, all we have to do is, in the box of the size, enter 720 pixels to directly assign that size, being able to also leave the second unit in inches, centimeters or whatever size we want.
In the same way, we can change the units of measure from «Canvas size », by clicking on the “Image” tab and then on “Canvas size”. This will open a new window, where we can choose the units we want to assign in the section called “New size”. We will find this next to the values of «Width» and «Height». Here, it will also be possible to change the size of the canvas by editing these values and configure them as “Pixels”, “Inches”, “Centimeters”, “Millimeters”, “Points”, “Spades” and “Columns”.
In the same way, we can make the change from the ruler view in the event that we have it enabled. In the event that we do not have it, we simply have to click on the “View” tab and click on the “Rules” option, or else press the keyboard shortcut “Ctrl + R”. Once enabled, we must click with the right mouse button on these guides to see the context menu. From there, we will be able to choose the unit in which we want these guides to be displayed. For example, we will be able to measure in pixels, in centimeters, millimeters, inches, percentages, etc.
What unit of measure to use
At the moment that we already know how to change the unit of measurement in Photoshop, we can choose exactly in which unit we are going to work based on our needs.
- Pixels: measuring our photo in pixels can help us to have control over its quality, since we will be able to know how many we are working with and how to change the quality as that number increases or decreases.
- Inches: Measuring in inches can be very useful when working with images that we intend to print or publish according to specified proportions. It is a measurement mode especially used in the United States, equating one inch to 96 pixels.
- Millimeters and centimeters: in the same way that inches, centimeters and millimeters to measure our photos can be useful to configure the printing modes, since these units are more used in European countries such as Spain, so they can help us edit our photos based on exact proportions.
- Spades and points– Generally used to measure font type and measurements. A Spade is made up of 12 points.
As seen, it does not matter as we use when working with Photoshop, since it will depend on the project that we are going to carry out, being able to switch between them at different points as it suits us.


