There are certain functions of the iPhone that are really useful at many times, but they are somewhat hidden and therefore many users do not know about them or how they can use them. One of them is the possibility of recording the screen of your device while also recording the sound of the equipment. In this post we tell you everything.
Steps to record your iPhone screen with audio
As we mentioned before, in iOS you have the possibility to record the screen of your iPhone without any problem knowing that the audio that the equipment is emitting at that moment is also recorded. That is, if you record the screen while you are watching a video on YouTube, the sound of this will be recorded as well.
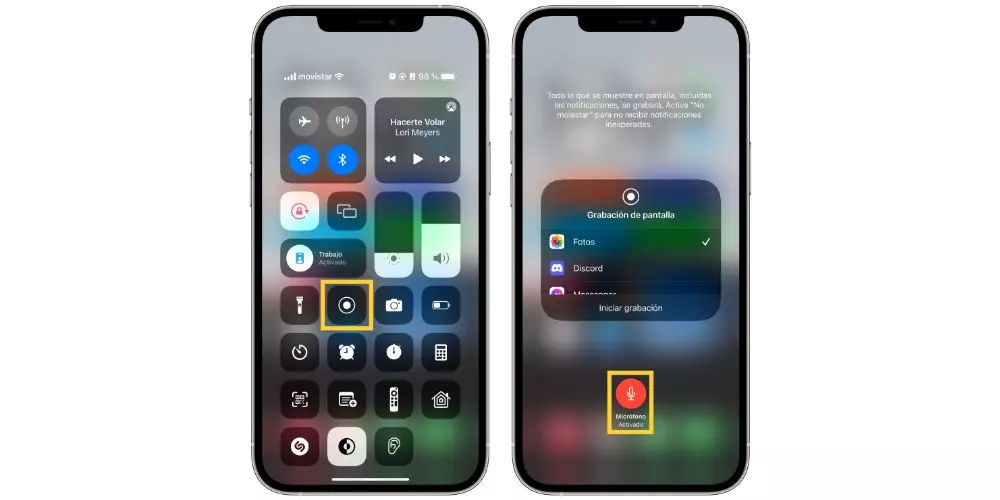
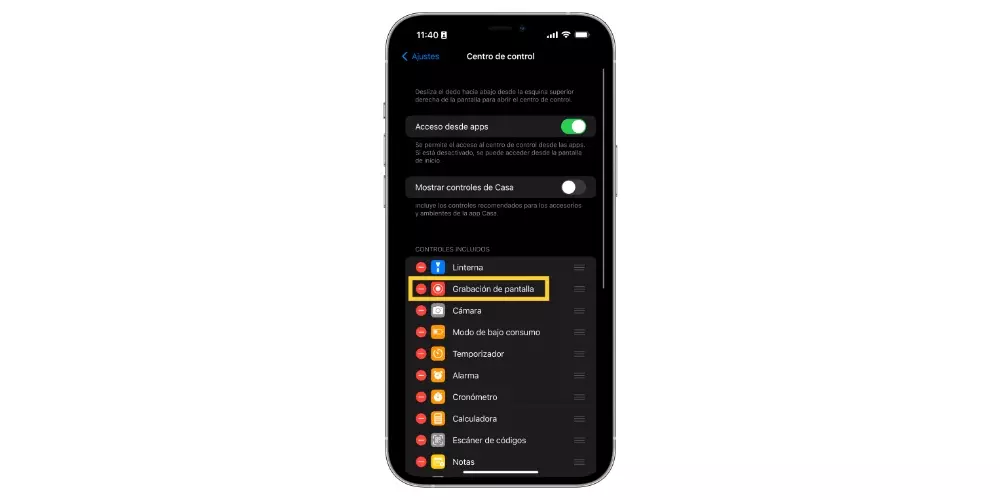
This feature is somewhat hidden within the system, so many users may not be aware of its existence, and thus may not know how to use it. The reality is that this is very easy to set up, and on many occasions it can be very useful. In order to have access to the screen recording you have to follow the following steps.
- Open the app of Settings on your iPhone.
- click on Control center.
- Add “Screen Recording” to “Included controls”.
With these simple steps you will already have access from the control center to the possibility of recording the screen of your device. But this is not all, there are more possibilities to add to the recording, and it is that you will not only be able to record the system audio, but also you can also record external audio, that is, you speaking or the ambient sound around you at the time of recording. To do this, follow the steps below.
- Open Control Center of your iPhone.
- Long press the access to Screen Recording.
- Press about “Microphone» to activate it.
Once you have everything well configured, you just have to start the recording in the conditions you want to carry it out. That if, as Apple warns you, during the recording all notifications will also be recorded to enter your iPhone, therefore, if you do not want this to happen, you will have to activate the Do Not Disturb mode. Now yes, since you have everything perfectly configured, to start the recording you just have to access the control center and click on the button “Screen recording”.
What is it for?
As we mentioned at the beginning of this post, this function that Apple provides through iOS, and which is also available in iPadOS, can be very useful on certain occasions and, above all, for certain users. In those moments in which a user wants explain the process of an action, with this function you can record your voice while recording the screen to explain everything step by step.
In the same way, for content creators on the internet, having the possibility of being able to carry out this action natively is a real advantage, and above all, tremendously easy when it comes to creating tutorials or explanations for your entire audience, since they won’t need to use any application and with just give a click will be recording your screen.
