What makes the Logitech MX Master 3 special?
Before we jump right into telling you what you can do to get the most out of this fantastic mouse, we want you to know what makes this accessory really special. As we have told you, it is a mouse that Logitech has manufactured to give all users another productivity toolso that certain actions can be carried out much more quickly and comfortably than before.
To achieve this, this Logitech MX Master 3 has different buttons along its entire surface, carefully placed so that you can not only use them, but also that it is not an effort to do so, that is, that you can click them comfortably whenever you need it. But beware, that does not end here, since there are other alternatives that also have different buttons that carry out certain actions. The most special thing about this mouse is that the user has the ability to configure the action to be performed when you press each of the buttons. In addition, this configuration can vary depending on the application, making work productivity much higher.
Steps to set it up on Mac
Once you know what makes this mouse special, we have to go to its configuration, so that really, once you have it in your hands, you can perfectly adapt each of the buttons it has to the function you want. that this performs, either common to all apps, or specific to any of them.
Download the app
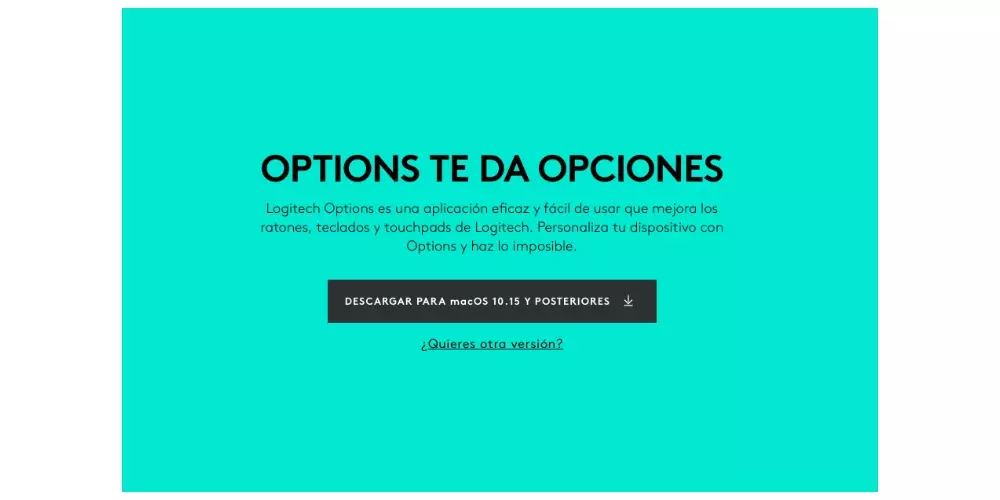
The first thing you have to do to be able to configure the Logitech MX Master 3 to your liking is to download the application of the brand itself that will allow you to do so. Without this app you will not be able to configure absolutely nothing, so it is essential that you do not skip this step if you really want to get the full potential of this device. Here are the steps you have to follow to do so.
- Access the page to download the application.
- Click on the button that will allow you to download the Mac version.
- Once the app is downloaded, launch it to install it.
- Follow the steps indicated for its installation.
Configure mouse buttons
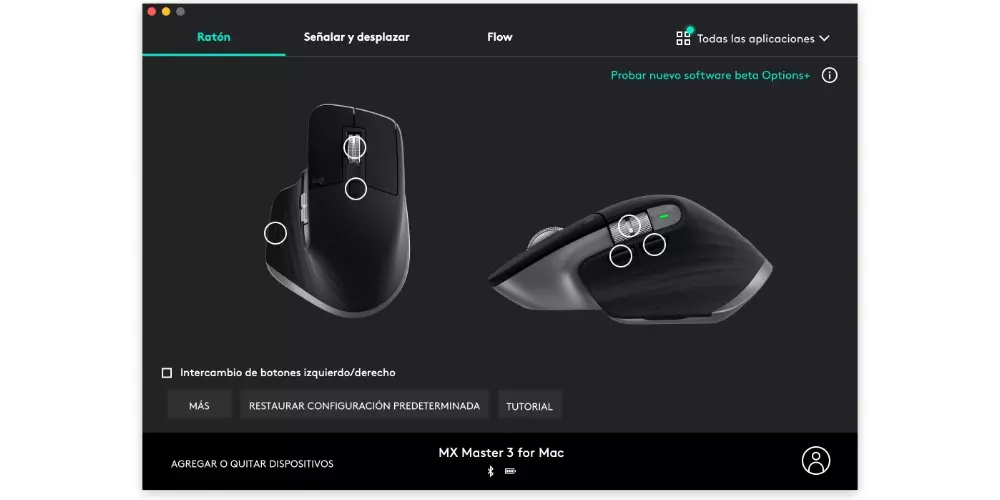
With the Logi Options application installed and configured, the next step to take full advantage of all the options offered by this mouse is to configure each of the buttons it has. For this you just have to open the app and do click on “Mouse”. In this way, all the options that you can configure will be displayed, for which you only have to click on the different buttons and select the function that you want to be carried out when you press it. Below we leave you all the options available in each of the buttons.
- The gesture button, center button and center wheel have the following configuration options.
- gesture button
- Mission Control
- Silence
- minimize window
- Change pointer speed
- Key Action Assignment
- App Expose
- show desktop
- Desk (left)
- Desk (right)
- maximize window
- Behind
- Ahead
- Screenshot
- Copy
- Cut
- Paste
- Undo
- Redo
- Play/Pause
- Previous
- Following
- volume down
- Turn up the volume
- Click
- Wheel button mode change
- Center Button
- advanced click
- Wheel button zoom
- modifiers
- left shift
- shift right
- lower brightness
- Brighten up
- Look for
- smart zoom
- launch pad
- Find a file
- Finder search
- Open Log Options
- open app
- Open file
- open folder
- Open web page
- None
- horizontal wheel
- Horizontal displacement
- zoom
- volume controls
- Key Action Assignment
- brightness control
- Navigate between apps
- Switch between desktops
- Switch between pages
- Navigate between tabs
- Show/hide notifications
- Redo/Undo
- None
- Front and back side button
- Ahead
- Redo
- Following
- Desk(right)
- Paste
- Key Action Assignment
- Mission Control
- App Expose
- show desktop
- Desk (left)
- minimize window
- maximize window
- Behind
- Screenshot
- Copy
- Cut
- Undo
- Play/Pause
- Previous
- volume down
- Turn up the volume
- Silence
- gesture button
- Change pointer speed
- Click
- Wheel button mode change
- middle button
- advanced click
- Wheel button zoom
- modifiers
- left shift
- shift right
- lower brightness
- Brighten up
- Look for
- smart zoom
- launch pad
- Find a file
- Finder search
- Open Log Options
- open app
- Open file
- open folder
- Open web page
- None
But furthermore, this does not end here, since these settings can be customized for each application that you have installed on your Apple computer. So you can increase productivity even more by making each of the buttons have a different function in each app depending on the actions you perform within it.
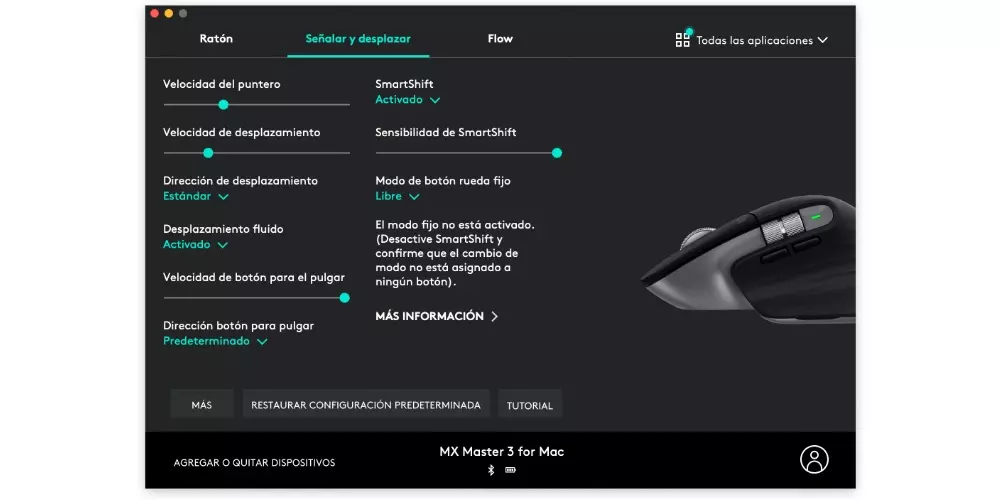
Customize the sensitivity
How could it be otherwise, the sensitivity of each of the buttons and even the mouse itself is also fully customizable within the options that the Logi Options application offers. After all, the configuration of the buttons will make you more productive, but without a doubt, being able to modify the sensitivity of each one of them as well as the speed at which the pointer moves, will make you feel really comfortable whenever you use this mouse. Then we leave you the options that can be modified.
- pointer speed
- Velocity of displacement
- displacement direction
- smooth scrolling
- Thumb button speed
- Direction thumb button
- SmartShift
- SmartShift Sensitivity
- Fixed wheel button mode
Use it with different computers at the same time
As we have told you from the beginning of this post, the Logitech MX Master 3 is a mouse that is totally focused on user productivity, so, in addition to all the custom configuration that can be carried out both for The general system, as for each of the applications you use, still has an extra function that many users will surely love.
On many occasions, due to work demands, a user has to work at the same time with two different computersWell, Logitech has a function that they have called “Flow”, which will allow you to use this mouse, at the same time, with two different computers. But when we say at the same time it doesn’t mean that you have to press a button to use it with one, and then press it again to use it with the other, but simply with drag the pointer to the edge of a screen, will allow you to pass to the other. In order to do so, you must meet the following requirements.
- Download and install the Logi Options app on both computers.
- match the mouse with the two computers, either via Bluetooth or with the USB receiver.
- Connect the two computers to the same network.

Price and availability
Finally, once you know all the possibilities you have to be able to configure the Logitech MX Master 3 according to your needs and the way in which you use both the computer itself and the different applications that you have installed on it, it is the time to tell you where you can buy it and, of course, the price of this device.

Obviously, through Logitech’s own website you have it completely available, in this case with a price of 135 euross in its exclusive version for Mac, since there is another version, the same, that is compatible with both Windows systems and macOS systems. However, in third-party stores like Amazon, you can find the MX Master 3 with some very interesting discounts.