Advantages of using the iPhone to upload photos to TikTok
One of the virtues of using iPhone is the number of high-quality applications that the iOS operating system natively offers. In these terms, the Photos app It is one of the most worked apps in the Apple ecosystem. For a few years now, it has not only served as a gallery, but is also a very complete photo editor.
Thus, while Android users almost necessarily have to install tools such as Lightroom Mobile, VSCO or Snapseed, on Apple smartphones we can directly use the application that comes by default in the system. Its editor is really powerful and is light years away from the one integrated in Google Photos.
To make good use of Apple Photos, the main thing is understand the parameters. Next we will show you what each point is for and how you can use them to bring light and shine in your photos for TikTok. You can also learn a lot by following the editing tips published by some step by step. tiktokers, as is the case with anaugazz, which we will tell you a little later.
How to use Apple Photos editing parameters
Edit photos on iPhone it’s pretty easy. In addition, the format that Apple uses to store the images gives us a lot of margin when it comes to develop photos. Next, we are going to explain what function each parameter found in the Apple Photos application performs. Once the controls, you can also handle other photo editors with ease, since they generally use very similar formulas.
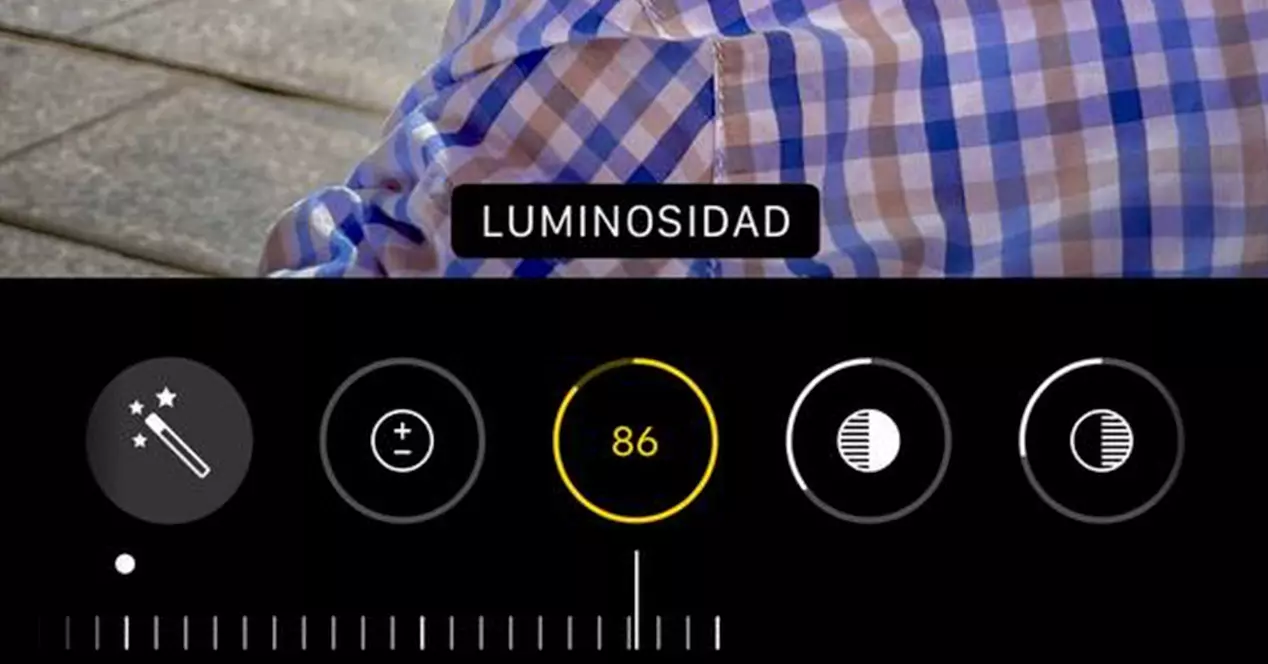
- Exposition: It refers to the overall amount of light the image has. If your photo has been dark, you can shift the exposure value towards the positive terrain. It affects all the tones of the entire image.
- Contrast: Brightens the lightest parts of the photo and darkens the duller areas at the same time. You should use this parameter fairly sparingly.
- Brightness: Lightens both dark and light areas without affecting color.
- Clear Zones: Retrieves the information of the lightest parts of the image without affecting other parts such as shadows.
- Shades: It allows you to retrieve information only from the darkest area of the image, without affecting the rest.
- Brightness: It carries out the same process as the exposure, but it only affects the midtones of the image, that is, the tones that would be gray if we changed our photography to black and white.
- Black Point: It allows you to “wash out” the darkest tones in the image or to make the darkest tones in the photo absolute black.
- Saturation: Moving the parameter to the right we will make the colors of our photo more vivid. In negative value, we will turn off the colors of the photo. If we set this parameter to the minimum possible, our photo will become grayscale. This process is called “desaturation.”
- Vivacity: It performs the same process as Saturation, but uses advanced algorithms to detect the duller colors in the image, intensifying them and respecting the already existing saturation of the colors that dominate the image.
- Temperature: This parameter, together with the Tint that you will see below, make up what in photographic jargon is called “white balance”. To avoid getting involved with technicalities, if you move it towards the negative you will make all the tones of your photo turn bluer, that is, colder. On the positive side, the colors will veer towards yellow, becoming warmer. In portraits it is usual to increase the temperature of the photo.
- Dye: In negative values it makes a shift towards the green tone. On the other side it will do the same, but with the magenta tone.
- Sharpness: It is a digital focus adjustment. Using very complex algorithms, it detects all kinds of edges and details in the image to increase its contrast without affecting the color of the image. If a photo was not very focused or is slightly blurred, this parameter is very useful.
- Degraded: It is what is known as a «vignette», but in the Photos app it has this name. It is used to darken or lighten the edges of the image and thus be able to focus the point of interest. It is a very interesting setting to improve your selfies.
How anaugazz edits her photos for TikTok
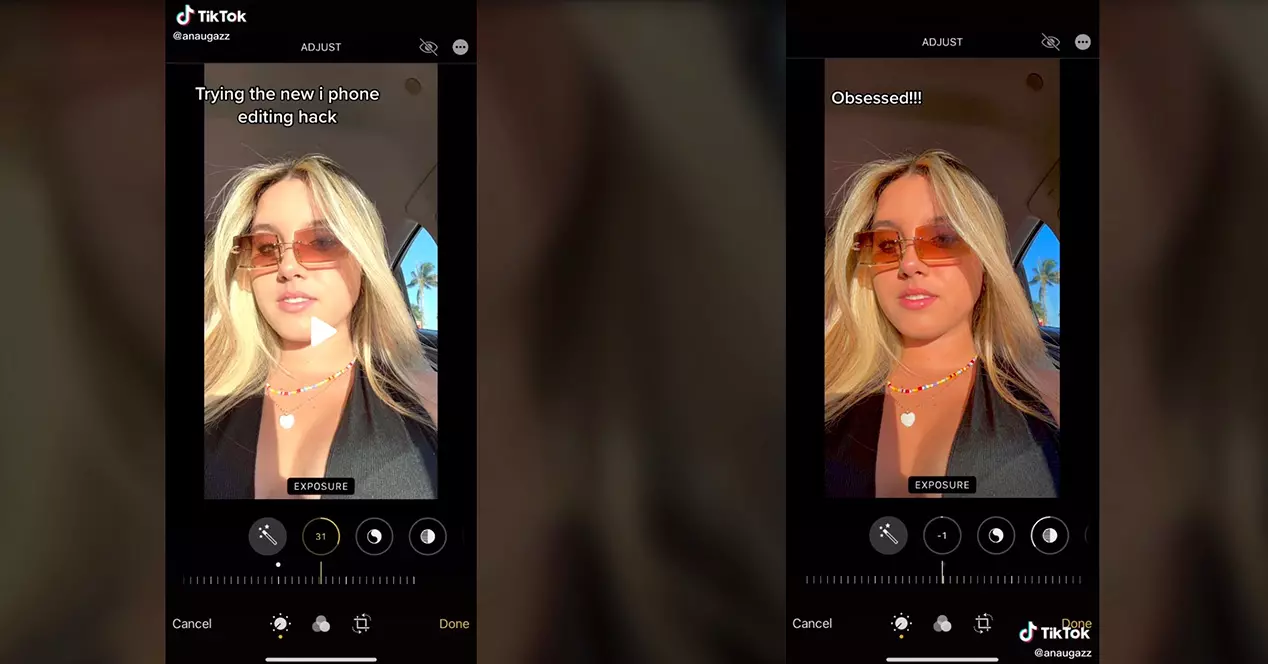
The user anaugazz is a tiktoker that has almost 60 thousand followers on the social network. A few months ago, a video that he posted on his profile quickly went viral. In it, the user showed a screen recording of her iPhone showing step by step how retouch their photos. The effect it achieves is interesting, since it applies it to an image taken in full sun.
These lighting conditions typically create harsh shadows. However, and despite the fact that the video has more than 3 million Likes, it cannot be said that it has invented anything new. There are many presets for programs like Lightroom that do the exact same thing. Of course, most of the presets that there is for these applications are paid, while the trick by anaugazz is totally free and comes to the same end.
Steps to do the anaugazz editing hack
Although we will leave you the link to the video, if you want recreate this effect and you do not want to be pausing the video every second, we leave you here the list of steps that you must perform in order in the iOS Photos application:
- Upload the Exposition to 100
- Upload the Brightness to 100
- Lower the Clear areas to -35
- Lower the Shades to -28
- Lower the Contrast to -30
- Lower the Brightness to -15
- Upload the Black dot to 10
- Raises the Saturation to 10
- Upload the Vivacity to 8
- Upload the Temperature to 10
- Increase the Dye to 29
- Upload the Sharpness to 14
- Increase the Degraded to 23
- Lower the Exposition to 0
- Lower the Brightness to 0
@anaugazzGo try it now !! #SkipTheRinse #foryoupage #editing #photo #filter #iphonehack #photohack #xyzbca #fyp #newtrend #musttry #inspo #fyp シ #viral # fypp ♬ original sound – poussy fire🔥
The result obtained is a image well contrasted and with quite intense colors. The midtones they are evened out, making the skin look more homogeneous without the need to use third-party filters to artificially soften it.
You could say that the effect pursues the same end as the HDR. The excessively highlighted parts are corrected at the same time as the darkest areas of the photo are lifted to enhance the whole. It can be somewhat artificial depending on which images, but what cannot be denied is that it is a very attractive filter, perfect to stand out on social networks.
How can I edit my photos for TikTok on Android?
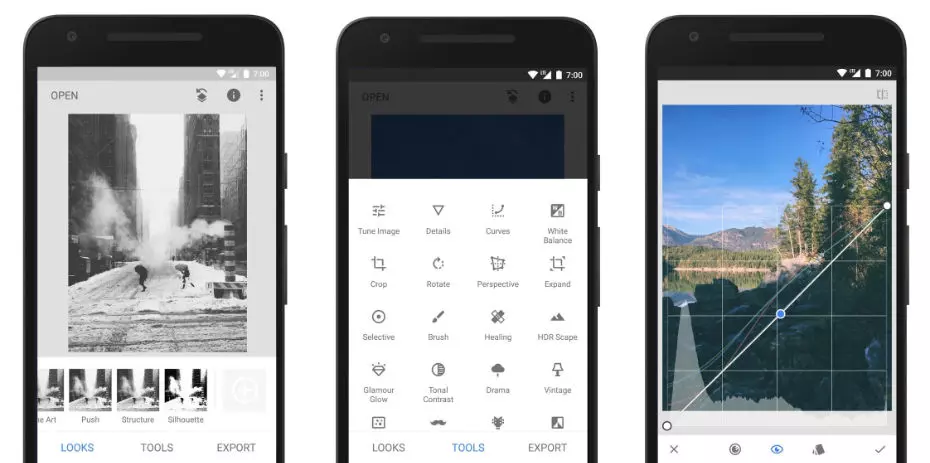
If you don’t have an iPhone, you can get very similar results with Snapseed app, which is available on the Google Play Store. By understanding a little the parameters that we explained at the beginning, you can recreate practically any filter that becomes fashionable. Another very interesting free app is Lightroom Mobile, which is a bit more complex, but it is one of the best photo editors available on both iOS and Android.
Still, you should know that to get good results on an Android phone, you probably have to work a little more on your images. The success of the iPhone is due to the fact that both its cameras and its artificial intelligence processing manage to obtain very clean and sharp images even in the worst conditions.