One of the main criticisms that Windows 11 has been receiving since its launch, more than a year ago, is its poor performance. While the games ran very well on Windows 10, after installing this new operating system users have complained that they have dropped FPS with the same settings, and have even started experiencing FPS drops, and even stuttering. Although everything pointed to a lack of optimization of the drivers, finally it seems that it is not for that. But the reason is much worse.
With the development of Windows 11, Microsoft has taken the opportunity to greatly strengthen the security of its operating system. Some of that security enhancement has focused on the use of virtualization to protect Windows from various computer attacks. Specifically with two functions:
- Virtual machine platform, or Virtual Machine Platform (VMP). Responsible for providing the necessary virtualization services to the system.
- Hypervisor-protected code integrity (HVCI), better known as “Memory integrity”. The shield that protects Windows from certain types of attacks to inject code or load unsigned drivers.
These functions are designed to protect us from all kinds of computer threats, even the most complex ones. And, together with Windows Defender, they provide us with absolute protection. However, these security measures have a high price to pay (not economic). And we have to choose: either have the best possible performance when we play or use very heavy programs (such as Premiere), or be very protected, but lose a lot of performance on the PC.
There is no solution: you must choose
Initially, Microsoft did not associate performance problems with these security measures. However, seeing that more and more users were affected, it has finally published a support page where it informs us of it and explains that, if we want improve gaming performance it will be necessary to disable these security measures.
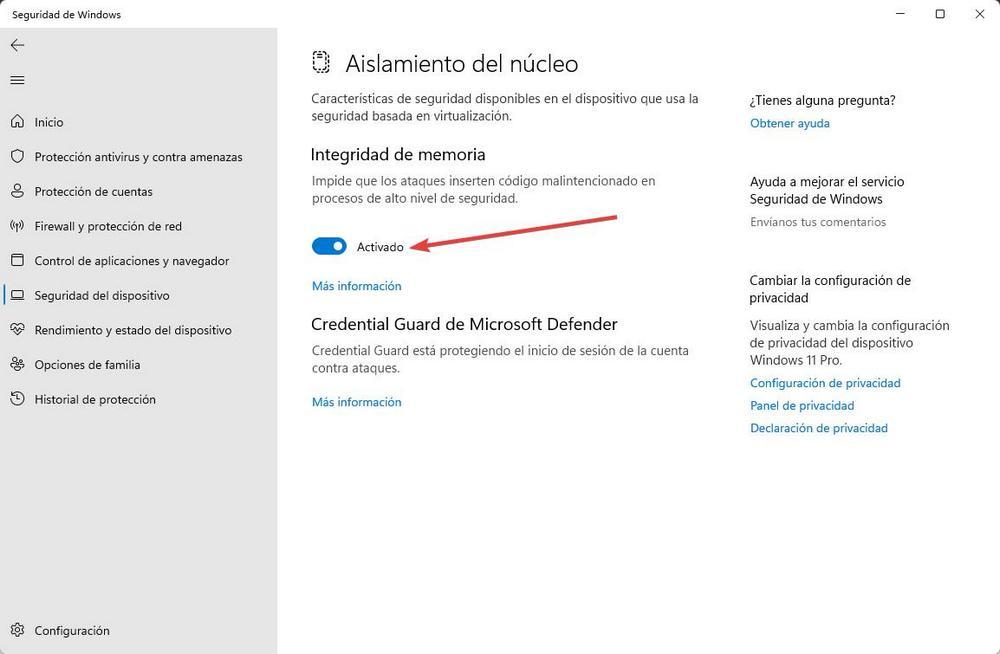
To deactivate the memory integrity shield, what we must do is open the Windows Defender panel, and look for the Device Security> Kernel isolation section. Within it we will see the “Memory integrity” option, which we will have to deactivate from the switch that appears.
After removing this option (and probably rebooting your computer), the next step will be to disable the Windows virtualization layer. To do this, we will use the Windows search engine to open the “Windows Features” window, and in it we will locate the “Virtual machine platform” option.
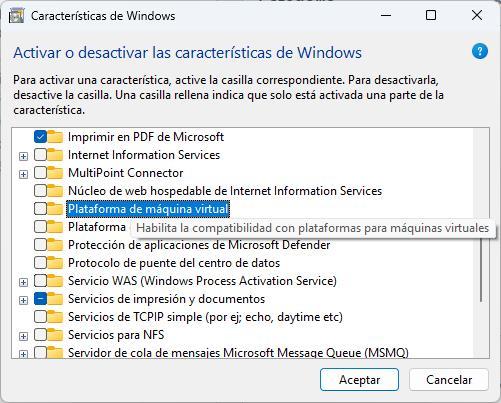
We uncheck the box, accept and wait for Windows to apply all the changes. The process may take a couple of minutes, and at the end it will ask us to restart the PC. We do, and automatically all Windows virtualization features will be disabled.
When Windows restarts we should no longer have performance problems when playing games or running very heavy programs. Of course, the price we have paid for it is worsen our security. Therefore, we must take extreme precautions to avoid that, by disabling this option, we can end up infected.