Many of the laptops that are sold today have an HDMI port, and the graphics cards of a desktop computer must also incorporate it. HDMI cables are capable of outputting Full HD and 4K video and surround sound to your TV. In the event that our computer does not have an HDMI port, we can use a VGA cable (D-Sub). However, in this case, the VGA cable only carries video, so we’ll need to use a 3.5mm audio port to send audio from your laptop to your TV or external speakers.
Display settings in Windows
On our Windows computer we can press the key combination “Windows + P” to open the display settings immediately. In it we will find the following settings:
- Duplicate: It is the screen mirroring function. Through it, it reproduces the screen of our computer on the television. It is especially used for making presentations, where you also need the computer screen to be on in front of you.
- Enlarge: This function allows us to use the television as a secondary screen, in addition to the computer screen. Here, you can drag windows from one screen to another. It can be of great help to us while working with multiple applications side by side.
- only second screen: This allows us to use the TV as the only screen, since the computer screen is turned off while we use this mode. This is useful while watching movies.
Connect over Wi-Fi
We can also connect our computer with the TV wirelessly through our Wi-Fi connection. To do this, the first thing we must ensure is that Both devices are connected to the same net so that they can “see” each other. This is usually quite common, since when purchasing a new Smart TV, for example, we usually connect it to the same home network that the device accesses. mobile phone or the laptop.
Next, the first thing in the configuration of our television we must select the option to Duplicate the screen or Connect wirelessly.
On Windows 10
Now, in the event that we use Windows 10 on our computer, the steps that we must follow are very simple.
On our computer we will press the keyboard shortcut “Windows + I” to access the “Settings” section. Then click on “System” and then on “Screen”. Here, we choose the option of Connect to a wireless projection. In the new screen we click on Detect.

Once this is done we can see the devices to which we can connect our PC, so we only have to choose the television and wait for them to connect to each other in a few seconds.
On Windows 11
If we have already updated our computer to Windows 11, the steps to connect it to our TV via Wi-Fi are equally easy to carry out.
The first thing will be to access the “Settings” menu, by pressing the keyboard shortcut “Windows + I”. Once here, in the “System” section, click on “Screen”. Now, on the right side we move to the bottom, where we find the “Scale and Design” section and within the “Various screens” option. Here we must click on Connect to a wireless projection.
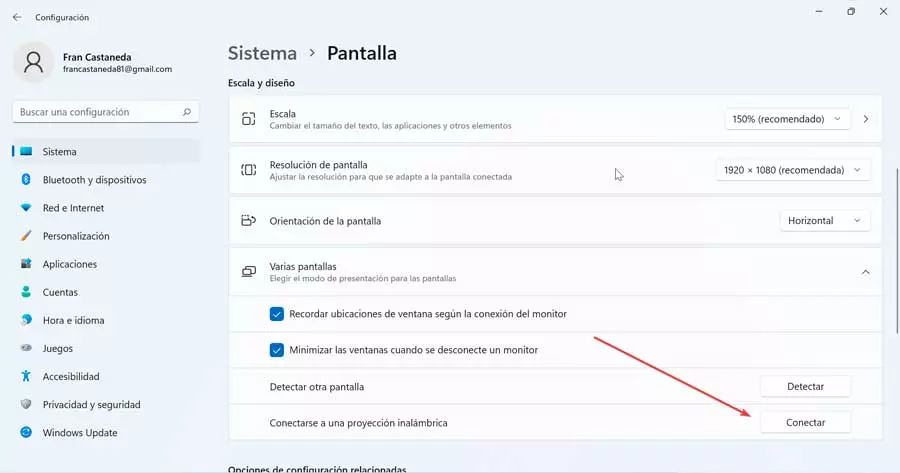
This will make a floating window appear where we will see the closest available devices. It will only be necessary to select the television so that they are linked between them.
Send the screen to the TV using Chromecast
Another very useful way to send the content of our computer screen to television is through the use of Chromecast. For this, it is necessary that our television has a Chromecast device connected or that the television already has an integrated Chromecast.
On our computer we can use the Google Chrome browser to send both the content of a browser tab and the desktop wirelessly through this function. To do this, the process is extremely simple.
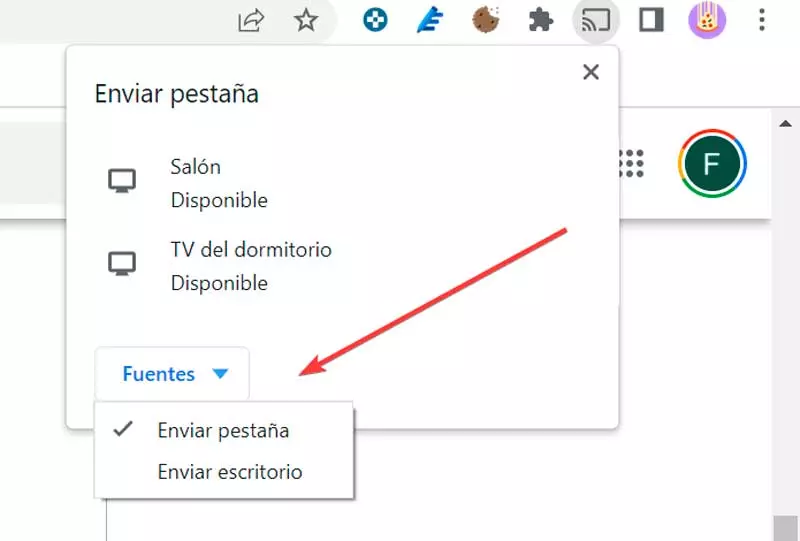
We simply have to start Chrome and click on the three-dot icon in the upper right. This will open a context menu where we click on the option “Send”. This will open a menu where the devices to which it can be sent will appear, among which our television should appear. If we click on the tab “Sources”we can choose if we want to send the tab or the desktop.
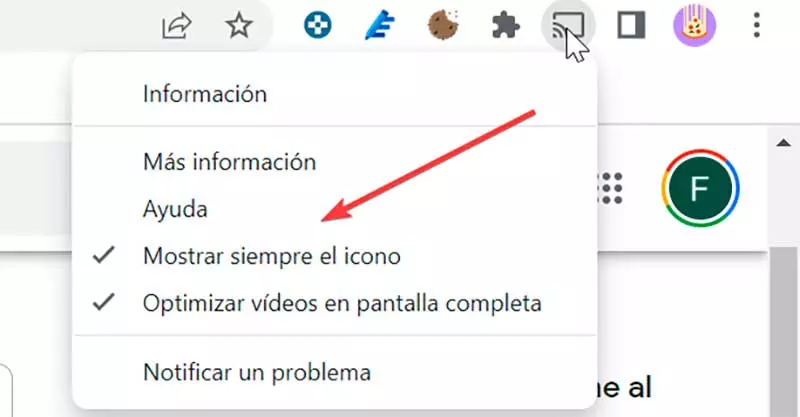
To make this process more comfortable we can add the Send button to the Chrome toolbar. This is something that we can easily do, because when we click on the Send button, it temporarily appears on the toolbar. To fix it permanently, just right-click the Submit button, and then click Always show icon.
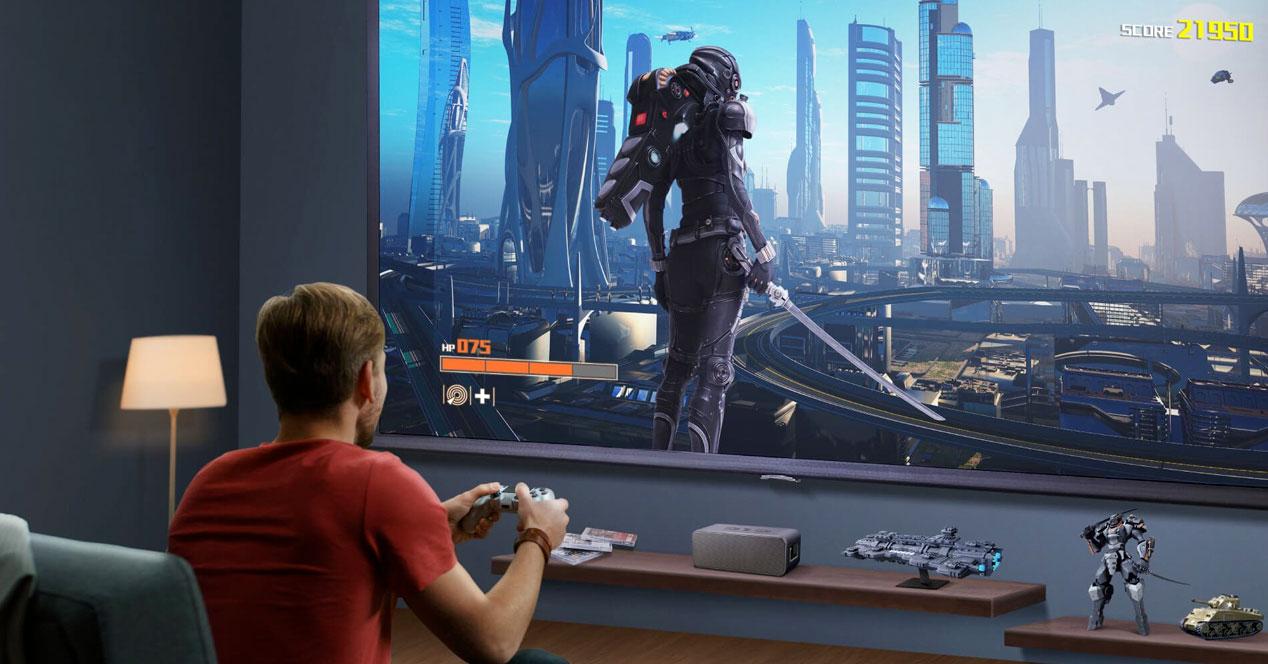
play wirelessly
In addition to the options seen so far, we can also connect our computer to the television through these third-party applications that are especially suitable for gaming.
Steam Link Anywhere
It is a Steam technology that allows us to play our PC games on an Android device regardless of where we are connected to the Internet. Therefore, if we have an Android TV we can use it to play our Steam games wirelessly.
In order to use Steam Link Anywhere, the first thing we must do is activate it from our Steam account. To do this we open our Steam client and click on the steam tab located in the upper left and later in Parameters. Later where does it say beta participationclick on the button Change and select the beta called Steam Beta Update. Finally, click OK to save the changes. Once this is done, the application will restart to apply the changes made.

Now we only have to connect the Steam Link beta application on our television to Steam on your PC, for which we will have to download it first from the Play Store on the TV.
NVIDIA Gamestream
It is a technology developed by NVIDIA that allows us to stream the games that run on our computer to other devices. So it is an ideal option to run our favorite video games on the computer and broadcast it to our TV or any NVIDIA device. We can only use the official client if we have a Shield or use an unofficial application called Moonlight which allows us to use GameStream technology on any computer or device.
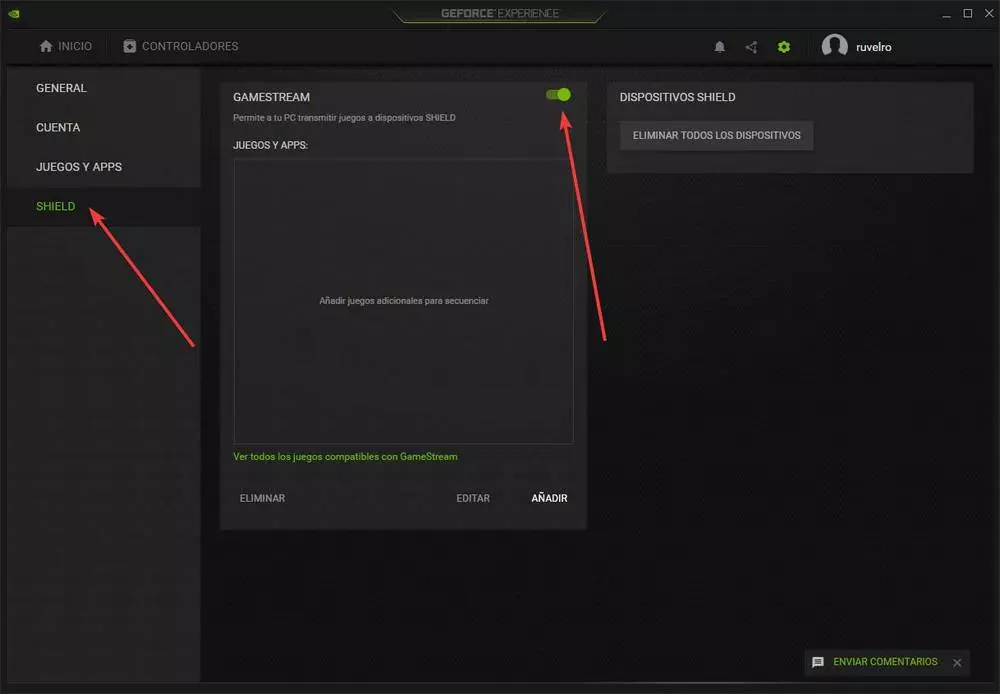
From the app GeForce Experience We open the settings by clicking on the gear-shaped icon that appears in the upper right. Within the options, on the left, we click on SHIELD«, and here we will activate the option “Game Stream”.
Once we have the NVIDIA GameStream configured, we must run the moonlight app that we have downloaded to connect to the PC and thus be able to play remotely. Once the computer to which we are going to connect has been selected, we can access a settings panel from where we are going to be able to configure all the options for the broadcast of the program. Once the configuration is finished, see a list with all the available titles, with which we only have to select the game that we want to start broadcasting and start playing.