How Wake-on-LAN works
Each network card has a MAC address that identifies you within the local network. When that card receives the packet, it starts the process of turning on the computer. Logically, for this to happen, the equipment must be connected to the network. It is also necessary that the motherboard of the computer supports Wake-on-LAN. However, today most are compatible.
In addition to these two basic points that we have indicated, it is necessary to have the BIOS configured and also Windows to be able to use this function. According to the BIOSIt will depend on the exact model but generally we must go to the parameters related to the network card and enable it there. We will see the option of Wake on LAN and we have to give it to enable in case it is disabled as standard. Make sure to correctly save the changes in the BIOS to take effect, since if we restart without saving the changes it will not do any good.
When we have all this configured, we can use Wake-on-LAN and turn on the computer remotely. Keep in mind that in some routers we can have problems and that it does not work well, but most of the current devices are perfectly compatible. This package that we refer to is known as Magic Packet. It is a 6-byte string with a value of 255 and followed by 16 repetitions with the MAC address of the destination computer to which we are going to send it to start.
How to activate WoL in Windows 10
First of all we are going to explain what we must do to activate Wake-on-LAN in the Windows 10 operating system. We are going to have to activate Magic Packet on the network card and also configure the energy saving. This is necessary so that the network card, even if we have turned off the computer, is still available.
We have to go to Start, we enter Device Manager and we go to Network adapters. We can also right-click on This Equipment and click on Manage, to later enter Device Manager and follow the same process.
We must mark the network card that interests us, which in this case for Wake-on-LAN will be the Ethernet card, and click with the second button in Properties. Later we go to Advanced options and mark Activate in Magic Packet.
We must make sure that this option is enabled and then go to Power management. We have to check that we have marked the team reactivation options. It has to appear as we see in the image below.
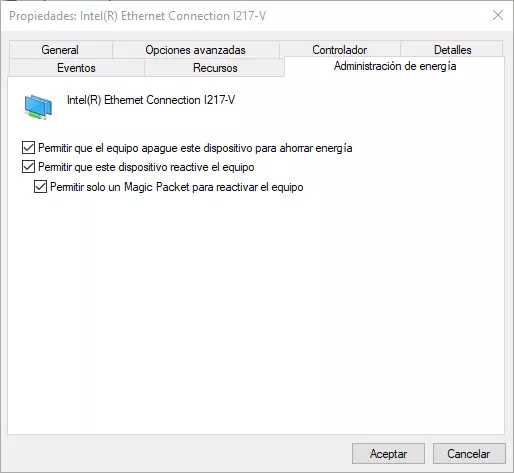
The options that should be marked with the Allow this device to wake up the computer and Allow only one Magic Packet to wake up the computer. This will allow this feature to work properly and we will not have any problems.
From that moment on, our Windows 10 computer will already be configured correctly and we will be able to use Wake-on-LAN to turn it on remotely. We can now use compatible applications, such as TeamViewer, to simply send that Magic Packet from our mobile phone to turn on the equipment within a local network.
Steps to enable it in Windows 11
In order to enable Wake-on-LAN in Windows 11 we are going to have to follow very similar steps to those we have mentioned. Beyond having the BIOS well configured and knowing that the network card is compatible, we must activate the parameters that we have explained previously.
We have to go to the Start button and, once here, write Device administrator. Look for Network Adapters and display the menu. All the network cards that we have on our computer will appear and what we are going to do is select the Ethernet card, which is the one that interests us.
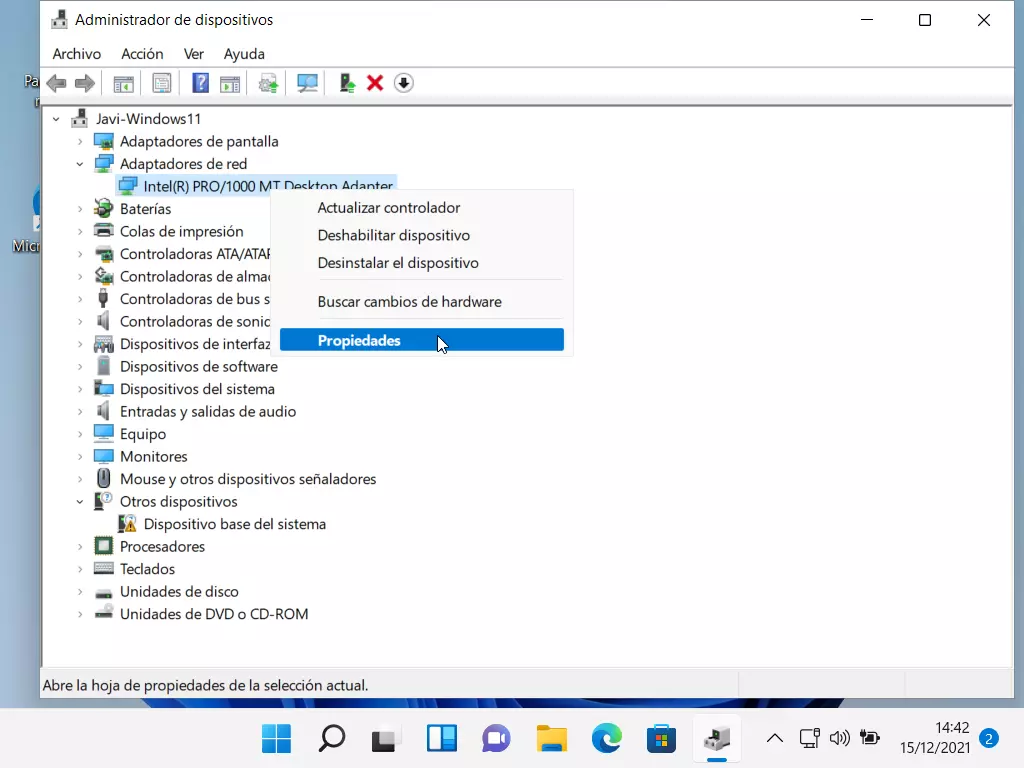
As we see in the image, you have to click on the card with the second mouse button and enter Properties. From here we will have to follow the same steps as in Windows 10. You have to go to Advanced Options and mark Activate in Magic Packet. Later we go to Power Manager and enable the options to reactivate the equipment.
With this done, we will have Windows 11 ready to be turned on remotely. It is a quick and simple process, where we will only have to make sure that we have these parameters activated and that our BIOS and network card are compatible, something that today is common that they are.
If at any given moment we are interested in disabling this function, we will simply have to follow the same steps but this time uncheck the boxes that we have activated. In this way we will no longer have the Wake-on-LAN feature running in Windows 11. We can resume the configuration at any time if necessary.
Conclusions.
In short, following these steps we can have activated the Wake on LAN function both in Windows 10 and in Windows 11. The process is practically the same. This is a feature that can be very useful to be able to turn on the computer remotely. If once the computer is turned on you want to have access by remote control, then you will have to install programs such as SupRemo control or Teamviewer among others, in this way, you will be able to turn on the PC whenever you need it and control it remotely without problems.
Using Wake on LAN is interesting in terms of saving energy and not having to keep a computer on constantly. Simply by having the network card correctly enabled, we can turn it on remotely as we have explained. Therefore, we consider it a very useful option for many users who have to use their computer equipment at any given time.