Once you are inside the Network and Sharing Center, above you can see the section of active networks. That’s where it shows the network you’re connected to and its name, which is what we want to change.
Modify the Registry to change the name
Therefore, to rename the network profile you will have to modify the Windows Registry. To do this you have to click on the Start button and in the search box type regedit. You have to go in and give it to allow making changes to the team. You must be careful in this section, since it is an important tool for Windows and you should not go beyond what you really need.
When you are in the Registry Editor window, you should search for the following command or directly paste the path in the bar above:
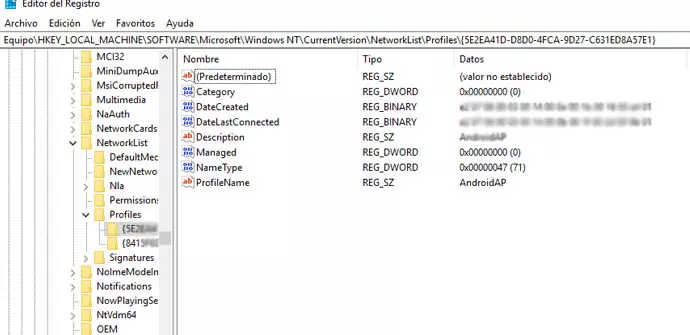
ComputerHKEY_LOCAL_MACHINESOFTWAREMicrosoftWindows NTCurrentVersionNetworkListProfiles
Inside the Profiles folder, you will see different network profiles. Each of them will have a unique name or identifier. If you click on each of them you will see different files, among which is the network name.
The ProfileName file is the one that will interest you. If you double click on it you can edit it. The name that comes by default will appear and you can put any other that interests you. When you put the new name, you simply have to click OK. It will automatically be changed.

reverse the process
At any time you can revert the name. If you want to go back to the one that was there before or even put another one, you can change it as many times as you want. The process is the same and you would simply have to return to Registry Editor of Windows and follow the steps that we have explained to change the network name in Windows 10.
If you see that the network name has not changed automatically, the only thing you should do is restart Windows. When making changes of this type it is always advisable to reboot the system and ensure that the changes have been applied correctly. This way you will also be able to avoid possible problems that may appear.
Change the network name in Windows 11
You can also change the name of the default network profile that it uses Windows 11. The process is very similar and after following a series of steps you will be able to put the name that most interests you and prevent the default from appearing. This way you can better control your network and be able to identify it more easily.
In this case you can also see the name assigned to a network if you enter the Internet Settings. You can click on the icon on the taskbar and click on Network and Internet settings. Once there, in Hardware Properties you will be able to see different data related to the network to which you are connected, among which you will be able to see the assigned name.
Modify the Windows Registry
For change the network name assigned by Windows 11 by default, you have to go to Start, type Registry Editor and open it. You can also access it simply by pressing the Windows + R key combination and run Regedit. You will automatically reach the same point.
Once you are in the Windows Registry Editor, the next thing you need to do is search for the exact path. To do this you can go to the menu on the left and go to the next route that we are going to show or simply copy it and paste it in the bar above:
ComputerHKEY_LOCAL_MACHINESOFTWAREMicrosoftWindows NTCurrentVersionNetworkListProfiles

Change File ProfileName
There you will find different network profiles. They may appear more or less, depending on the case. There what you should do is select the one that interests you and access the folder. You will see multiple files, but the one you are interested in is ProfileName. That’s the one you’re going to have to modify.
To change it, you simply have to double click on the ProfileName file and a new box will automatically appear to put another name. You can remove the default one and put the one that interests you. Once done, you just have to click OK for the changes to be applied.

If you see that the name has not been changed correctly, what you should do is reboot the system. This way you will make sure that it has been changed correctly and you already have the new name for the network profile that you have created in Windows 11.
If you want to return to the previous name or put any other, the process that you must follow is the same that you have done. You must go to the Windows Registry Editor again, access the path and search for the network you are interested in, then modify the ProfileName file and put the name you want.
In short, as you have seen, it is very simple. change the default network name in both Windows 10 and Windows 11. The process is very similar and you simply have to access the Windows Registry Editor and carry out the steps that we have mentioned. You will quickly have changed the name to any other that interests you and thus you will achieve greater control of the network and you will be able to identify it better.
As a note to keep in mind, beyond changing the name of the Windows network profile, our advice is that you always change the name of the Wi-Fi network. This will prevent you from giving clues about what router you use, what your operator is or even risking your privacy if you use something that relates to you as a name. At least this way you can make it more difficult for an attacker to break through the security.