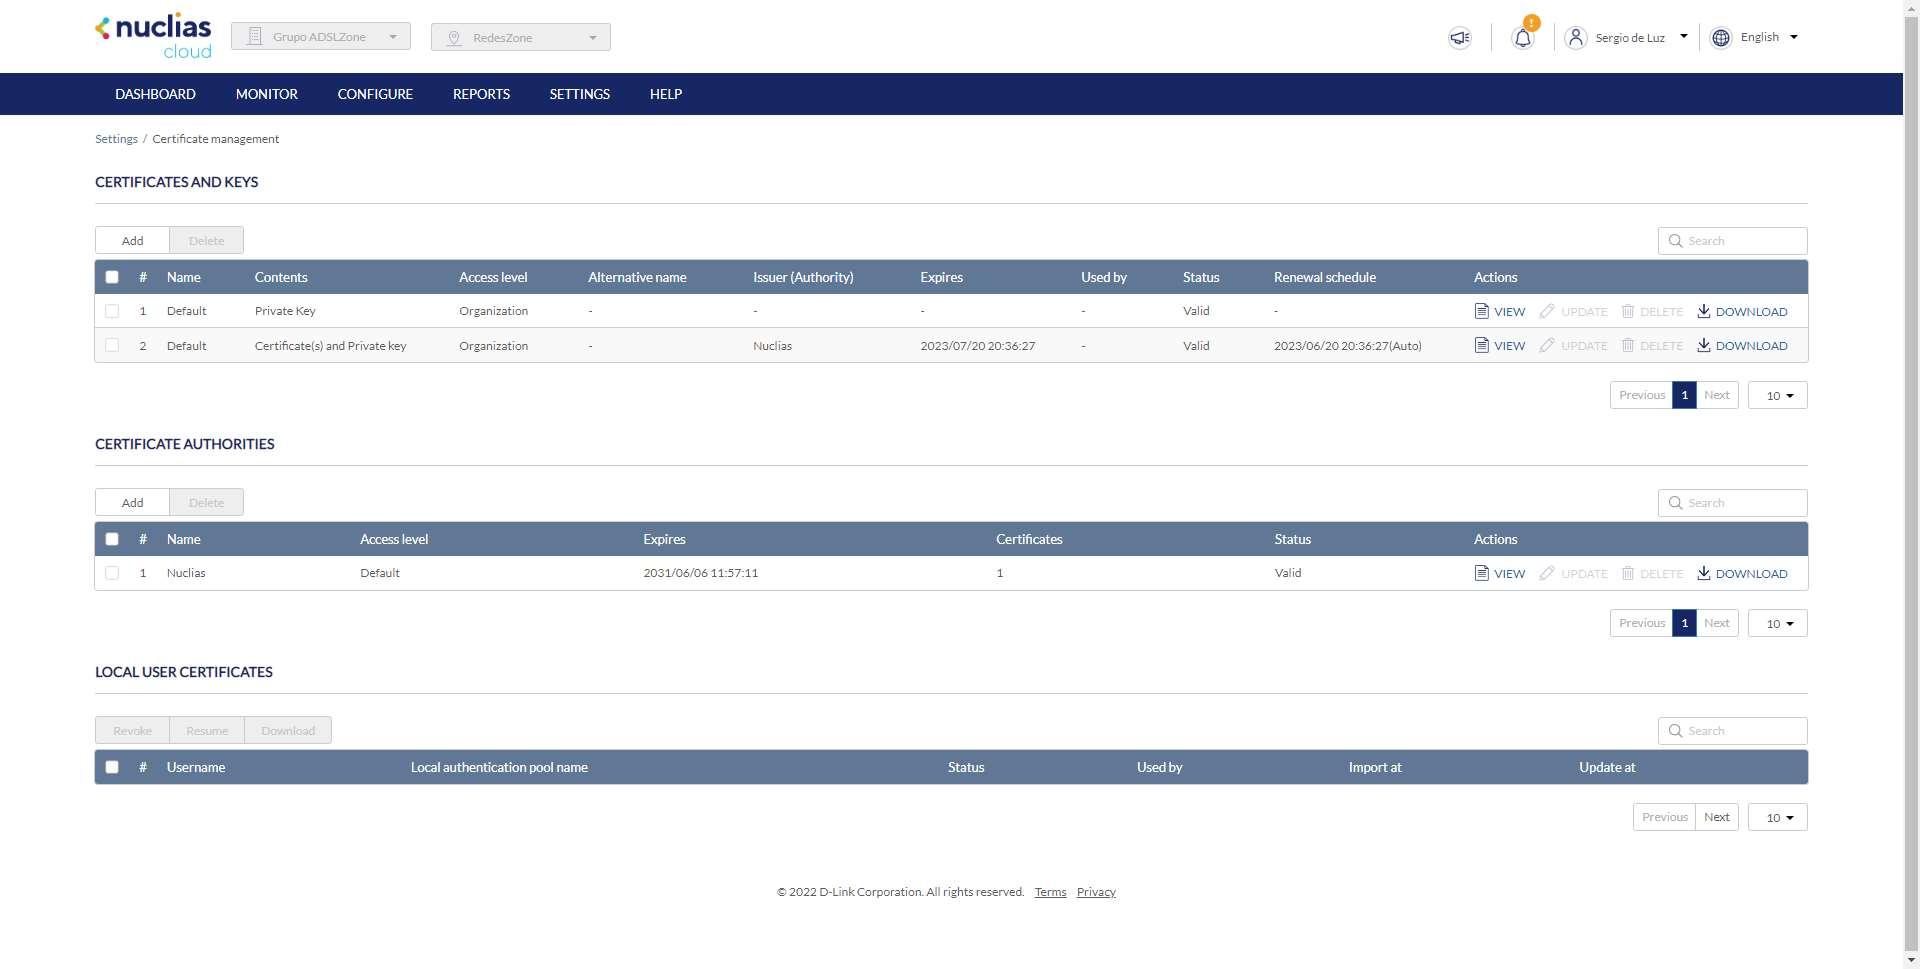
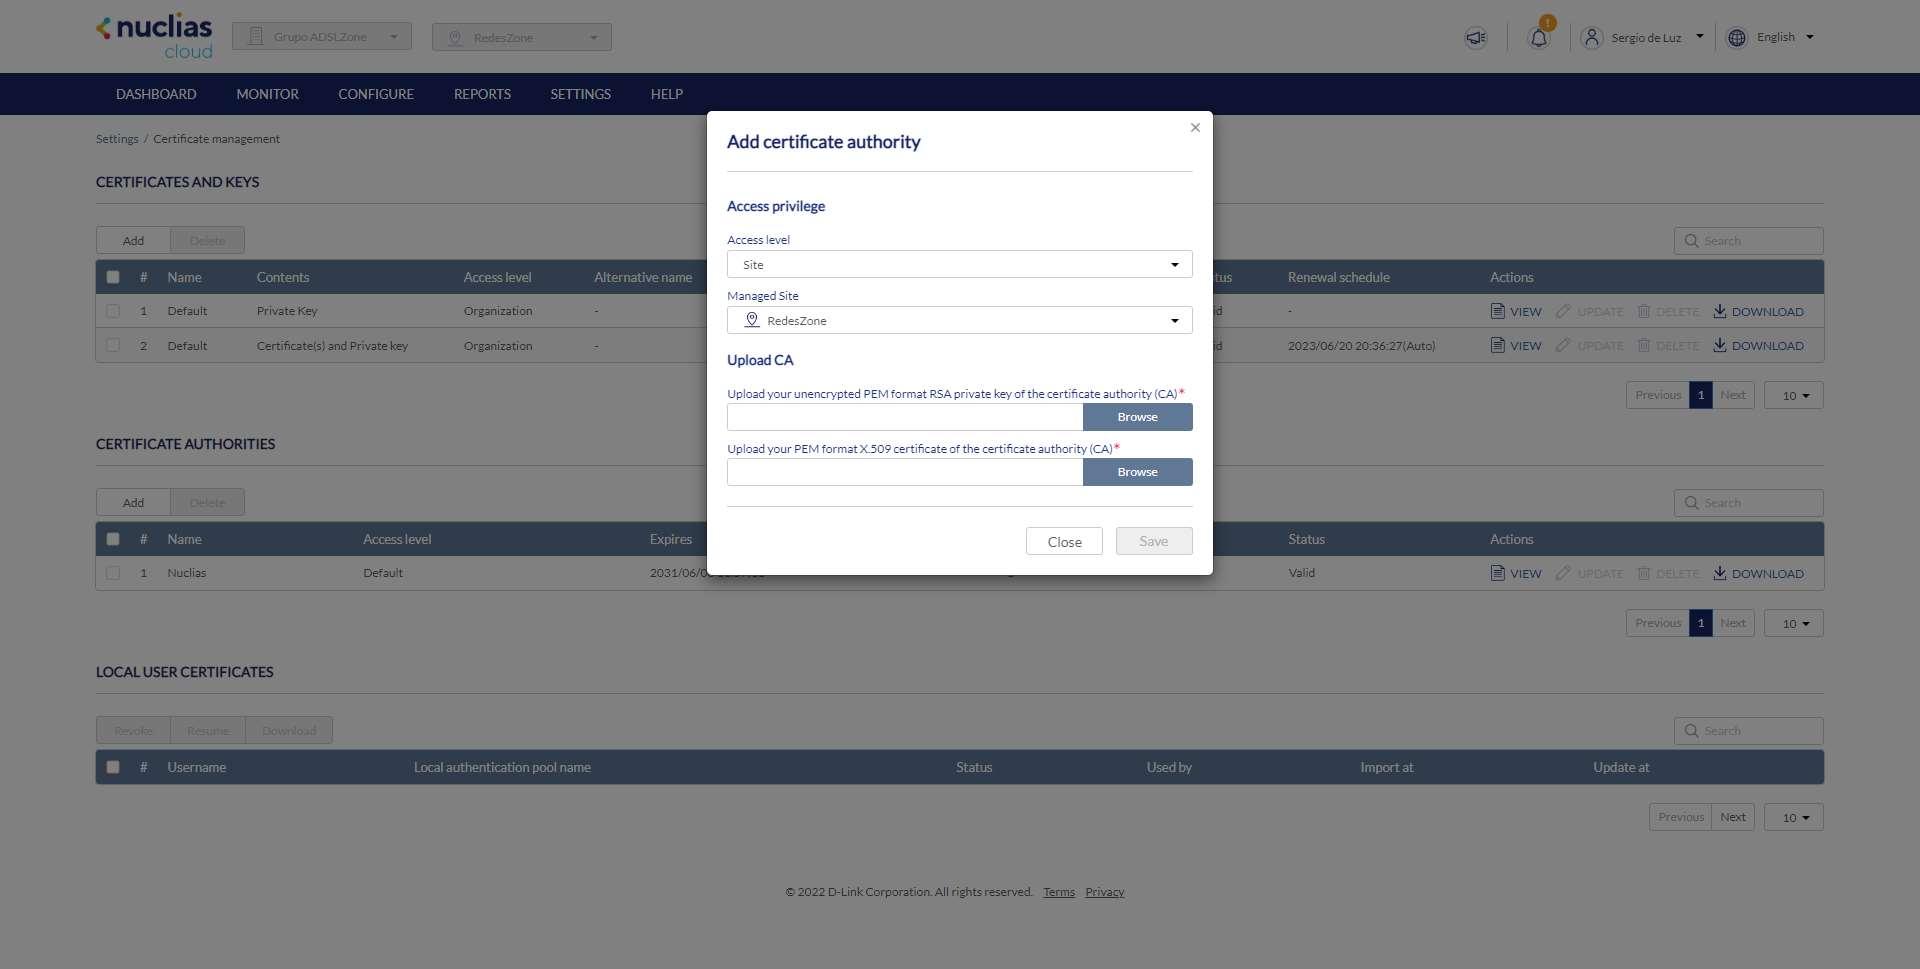
A very important detail is that we have the possibility of adding our own Certification Authority, we can upload it globally to all sites, or to a specific site. We always have to upload it in PEM format, both the public and the private key.
In our case, we are going to create the certificates by signing them with the Nuclias CA that we already have on the platform, in addition, it expires in 2031, so we have a lot of time ahead of us to be able to use these certificates that we will sign.
Create the digital certificate for the server
In the “Certificates and Keys” section, what we must do is click on “Add”. Then we will get a new menu where we can create a new certificate and key for the OpenVPN server. In the menu that will appear we have to choose:
- Issue certificate signing request
- common name: OpenVPN-Server
- Alternative Name: openvpn-server
- Signed by: nuclei
Once we have done this, click on «Save» so that the corresponding certificates and keys are created. After waiting a couple of minutes, in the main menu of the certificates we will already have it available to use. If we enter the certificate we can see that a 2048-bit RSA has been used, and we can download it at any time, although we won’t need to download it at any time. If we click on «update» we can see the same information as before, but we should not touch anything of the configuration made.
Once we have created the certificate, we must also create the TLS and DH keys.
Create the TLS key
Now we have to create the TLS key to add an additional security layer to the server, in this case what we have to do is the following:
- Generate private Key (DH/TLS)
- Key name: OpenVPN-TLS-Key
- key type: TLS Key
- key size: 2048-bit
We must also configure the access privileges, we choose “Site / RedesZone”, although you could also create it for all sites globally, there would be no problem and you could continue using it.
After waiting a couple of minutes, we will have the key created and available in the main menu. If we click on “View” we can see the private key and download it, if we click on “Update” we could change the name without problems, although we will leave it that way.
Create the DH key
Now we have to create the DH (Diffie-Hellmann) key, which is mandatory for the proper functioning of the server, without this it will not be able to work directly. In this case, what we must do is the following:
- Generate private Key (DH/TLS)
- Key name: OpenVPN-DH-Key
- key type:DH Key
- key size: 2048-bit
We can also configure the access privileges, we choose «Site / RedesZone“, although you could configure it globally, as in the previous case. The most normal thing is to have the DH key only for a «If you» specifically, and not for everyone.
In this case we also have to wait a couple of minutes for it to be available, we can see it and also edit the name of the key, although it is better to leave everything as it is at first.
Create allowed users
In order to connect to the VPN server, we are going to configure an authentication based on username and password, to know who is connecting to it at all times. To do this, we must go to the main menu of Nuclias Cloud and go to the “”Configure / Authentication / Local authentication list«. In this menu we click on the option «Add local authentication«, and in this menu we choose:
- Local authentication name: is an identifier name of the list of users that are allowed to connect. It is recommended that it be a fairly descriptive name, to later choose it through the web configuration menu. In our case we have chosen “RZ-OpenVPN” as the identifying name.
- Access Privilege: in this case we can choose the «Access Level» as «Site», and then choose the site «RedesZone» so as not to have this list for all the available sites. It is always advisable to give the minimum permissions possible, if we are managing a specific site, we create everything for that site and not for others.
- Add local authentication: here we will be adding one by one all the users and passwords that we want. You must bear in mind that these usernames/keys will be used later by the users, it is recommended that we use strong passwords.
- bulk import: If we have a file with hundreds of users and passwords from our company, we can upload it all at once to save a lot of time. We have only added one user, so it is not necessary to upload it as a file.
Once we have configured the users that are going to connect and also the certificates, we are ready to start configuring the server.
OpenVPN configuration on Nuclias Cloud
To configure the OpenVPN server, we must go to the «Monitor / Gateway / Devices / DBG-2000«. In the “VPN” section we must click on the “OpenVPN” area and all the available configuration options will appear. In this menu we must choose the following options:
In the “VPN Settings” section, we can configure it as follows:
- vpn networks: is the subnet where the clients will connect, the default subnet of this protocol is usually 10.8.0.0 so we set this configuration.
- vpn netmask: we choose the typical subnet mask 255.255.255.0
- Duplicate CN: click on disable.
- port: is the TCP/UDP port to be used by the server, it is recommended to change the default.
- tunnel protocol: It is recommended to use UDP because it is faster, so we will have better performance.
- Encryption Algorithm: AES-256 to choose the most secure.
- Hash Algorithm: SHA512 to choose the most secure algorithm.
- Tunnel Type: Full Tunnel to forward traffic, although we could also do Split tunnel. Depending on your needs, you can choose between the two options.
- User-based authentication: enable, and we choose the “local authentication” list that we have previously created with the name of RZ-OpenVPN.
- Certificate verification: enable
- Certificate: we choose the OpenVPN-Server that we have created previously.
Just below the certificate that we have chosen, we must continue with the security configuration:
- TLS authentication key: enable, and we choose the private key that we have created with this same name.
- DH Key: we choose the private key, it is mandatory to create a DH key if we want the server to work.
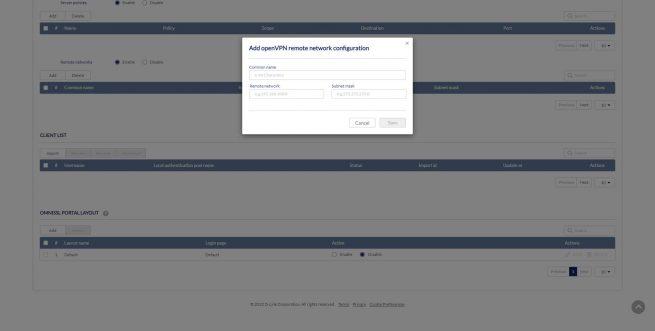
In the section of “Advanced Settings» is where we can enable the «Server policies» and also the «remote networks», in our case both options are disabled.
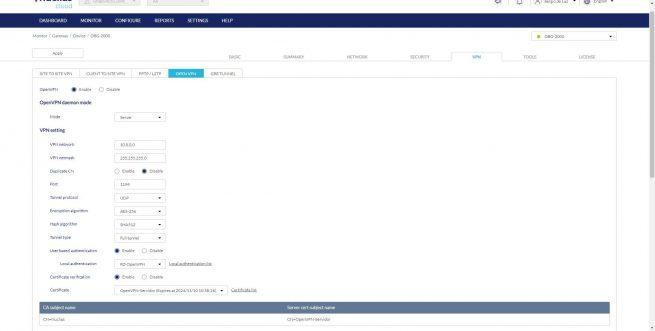
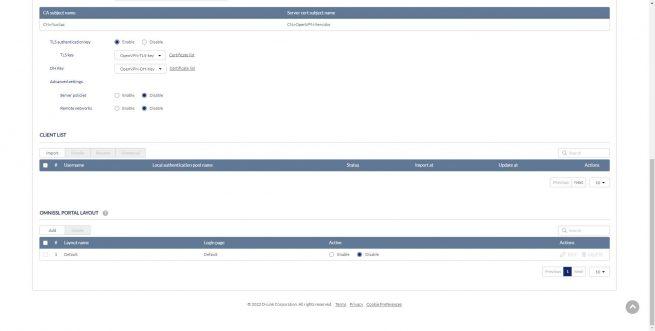
If we enable the «server policies» We can configure these policies on the server, both to allow and to deny the traffic. In the case of “Remote Network”, if we are creating a site-to-site tunnel with OpenVPNwe will have to use this option.

At the bottom where it says “client list«, we must click on «Import» and choose the list that we have created of allowed clients, and click on «Save». Once we have done so, the “Download” button will be activated, which will allow us to download all the OpenVPN server configuration in order to facilitate the connection to clients. It is advisable to click on the “Download” button and directly download the .ovpn file for the client that we want to use.
When we fully configure the server, we must click on the “Apply” button at the top left to apply the changes and that they are reflected in the DBG-2000. We must wait a few seconds until the server is available on the device.
Connection to the DBG-2000 server
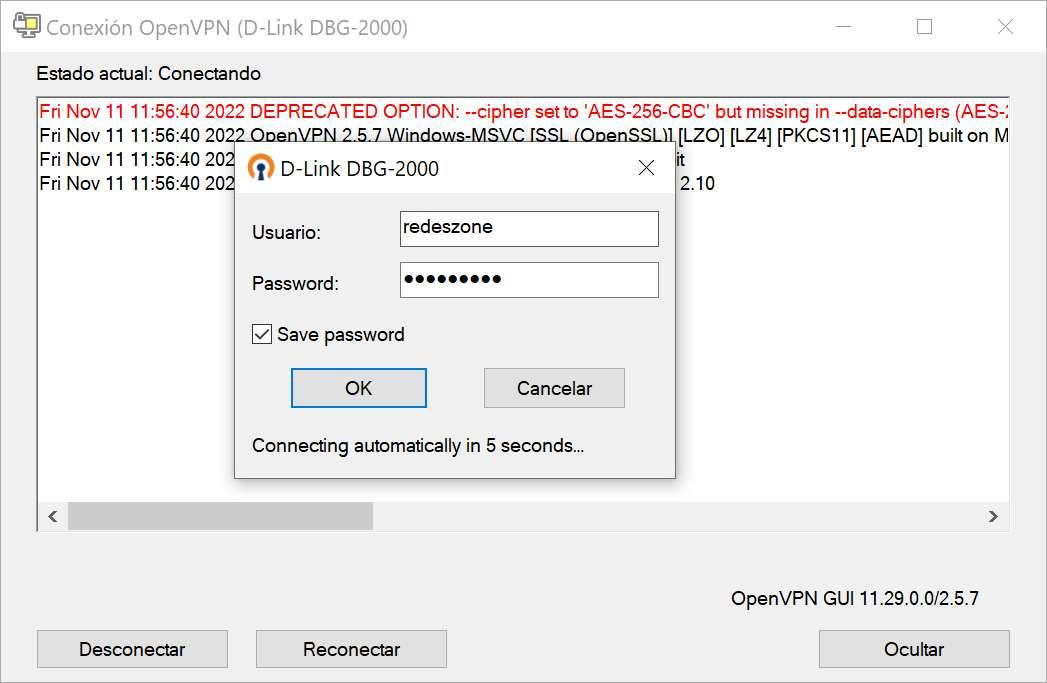
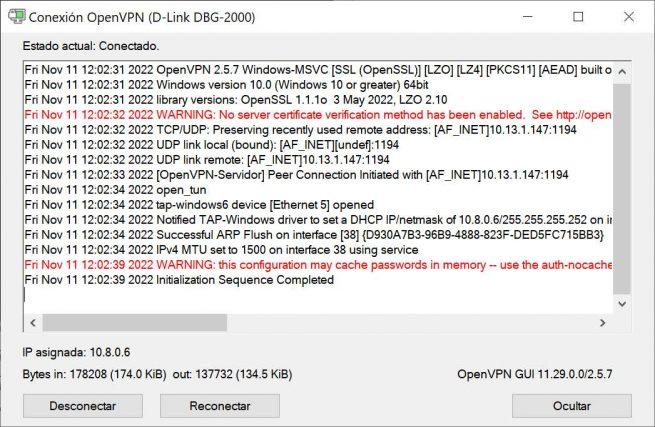
To connect to the server, just put the configuration file in the “config” folder of the OpenVPN software, or import this configuration file to connect later. When clicking on connect, we will need to know and put the username and password that we have previously created in the list of clients that can be connected.
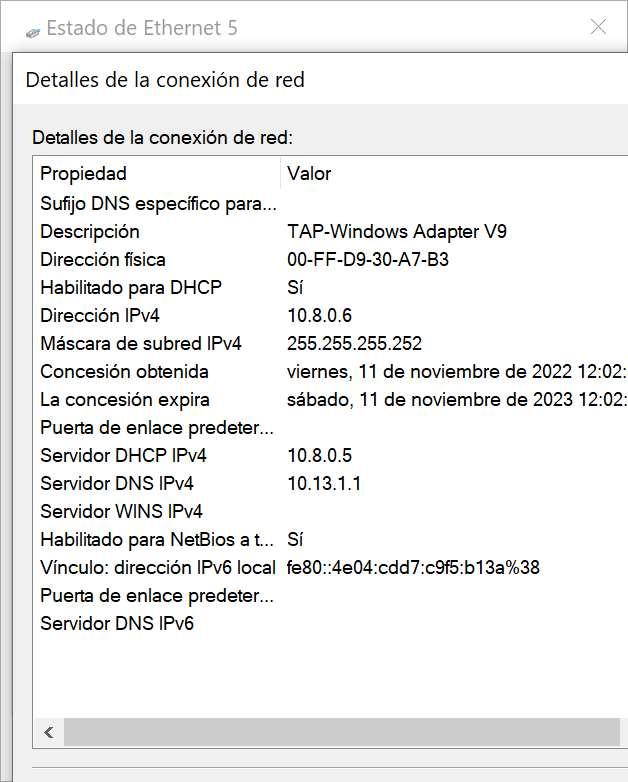
The connection has been made correctly without any problem, from this moment we can access the Internet through the DBG-2000, and we can also access all the networks that we have defined, by default they are all the subnets, although we could edit it accordingly. somewhat more advanced way through server policies.
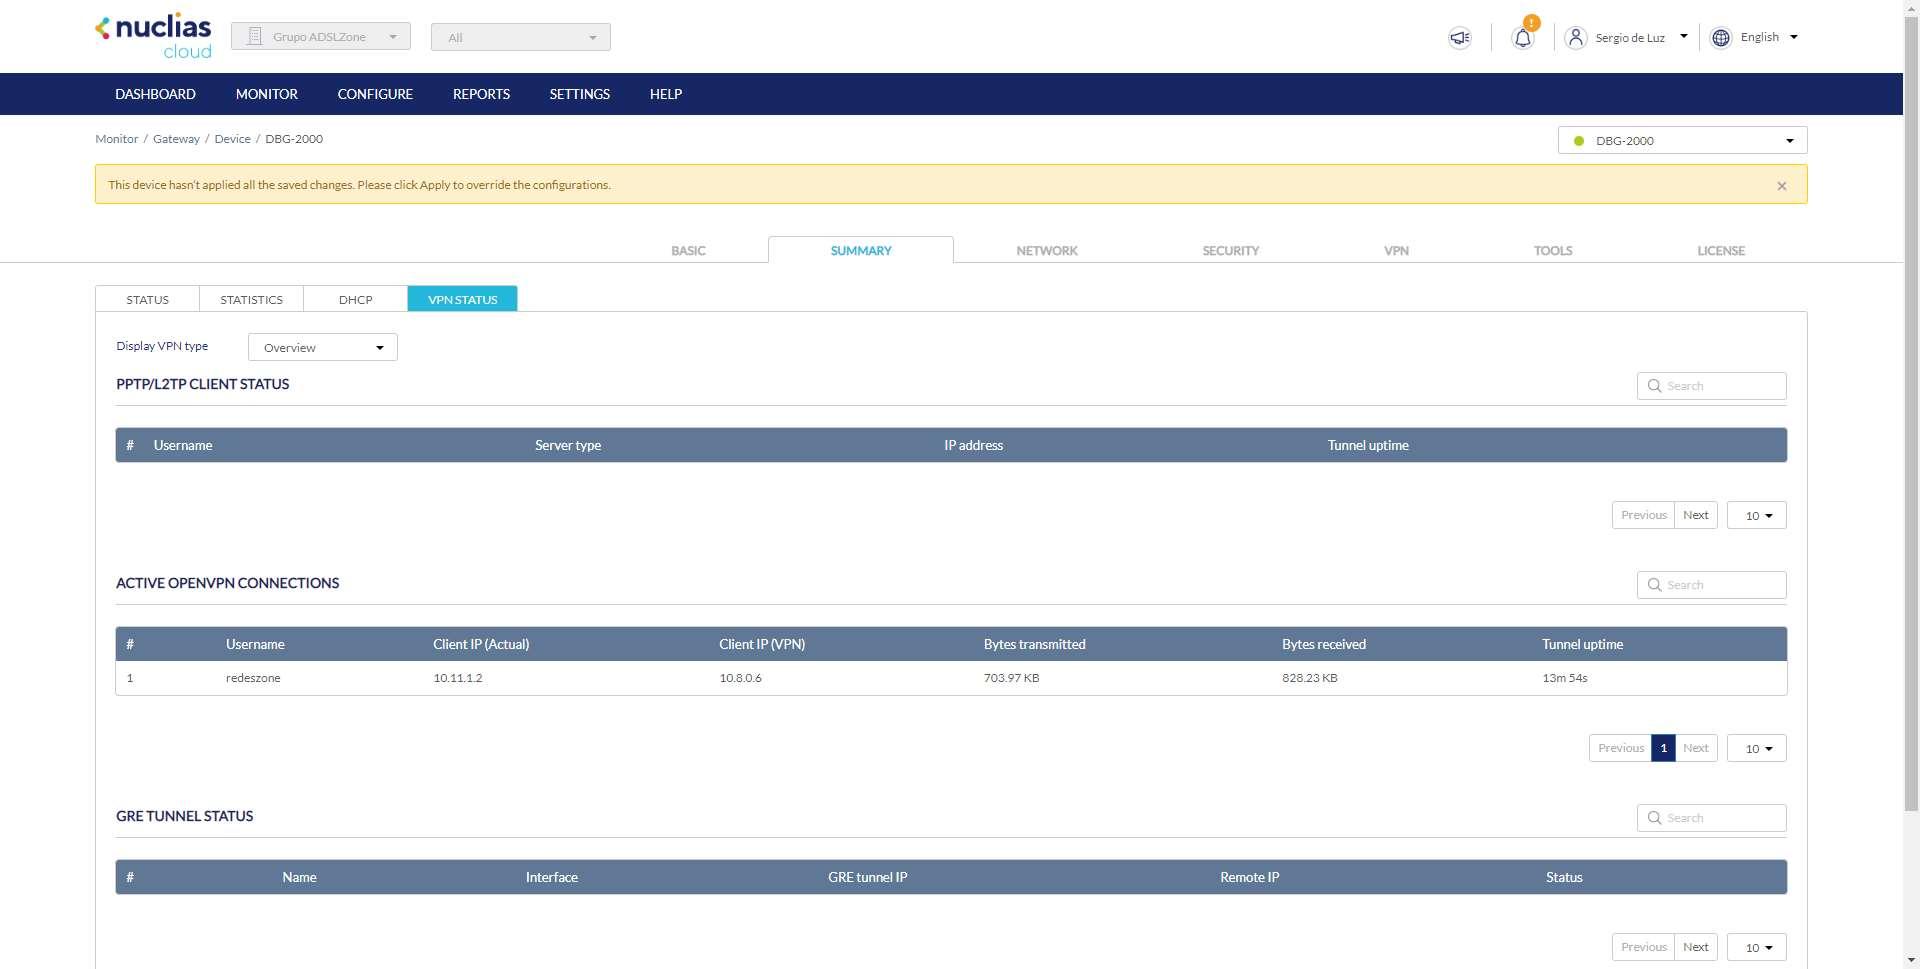
If now that we are connected, we go to Nuclias Cloud to the configuration menu of «Monitor / Gateway / Device / DBG-2000» and we go to the « tabSummary” in the section of vpn statuswe will be able to see the client that has just connected, with its corresponding IP address that the client has, the IP address assigned by the VPN server, the bytes transmitted and received, and also how long it has been connected to the server.
So far we have come with this tutorial where we have shown you step by step how to configure the OpenVPN server on the DBG-2000 using the Nuclias Cloud platform. As you have seen, it is quite simple, but we must follow the steps in order as we have taught you, because if we are going to configure the server directly we will not have the certificates created, the TLS and DH keys, as well as the list of allowed clients. It is essential to follow the correct order.