What ways do we have to connect remotely?
The Nuclias Connect Management is based on a web server, therefore, we must access a URL with our web browser and we will access the general administration website of all the access points, offices and networks that we have registered. In this simple way, we can monitor, administer and manage the entire network of access points in a centralized way. If you have Nuclias Connect for PC, you can also manage the switches centrally.
Ideally, Nuclias Connect was accessible via the Internet, both via the web with the browser as well as with the application for Android and iOS smartphones, with which we can quickly and easily monitor all the configured WiFi networks and access points. What other manufacturers do is use reverse connections to avoid security problems, in the case of Nuclias Connect we have a centralized control panel in the cloud from where we can click and go to each controller, whether software or hardware (with the DNH -100), however, it is mandatory that the router has a port open to the Nuclias administration website, which can be quite dangerous.
Open port and direct access
The shape easier to access remotely to the control panel via the web, is by opening a port on our router in the «Forwarding of ports» or «port forwarding». Although it is the simplest and easiest solution, also is the most dangerous, because we are exposing the Nuclias Connect web administration menu to the Internet. A possible attacker could not only try to gain access by trying user credentials, but could find a vulnerability in the web server and exploit it, to take full control of the device.
We do not recommend opening a port and directly accessing the administration website, because any cybercriminal could do a port scan, see that the port is open and accessible, and start trying different attacks to try to enter the Nuclias management.
Use a VPN
This is the safest way without a doubt, but also the most complicated to set up and the most annoying to use once everything is set up. With this option, you will have to mount a vpn server with protocols like IPsec, OpenVPN or Wireguard. This server must be on the router or on a NAS or PC server that you have in the organization. If you already have a VPN server set up, then you just have to make sure that you can access Nuclias Connect from the VPN subnet.

The negative part of this option is that you will always have to be connected to the VPN server if you want to access Nuclias, you do not have direct access, neither with the PC via the web nor with the mobile app. You will always need to have the VPN service running before attempting to access it, so this can become quite tedious.
Mount a reverse proxy
This is a very safe and very easy way to connect, although setup at first can be tricky, then thank you for putting a reverse proxy. The objective of this is that we can access our Nuclias through a subdomain of our main domain, only users who know that domain will be able to access the administration website, in addition, it works with HTTPS using Let’s Encrypt as CAand we can use TLS 1.3 to protect the connection as much as possible.

Other security options that we can implement are that they only have access clients with IP from Spainwe can also configure the security settings to be the most secure, lastly, we could also limit the number of packets to avoid brute force attacks. Finally, we could also put different plugins to add more security optionally, for example, we could add an OAuth to authenticate with our Google account to add a second authentication factor, however, if you put this you will not be able to access with the mobile app since it would not support it.
How to configure Traefik for Nuclias
The Traefik reverse proxy it can be installed through a Docker container, either on our Windows server, Linux and even a NAS server. Next, we provide you with the docker-compose that is responsible for installing Traefik, you can modify it based on your general configuration. In this Docker-Compose we also install Portainer for the management of all containers, but if you already have it installed, you can skip it. If you want to access with a purchased domain, you will have to configure it to point to our public IP address or to the DDNS domain, in our case
version: '3.7'
#Directorio Docker ${DOCKER_CARPETA} en el archivo .ENV
networks:
redeszone:
name: redeszone
driver: bridge
ipam:
config:
- subnet: 172.30.1.0/24
services:
## Portainer - Gestor Dockers
portainer:
container_name: portainer
image: portainer/portainer-ce:latest
restart: always
networks:
redeszone:
ipv4_address: 172.30.1.2
ports:
- ${PORTAINER_PUERTO}:9000
security_opt:
- no-new-privileges:true
volumes:
- ${DOCKER_CARPETA}/portainer:/data
- /var/run/docker.sock:/var/run/docker.sock
- /etc/localtime:/etc/localtime:ro
environment:
- PUID=${PUID}
- PGID=${PGID}
- TZ=${TZ}
labels:
- "traefik.enable=true"
## HTTP Routers
- "traefik.http.routers.portainer-rtr.entrypoints=web-secure"
- "traefik.http.routers.portainer-rtr.rule=Host(`portainer.${NOMBREDOMINIO}`)"
## Middlewares
- "traefik.http.routers.portainer-rtr.middlewares=simpleAuth@file"
## HTTP Services
- "traefik.http.routers.portainer-rtr.service=portainer-svc"
- "traefik.http.services.portainer-svc.loadbalancer.server.port=${PORTAINER_PUERTO}"
## Traefik proxy inverso
traefik:
container_name: traefik
image: traefik:v2.5.4
restart: always
networks:
redeszone:
ipv4_address: 172.30.1.3
ports:
- 80:80
- 443:443
- 8082:8082
security_opt:
- no-new-privileges:true
volumes:
- /var/run/docker.sock:/var/run/docker.sock:ro
- ${DOCKER_CARPETA}/traefik/traefik.yml:/etc/traefik/traefik.yml
- ${DOCKER_CARPETA}/traefik:/etc/traefik
- ${DOCKER_CARPETA}/traefik/letsencrypt:/letsencrypt
environment:
- PUID=${PUID}
- PGID=${PGID}
- TZ=${TZ}
labels:
- "traefik.enable=true"
# HTTP-to-HTTPS Redirect
- "traefik.http.routers.http-catchall.entrypoints=web"
- "traefik.http.routers.http-catchall.rule=HostRegexp(`{host:.+}`)"
- "traefik.http.routers.http-catchall.middlewares=redirect-to-https"
- "traefik.http.middlewares.redirect-to-https.redirectscheme.scheme=web-secure"
# HTTP Routers
- "traefik.http.routers.traefik-rtr.entrypoints=web-secure"
- "traefik.http.routers.traefik-rtr.rule=Host(`traefik.${NOMBREDOMINIO}`)"
## Services - API
- "traefik.http.routers.traefik-rtr.service=api@internal"
## Middlewares
- "traefik.http.routers.traefik-rtr.middlewares=simpleAuth@file"
The source code of the .env file for all passwords would be the following:
##### PUERTOS
PORTAINER_PUERTO=9000
##### SISTEMA
PUID=1000
PGID=1000
TZ=Europe/Madrid
DOCKER_CARPETA=/share/Container/Docker
Once Traefik is installed in the Docker container, we now need to put the following configuration in the file túfik.yml (the static file):
global:
checkNewVersion: true
sendAnonymousUsage: true
entryPoints:
web:
address: ':80'
http:
redirections:
entryPoint:
to: web-secure
scheme: https
web-secure:
address: ':443'
http:
tls:
certResolver: lets-encrypt
traefik:
address: ':8082'
log:
level: DEBUG
filePath: /etc/traefik/logs/traefik.log
accessLog:
filePath: /etc/traefik/logs/access.log
api:
insecure: true
dashboard: true
debug: true
#pilot:
# token: "TOKEN QUE CONSEGUIMOS DESDE LA WEB"
experimental:
plugins:
GeoBlock:
moduleName: "github.com/PascalMinder/GeoBlock"
version: "v0.1.6"
ping: {}
providers:
docker:
endpoint: unix:///var/run/docker.sock
exposedByDefault: false
watch: true
swarmMode: false
file:
filename: /etc/traefik/dynamic-conf.yml
watch: true
certificatesResolvers:
lets-encrypt:
acme:
email: "sergio.deluz@grupoadslzone.com"
storage: "/letsencrypt/acme.json"
httpChallenge:
entryPoint: web
In the case of the dynamic configuration file, the configuration that we recommend is the following:
#Configuracion dinamica de Traefik
#Configuracion de TLS
tls:
options:
default:
minVersion: VersionTLS12
sniStrict: true
cipherSuites:
- TLS_ECDHE_ECDSA_WITH_AES_128_GCM_SHA256
- TLS_ECDHE_ECDSA_WITH_AES_256_GCM_SHA384
- TLS_ECDHE_ECDSA_WITH_CHACHA20_POLY1305
- TLS_ECDHE_RSA_WITH_AES_128_CBC_SHA256
- TLS_ECDHE_RSA_WITH_AES_256_GCM_SHA384
- TLS_ECDHE_RSA_WITH_CHACHA20_POLY1305
- TLS_AES_128_GCM_SHA256
- TLS_AES_256_GCM_SHA384
- TLS_CHACHA20_POLY1305_SHA256
curvePreferences:
- CurveP521
- CurveP384
#HTTP routers para el Traefik, listado:
# - D-Link Nuclias Connect
http:
routers:
router-https-nuclias-connect:
rule: Host(`nuclias-connect.redeszone.net`)
entrypoints:
- web-secure
middlewares: chain-sin-autenticacion
service: service-https-nuclias-connect
tls:
certResolver: lets-encrypt
services:
service-https-nuclias-connect-dnh-100:
loadBalancer:
servers:
- url: "https://IP:443"
#Middlewares HTTP para Traefik
middlewares:
chain-sin-autenticacion:
chain:
middlewares:
- GeoBloqueo
- limitePaquetes
- seguridadCabeceras
#Seguridad para las cabeceras de la comunicación HTTPS.
seguridadCabeceras:
headers:
accessControlAllowMethods:
- GET
- OPTIONS
- PUT
accessControlMaxAge: 100
addVaryHeader: true
browserXssFilter: true
contentTypeNosniff: true
forceSTSHeader: true
frameDeny: true
sslRedirect: true
sslForceHost: true
stsPreload: true
customFrameOptionsValue: SAMEORIGIN
referrerPolicy: "same-origin"
featurePolicy: "camera 'none'; microphone 'none'; payment 'none'; usb 'none'; vr 'none'; vibrate 'self';"
stsSeconds: 315360000
hostsProxyHeaders:
- "X-Forwarded-Host"
#Middlewares para poner un limite de datos intercambiados
limitePaquetes:
rateLimit:
average: 350
burst: 500
period: 1m
sourceCriterion:
ipStrategy:
depth: 2
#Middlewares para comprobar dirección IP de origen. Solo se permite España.
GeoBloqueo:
plugin:
GeoBlock:
allowlocalrequests: true
loglocalrequests: true
api: https://get.geojs.io/v1/ip/country/{ip}
countries:
- ES
Once everything is assembled, we can access our Nuclias Connect via HTTPS using the same port 443 as always, since we make the request to Traefik, and it will direct us to the Nuclias web server, first passing through the different filters or “middlewares” that we have. If we are system and network integrators, we can set up a reverse proxy in each installation with the aim of accessing the Nuclias management via the web without the need for a VPN or opening ports (which is not secure).
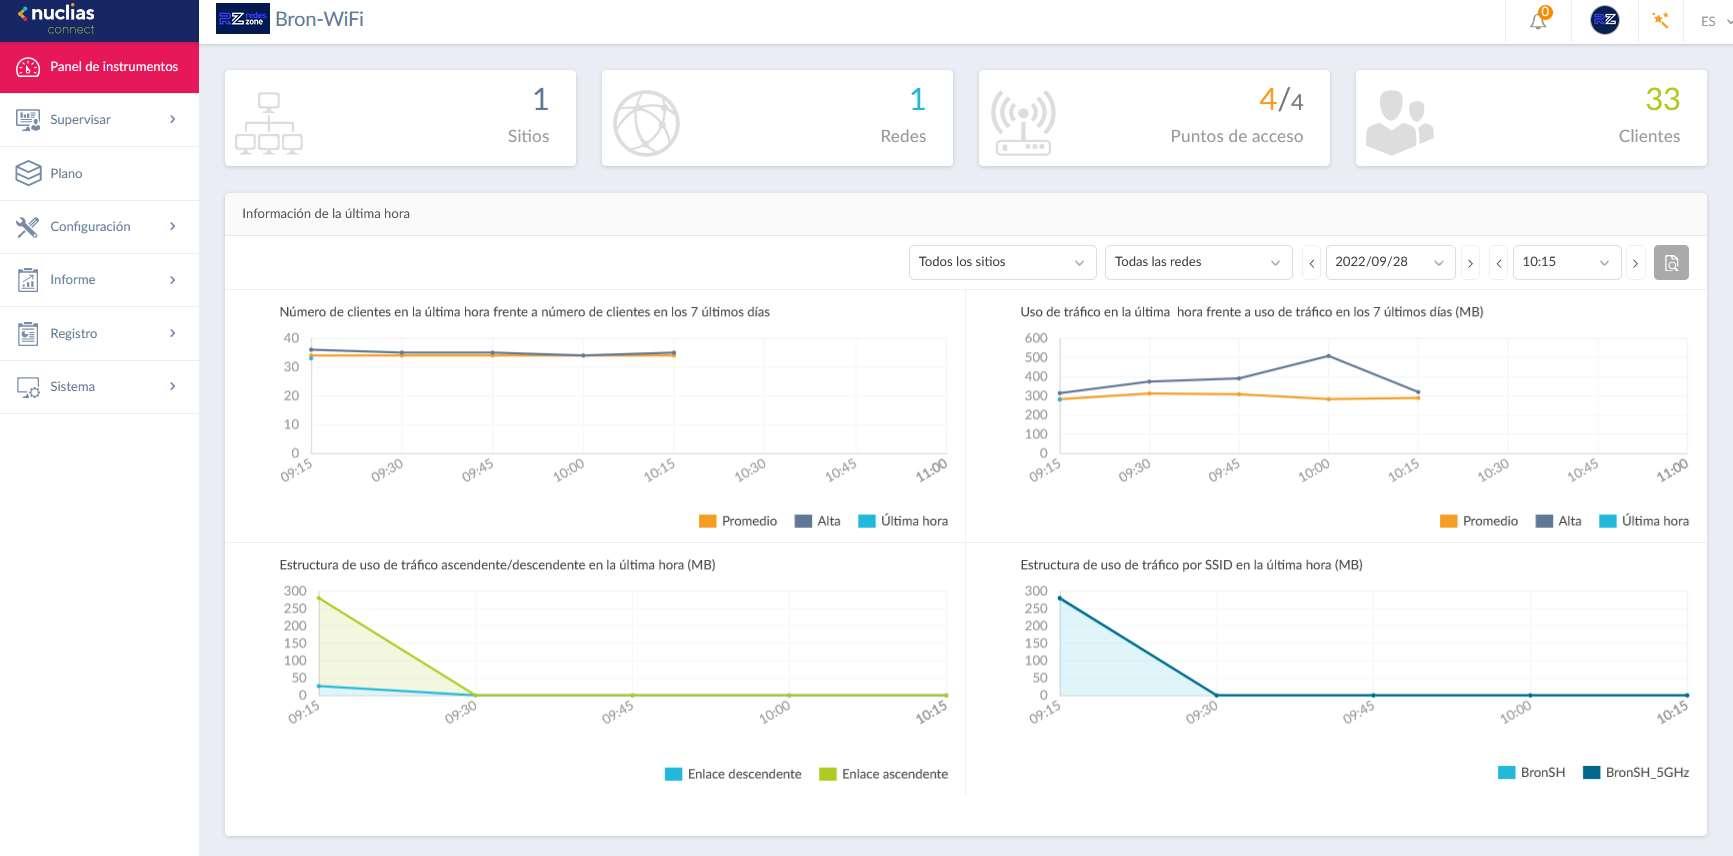
Next, you can see how our Nuclias would be accessed from the Internet, using a domain:

We can see that the Let’s Encrypt certificate is perfectly installed and working, in addition, the connection is TLS 1.3:

With the same URL where we access the Nuclias administration website, we can put it in the smartphone application and we can also access it. Remember that if you decide to put an additional authentication to access, with the typical username and password, or an OAuth2 type authentication, you will not be able to access with the smartphone, only via web with the browser.