However, despite being quite discreet, automatic updates are still a feature that continues to bother many users. In the event that we have decided that they do not run automatically, we will not find any configuration in the browser to be able to deactivate it.
Updates in Google Chrome
When Chrome is the most used browser worldwide, it is for a reason. Google knows this and is permanently in charge of carrying out updates, which beyond eliminating any fault is also in charge both add and remove workss of this. This is something that can annoy certain users, as they suddenly find that a function that they have used regularly for a long time is lost without them being able to do anything to prevent it.
Despite this, it is important to understand that, if we disable Chrome updates, our browser may become vulnerable to security issues, as well as losing some new functions that are incorporated.
In this case, the possibility of sticking to a specific version of Chrome may be especially interesting to us in order to continue using that function that we know can end up disappearing as soon as the browser is updated. Although Google does not incorporate any function that allows us to stop automatic updates, the truth is that there are different ways to do it from Windows 10, easily and in a few steps.
Ways to disable updates in Chrome
If for whatever reason we have decided that we want to stop the automatic updates of Chrome, we are going to comment on different ways that we have available in Windows 10 to carry them out.
Rename the Chrome updates folder
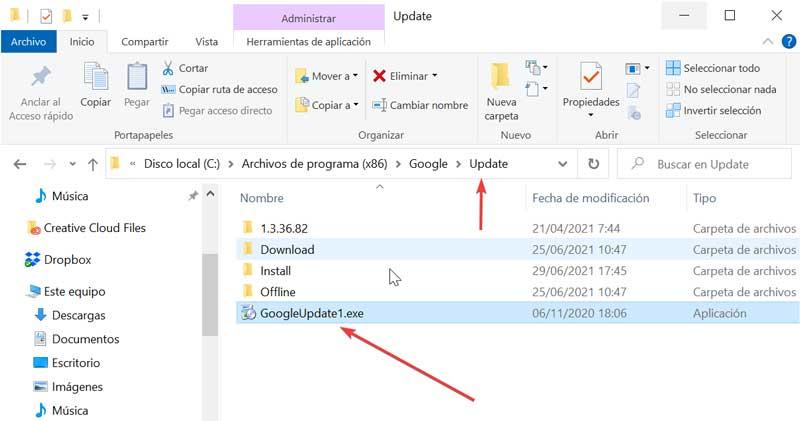
Without a doubt the easiest method to disable Chrome updates. To do this, it will only be necessary to access its installation folder, which should generally be found in the path:
C: / Archivos de programa (x86) / Google / Update
Once here we will only have to change the name of the file GoogleUpdate for, for example, GoogleUpdate1. In this way the automatic update will not be carried out again.
Disable the Google update service
Google Chrome carries out its updates only in the event that a service called Google Updates is running. Therefore, if we turn off the service, the browser will stop looking for or downloading updates.
To do this we will press the keyboard shortcut “Windows + R” which will open the Run window. Here, we will write services.msc and we will press Enter or the Accept button to confirm.
Within the list of Services we must find and select “Google Update Service (gupdate)” and “Google Update Service (gupdatem)”. We click on each of them with the right mouse button and select “Properties”.
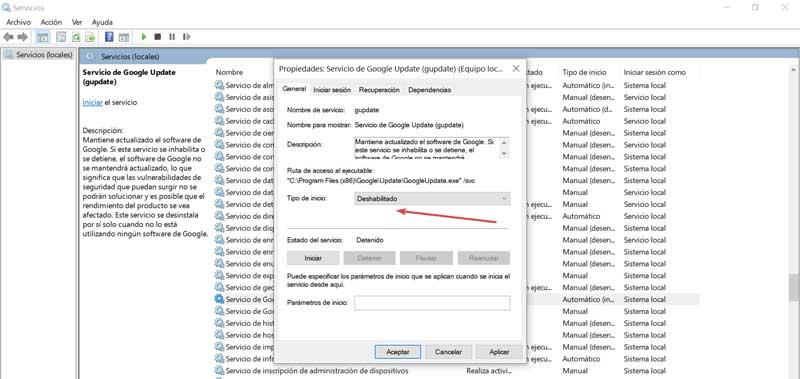
Inside the “Properties” window we go to the “General” tab. Within the tab «Startup type» we must select the option of «Manual» or «Disabled». Finally, click on “Apply” and “OK” to save the changes.
Once the action is performed in the two options, Chrome will stop searching and downloading updates automatically.
Using Windows 10 Task Scheduler
Another possibility that we have available to deactivate the automatic updates of Google Chrome is through the “Task Scheduler” in Windows 10. To open it, we will write task scheduler in the search bar next to the Start menu and select it from the results.
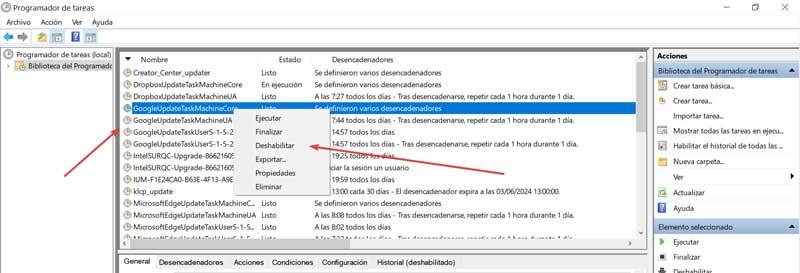
Once open, we select Task Scheduler Library in the left column. Here, we must look for all the tasks related to GoogleUpdate. Then we will click the right button on each of them and select “Disable”.
From System Settings
We can also disable automatic updates for Chrome from the System Settings. To do this, we must press the keyboard shortcut Windows + R to open the Run command. Here we write msconfig and we click Integer we press the Accept button to confirm.
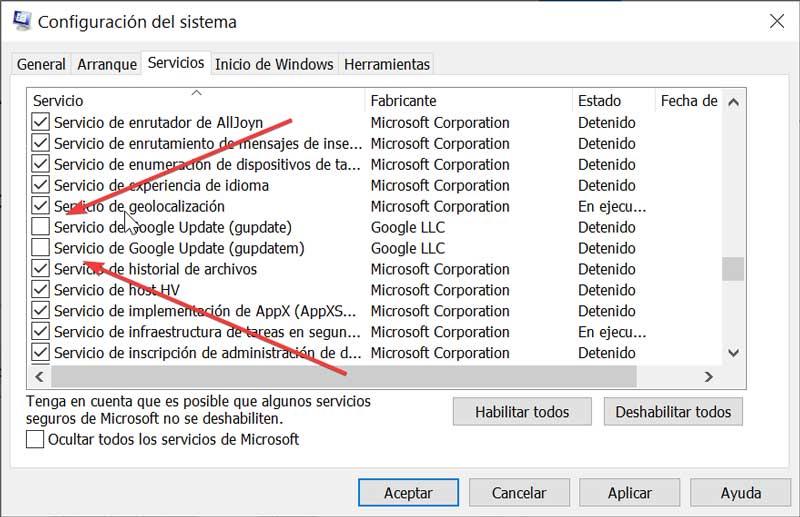
Once in the System Configuration window, click on the Services tab. At the bottom we must find the entries for “Google Update Services (gupdate)” and “Google Services (gupdatem)”, and uncheck them. Finally, click on “Apply” and “OK” to save the changes. Once we restart our PC the changes will take effect.
Disable updates from Registry Editor
Finally, we will be able to prevent Chrome from continuing to update automatically by editing the registry keys. To do this, we press the keyboard shortcut Windows + R, to launch the Run command. Here we write regedit and press Enter or the OK button to confirm.
In this way we access the Registry Editor. We must use this function with great care as any invalid modification can cause performance problems in the system. Therefore, we must use it under the own responsibility of each user.
Next, we must navigate to the following route:
HKEY_LOCAL_MACHINE / SOFTWARE / Policies / Google
Subsequently, we click with the right mouse button on the Google folder, select New and Key. Once the key is created, we change its name to Update. Then we right-click on a blank space (under Default) and choose New and 32-bit DWORD Value. We change the name of the new key to Updatedefault. We double click on it and in Value information we put 0.
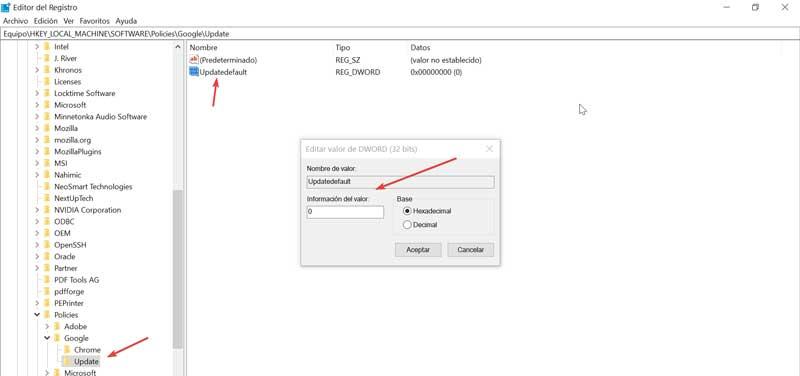
We click OK to save the changes and exit the Editor. Finally, we restart so that the changes are accepted.
How to update Google Chrome manually
Once we have disabled automatic updates, we will keep the current version that we have in Chrome until we decide to download a new version manually.
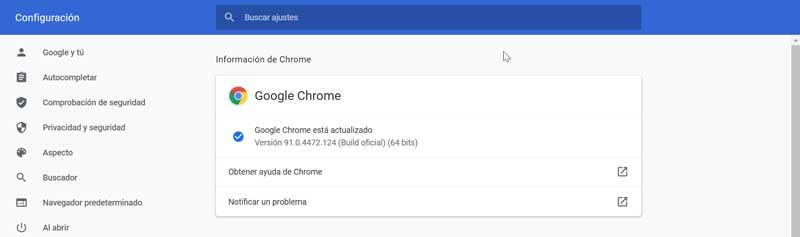
To do this we must open our Chrome browser and click on the three points in the upper right. This will open a menu where we must select the option “Help” and “Google Chrome Information”.
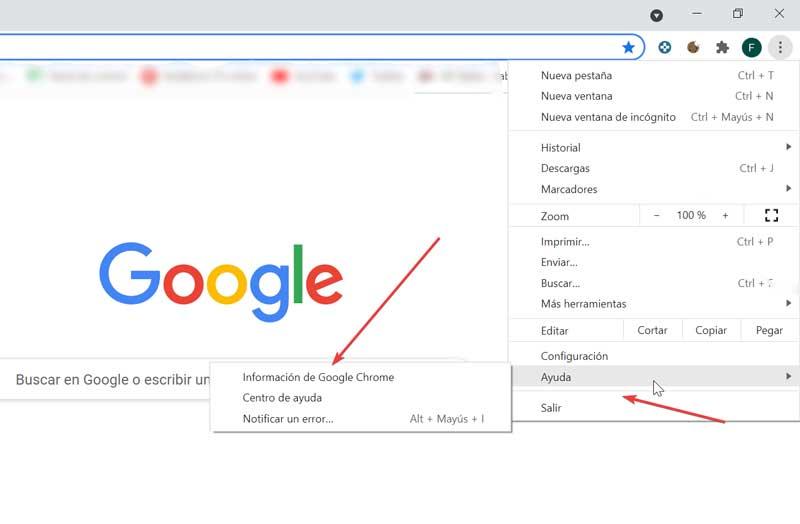
This will open a new tab and Chrome will take care of checking for updates. In case there is a new update available, it will be downloaded and we will only have to restart Chrome for the update changes to take effect.