One of the elements that are most taken into account when using this type of application is its customization capabilities. That is why we are going to talk about the management and customization of margins, which we find in Docs. This is an element that is usually common in most programs of this type. Without a doubt, Google’s word processor has become the great alternative to Microsoft’s Word, as it is free and has the most important functions. That is why not a few users have chosen to use it through the browser.
Margins and indentation, is it the same?
When we talk about margins we are referring tol unused white space between the content and the edges of the document, appearing, therefore, in the side boxes: top, bottom, left and right. These do not contain text or images, as their general purpose is to prevent the text from colliding with the boundaries of the document. Generally, the default margin is 2.54 centimeter on each side of the page. However, it can be customized to our liking, to modify and manage the appearance of the document.
That is why, although the margins that are predefined by default are valid and useful in most cases, it is still true that there may be circumstances where we must know how to customize them, so it is important to know how to carry out this task .
However, it is very important that let’s not confuse margins with indents. These are blank spaces that are included between the margin and the first line of the paragraph. In addition, it is possible to have different indentations within the same document, but instead it is only possible that there is one margin.
As we are going to see, the margin adjustment process is simple, which we can carry out in a matter of seconds. We can do it from the ruler that we see on the screen, such as from the menu bar. Of course, we must bear in mind that this change can affect the entire page in its entirety or select a paragraph and make it adapt to that content.
Methods to change them in Google Docs
Next, we are going to see the different ways we have to change the margins and adapt them to our needs. In Google Docs, margins can be set using the ruler to make rough changes, simply by dragging the mouse, or in a much more detailed way using the page setup window.
Adjust using the ruler
Once the corresponding document is opened, we can see how the rules are located in the upper left part of it. In case they are not shown, we must activate it by clicking on «View» and then on «Show rule». The first refers to the left and right margins, while the other controls the upper and lower margins. In the same way, we can see how the gray area of the ruler is in charge of informing us what is the current margin that we have defined.
That is why it is a section of easy access and that we can use to adjust it to our needs. To do this, it will only be necessary to click on the separator marked with a small blue arrow, to later drag it along the available margin to be able to adjust the fill. As we have commented, the default value of the space is placed in the 2.54 cm, which is equal to one inch. Therefore, this adjustment can be carried out on both sides of the document quickly.
We also see how a bar and two blue triangles inverted have appeared in the upper rule. These are the so-called indentation settings for the paragraphs of the document. In general, these are aligned with the margins, but if we modify them, it allows the content of a specific paragraph or a selected region to overflow towards the margin. Similarly, this is done by preserving the margins of other paragraphs.

As with the margins, these can also be adjusted by clicking on them and dragging them to the location we need. On the one hand, the blue bar is in charge of adjusting the indentation of the first line of the paragraph in which the cursor is located. On the other hand, the left arrow is responsible for adjusting the indentation of the entire paragraph, while the right arrow modifies the indentation located on the right side.
From Page Settings
However, if we want to be more precise, in the event that we have to make a special type of document in terms of size, we can choose to use the settings in the Page Settings window. In this way, as we will see below, we will be able to create specific margins, instead of dragging the ruler’s separator, as well as perform some complementary functions.
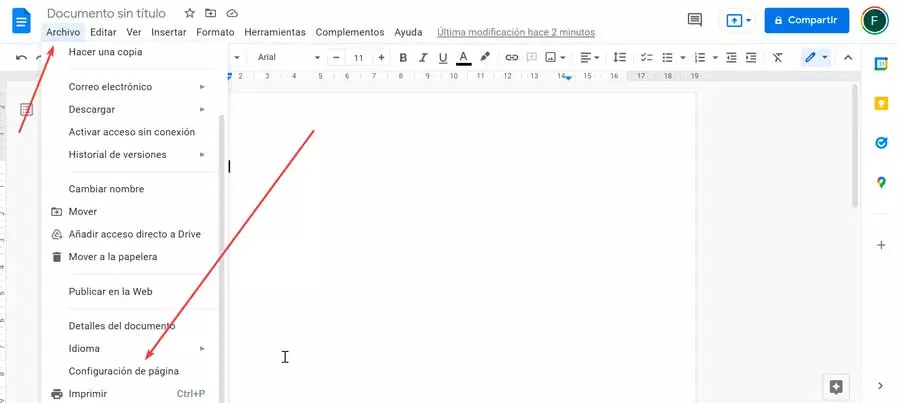
To access this section it will only be necessary to click on the “File” tab. Later in “Page setup”, from where we will have the possibility of manually entering those values that we want to assign to the margins of the document.
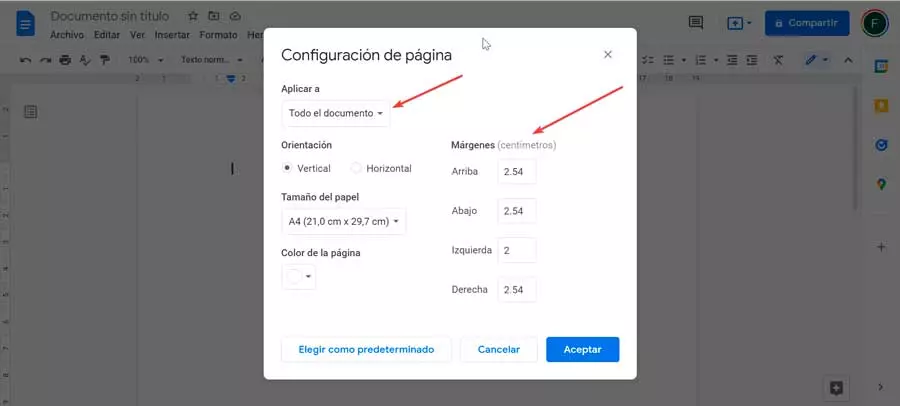
In the new window that appears on the screen we can enter exact measurements of the lower, upper, left and right margins (in centimeters). If we wish, we can modify the default parameters (2.54 centimeters) by the desired margin, and set them to remain fixed every time we open a new document. To do this, once the desired margins have been established, click on the “Set as default” button. In the event that we only want to change them for this document in question, just click on “Accept” so that the established changes are saved and applied.
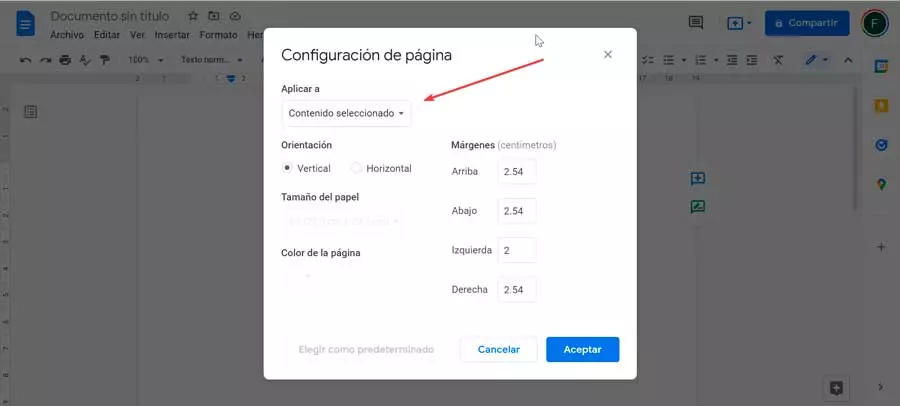
Similarly, changes to the margins can also be applied to only one section within the document. To do this, it is enough to turn out that section, then access the “Page Configuration” window and in the “Apply to” field, select “Selected content”. The result of this action is similar to modifying the indentation of that paragraph, but in this case it splits the highlighted content on its own page.