What is the SMART of the discs
All hard drives and SSD drives have a technology called SMART, or also known as SMART which stands for “Self Monitoring Analysis and Reporting Technology”. This technology incorporated in the firmware of hard drives and SSDs consists of detecting possible failures in the hard drive, with the aim of anticipating physical errors in the hard drive or unexpected failures in SSD drives due to writing to internal flash memory. . The goal of SMART is to alert users so they can back up and replace the drive without having any data loss. If we ignore the SMART, there will come a time when the hard drive will break and we will lose data, so it is essential to always pay attention to the SMART data of the disks.
In order to use SMART, it is absolutely necessary that the BIOS or UEFI of the server is compatible with this technology and that it is activated, in addition, it is also absolutely necessary that the disks incorporate it. Today all servers, operating systems and disks use this technology to detect problems in the hard disk, we could say that it is “universal” and that it is always used.
This technology is responsible for monitoring different parameters of the hard disk, such as the speed of the disk platters, bad sectors, calibration errors, cyclic redundancy check (the typical CRC errors), disk temperature, data reading speed, time starting (spin-up), reallocated sectors counter, search speed (seek time) and other very advanced parameters that allow you to know what is important: if the hard drive is going to fail soon.
Internally SMART has a range of values that we can consider “normal”, and when a parameter goes out of these values, that is when the alarm goes off, the BIOS/UEFI will detect it and notify the operating system that there is a failure in the system. disc and that can be serious. In Linux operating systems we have the possibility of carrying out SMART tests to check if the disk is working correctly, in addition, we have the possibility of programming these tests to minimize the impact on performance.
How to view disk health
In most Linux based distributions we have a package called smartmontools. Sometimes this package is pre-installed in our distribution, and other times we have to install it ourselves. This package has two different programs:
- smartctl: It is the command line program that allows us to verify the hard drives and SSD drives on demand, or we can program its operation through the typical cron in the operating system.
- smartd: is a daemon or process that verifies that the hard drives or SSDs in a specific interval have not had any failures. It is capable of registering any type of warning or disk error to the main syslog of the server, it also allows sending these same warnings and errors by email to the administrator so that he can verify that everything is correct.
The smartmontools package is responsible for monitoring hard drives and SSD drives, regardless of whether they use SATA, SCSI, SAS or NVME interfaces, it supports any type of data interface. Of course, this program is completely free.
Installation
The installation of this program, if it is not installed by default in your Linux distribution, is using the package manager of your distribution. For example, on Debian operating systems with apt it would be as follows:
sudo apt install smartmontools
Depending on the package manager of your distribution, you will have to use one command or another, the important thing is that this package is available for all Unix-based distributions and also Linux, so you could also install it on FreeBSD without problems.
Using smartctl
In order to use this program and check the health of our hard drive, the first thing we must do is know how many hard drives we have, and what is the path to examine those hard drives or SSDs in question. In order to know where the disks are, we must execute the following command:
df -h
We could also use fdisk to get the list of disks that we have on our server:
sudo fdisk -l
These commands will show us a list of the units and also of the partitions. We have to use this program at the hard disk or SSD level, not at the partition level. Generally in Linux systems we will find the disks in the /dev/sdX path.
Once we know which drive we are going to analyze to check its health through SMART, we must know that there are a total of two different tests that we can perform:
- Short test: This test is most commonly used to detect disk problems. When performing this test, it will show us the most important errors and warnings, without the need to analyze the entire disk in detail. We can schedule this short test through cron to be weekly, in this way, once every week it will perform this analysis and notify us if it has detected any errors. It is advisable to do this test at a time when there is little or no use, it is not recommended to do it during working hours, better at dawn.
- long test: This test can take a long time, depending on the drive and its capacity. By performing this comprehensive test, it will show us all the warnings or errors it finds on the entire disk. We can schedule this long test with cron to be done monthly, that is, once every month we will perform this test to check the health of the disk. It is advisable to do this test at a time when there is little use of the disk, for example, at dawn, because otherwise the reading and writing performance as well as the data access latency will increase considerably.
Once we know the two types of tests that we can use, the first thing we need to know is if the hard drive or SSD has SMART enabled:
sudo smartctl -i /dev/sda
In the event that the disk supports SMART but is not activated, we can activate it by executing the following command:
sudo smartctl -s on /dev/sda
To see all the SMART attributes of the manufacturer of the disk in question, we can execute the following command:
sudo smartctl -a /dev/sda
To perform a short test we execute the following:
sudo smartctl -t short /dev/sda
To perform a long test we execute the following:
sudo smartctl -t long /dev/sda
Once we have performed the short or long test, we can execute the following command to see all the results:
sudo smartctl -H /dev/sda
We recommend reading the man pages of smartctl where you will find all the commands that we are going to be able to execute to use the possibilities of SMART, however, the main commands are the ones that we have explained to you.
What values should I look at?
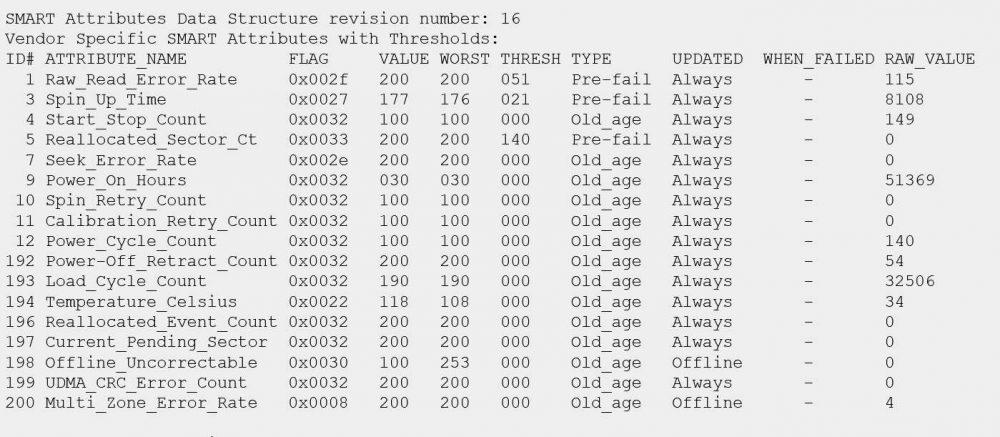
When we do a SMART test, a large number of attributes of our hard drive or SSD will appear. Some of these values are critical that we pay close attention to, because they could give us “clues” that the disk is going to fail very soon:
- Reallocated_Sector_Ct: is the number of sectors that have been reallocated to other areas of the disk because there have been read errors. This error is very typical when a disk is very old and is near the end of its useful life.
- Spin_Retry_Count: is the number of attempts that have been necessary to boot the disk, this indicates that there is a serious hardware problem in the disk, and it might not boot next time.
- Reallocated_Event_Count – The number of reallocations that have been performed, either successfully or unsuccessfully. The higher the number, the worse the health of the hard drive.
- Current_Pending_Sector: number of sectors that are pending to reallocate soon.
- Offline_Uncorrectable: number of uncorrectable errors when accessing, either reading or writing, to different sectors of the disk.
- Multi_Zone_Error_Rate: total number of errors during the writing of a sector.
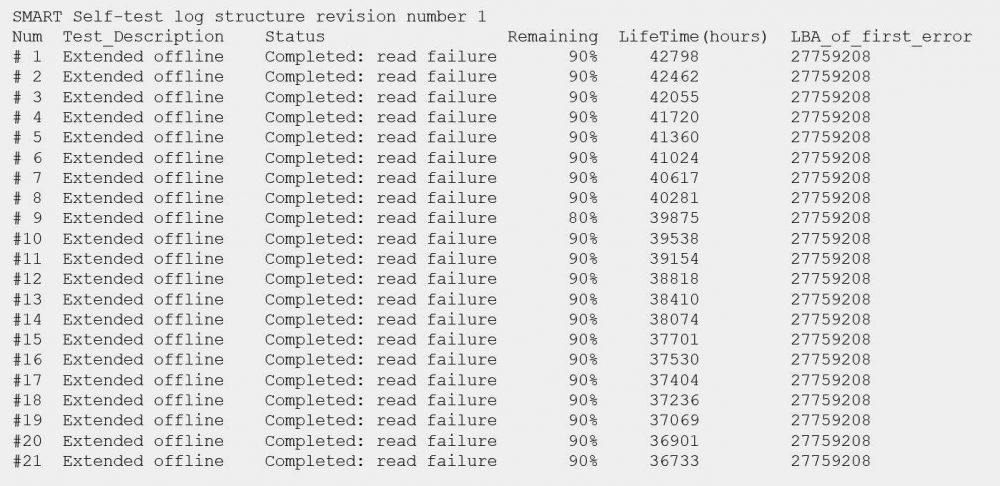
In the following image you can see the status of a WD Red 4TB hard drive from our NAS with the XigmaNAS operating system:
In the previous capture you can see a large amount of information, but we must know if it is an isolated failure or our disk may fail soon.
Status of disks in QNAP NAS
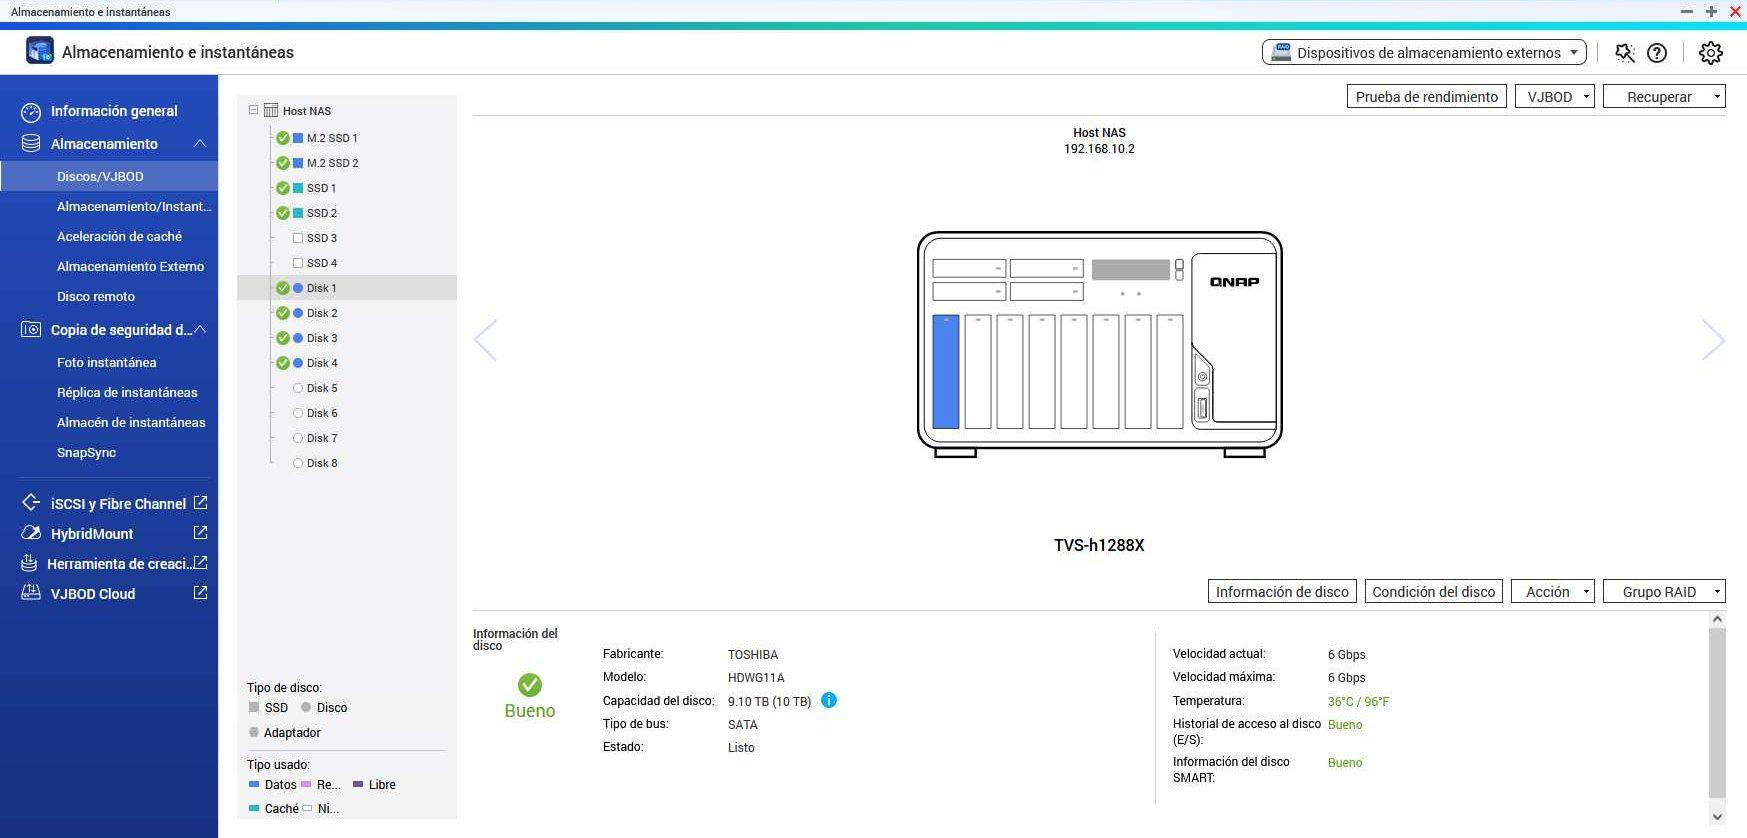
If you have a QNAP, Synology or ASUSTOR NAS server, you will also be able to see the SMART status of your hard drives and SSDs through the operating system with web access, there is no need to enter via SSH or Telnet and execute any commands. In the example below we have used a QNAP NAS server, but the process with the other manufacturers would be very similar.
The first thing we have to do is go to the «Storage and snapshots«, once here, click on «Storage / Disks» and we will see something like this:
If we click on “Disc Condition«, we will have to choose which album we all want to watch. We can select both HDD hard drives as well as SSD drives, no matter what type they are because they also have internal SMART information to see if there is a disk error.
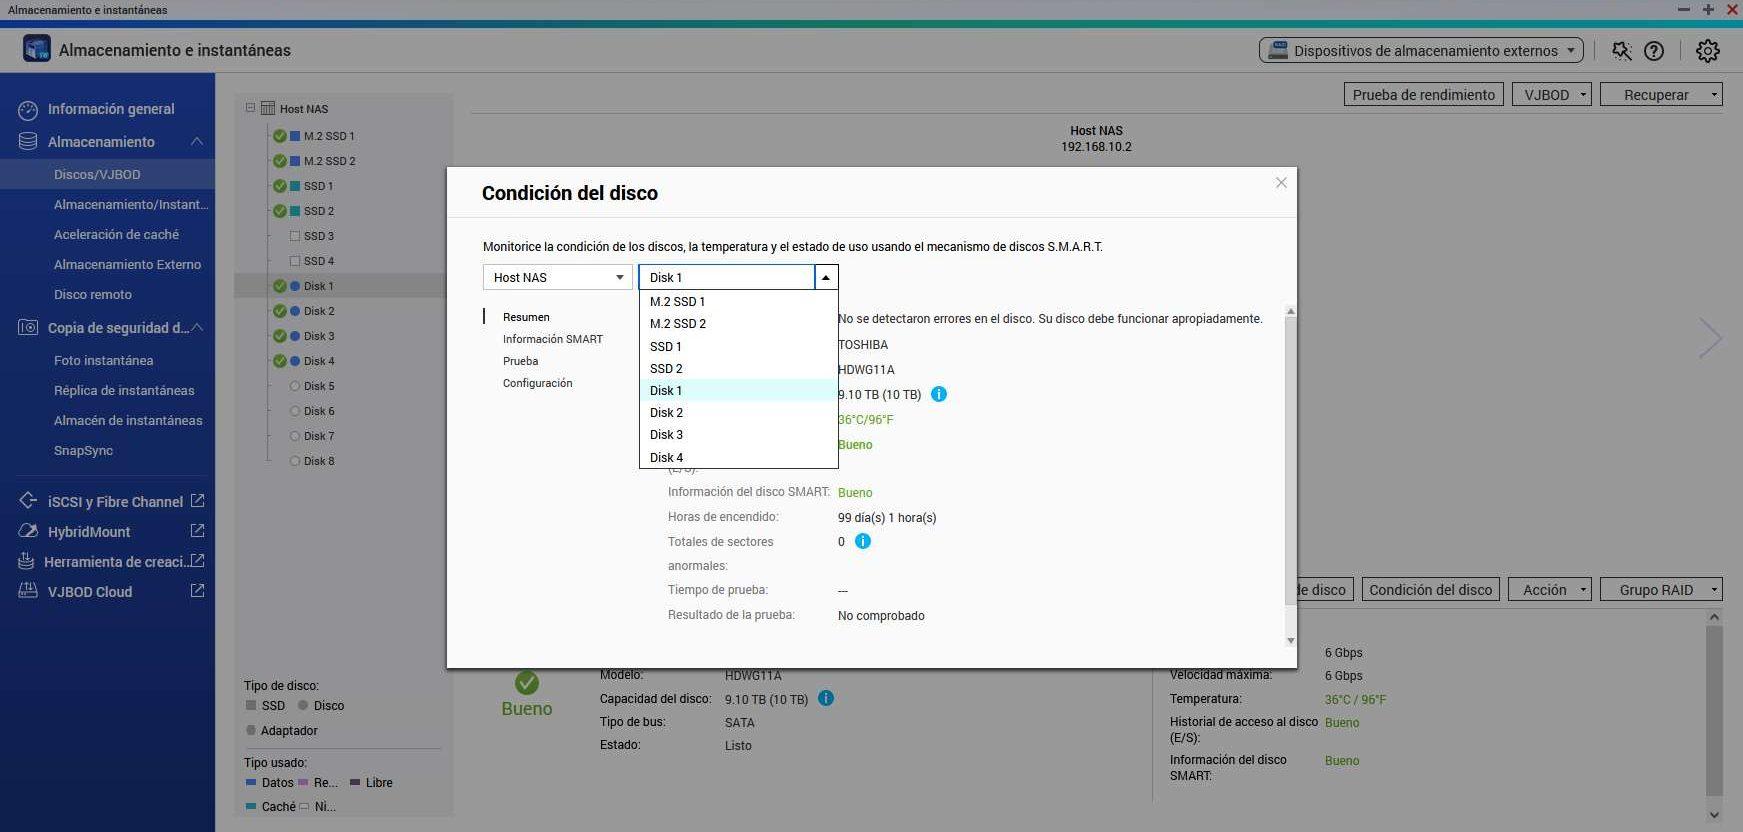
In the “Summary” menu we can see the general status of the disk, if there is any type of error or serious warning, we can also see the general health easily and quickly, without the need to carry out a detailed analysis of the SMART values . Of course, we can also see the disk access history and if there have been any problems.

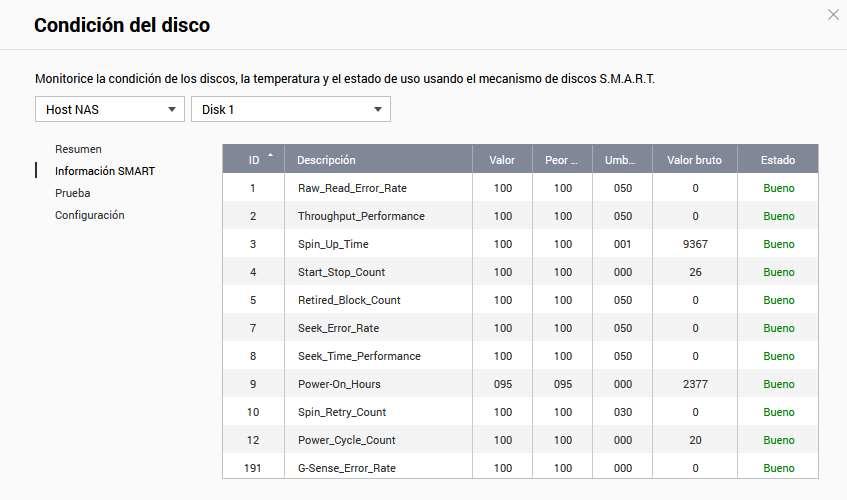
Although QNAP provides us with very easy to understand information, in case we want to see all the raw values, we will also be able to do it without problems. In addition, we will have an additional column that tells us “Status” and if it is good or bad.
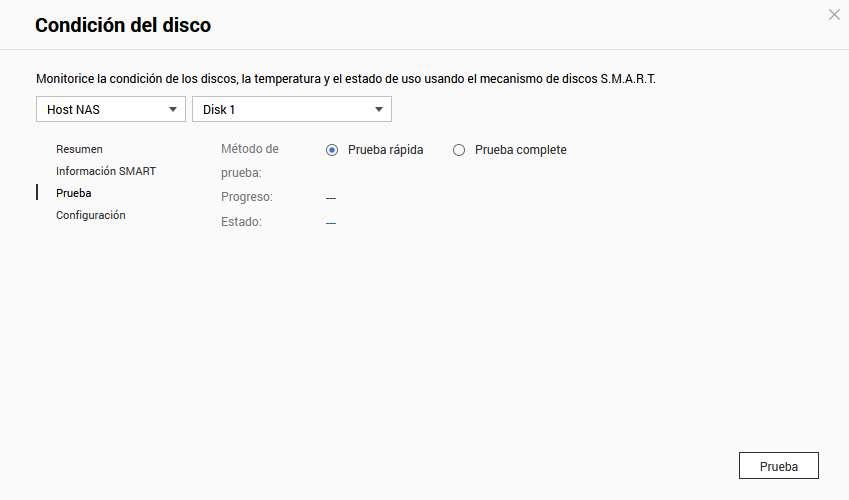
We will be able to do quick or complete tests through here, we simply have to choose the test method and then click on the “Test” button.
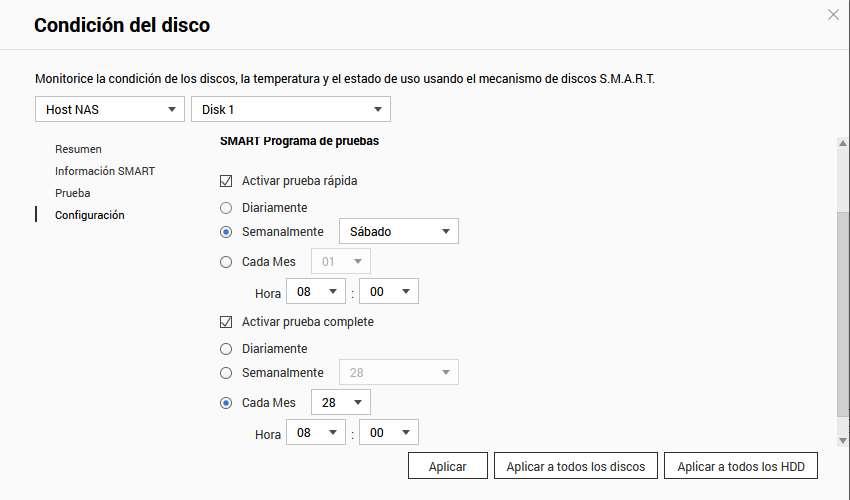
Finally, we can also program these tests in a very easy way, we simply have to choose to activate quick or complete test, and choose the frequency: daily, weekly or monthly, in addition, we can define the start time of this test.
As you can see, checking and verifying the health status of hard drives and SSDs in a server is something really important to avoid data loss. When any kind of error occurs, it is very important to buy a new drive and make a backup to avoid data loss. In addition, we should also check the status of the RAID because we could cause the loss of the entire storage pool, especially if we have configured a ZFS RAID 0 or Stripe.