- Failure in connection to the Internet or the local network.
- Not having remote desktop activated.
- Windows 10 RDP client not working.
- Firewall or antivirus configuration problems.
- After a Windows update it stops working. In this case, the solution is usually to uninstall.
- The remote desktop option is not enabled.
- Remote desktop credentials failure. The easiest way to fix the problem here is to delete those credentials and recreate them.
Now we are going to see some solutions for when the remote desktop does not connect to our computer.
Check the internet connection and if remote desktop is enabled
The first thing we have to do is check that the computer to which we are going to connect has an Internet connection. In this case we must see if we can navigate, download files and if we can also do our usual tasks normally. Also, if we can, we should watch for a while and see if the connection breaks down. Problems can sometimes be caused by the power options of the network card or Windows.
One of the reasons why we have the error that the remote desktop does not connect, is because it is not enabled. If we want to do it, we will follow these steps:
- Start Menu.
- Control Panel.
- Security system.
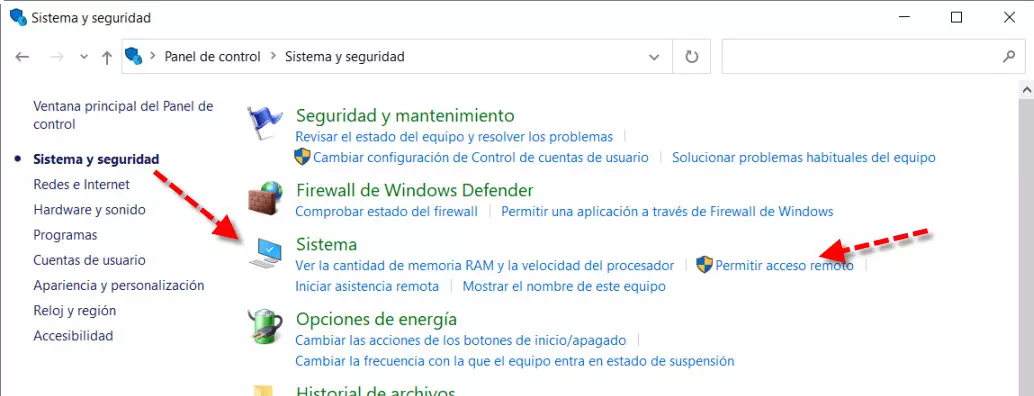
Then we will see a screen like this, and in System we will click on Allow remote access.
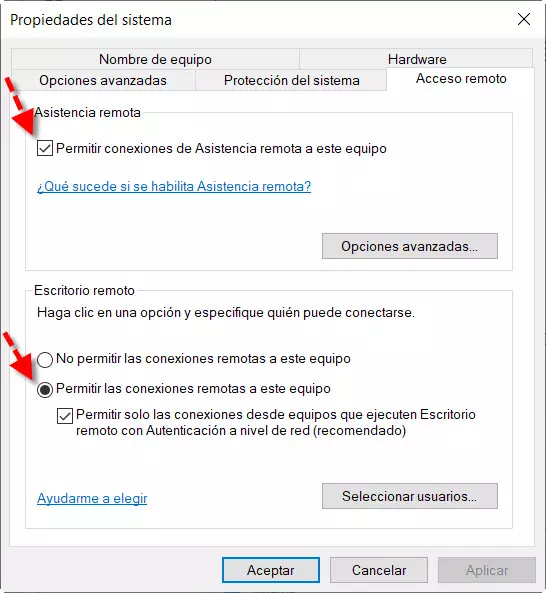
Next, we will see a screen like this. The first box of Remote assistance It is usually enabled by default, but for security reasons, someone may have decided to deactivate it and that is why it is the one that we have to check with special attention. The second we can activate it here or in another place that I will show you later.
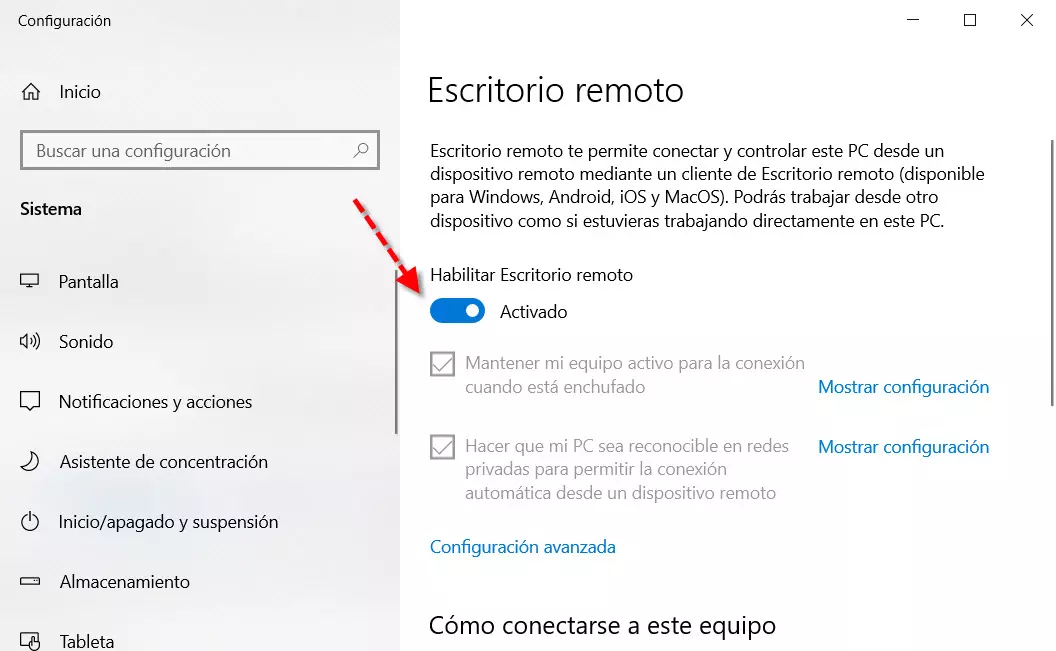
Also in Start Menu, Remote Desktop Settings we can enable it like this:
Either this way or the other, we have to have this option activated if we do not want to have problems.
What to do if you don’t connect due to a bad firewall configuration
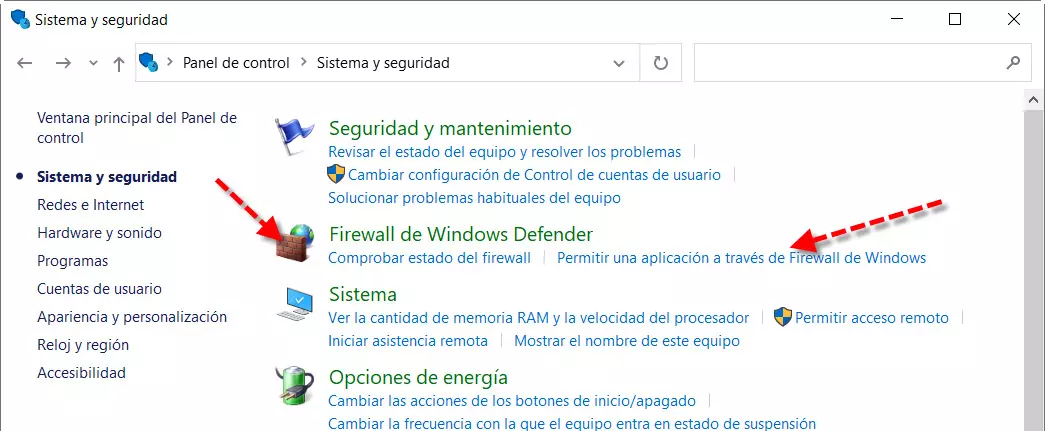
Either the Windows firewall or one of third parties that we have installed, it must have a rule configured that allows it to be used. In the case of Windows 10, we would go to Start Menu, Control Panel, on Windows Defender Firewall we click on Allow an application through Windows Firewall:
Then we click on the button Change settings and among the applications and features allowed we look for Remote Desktop.
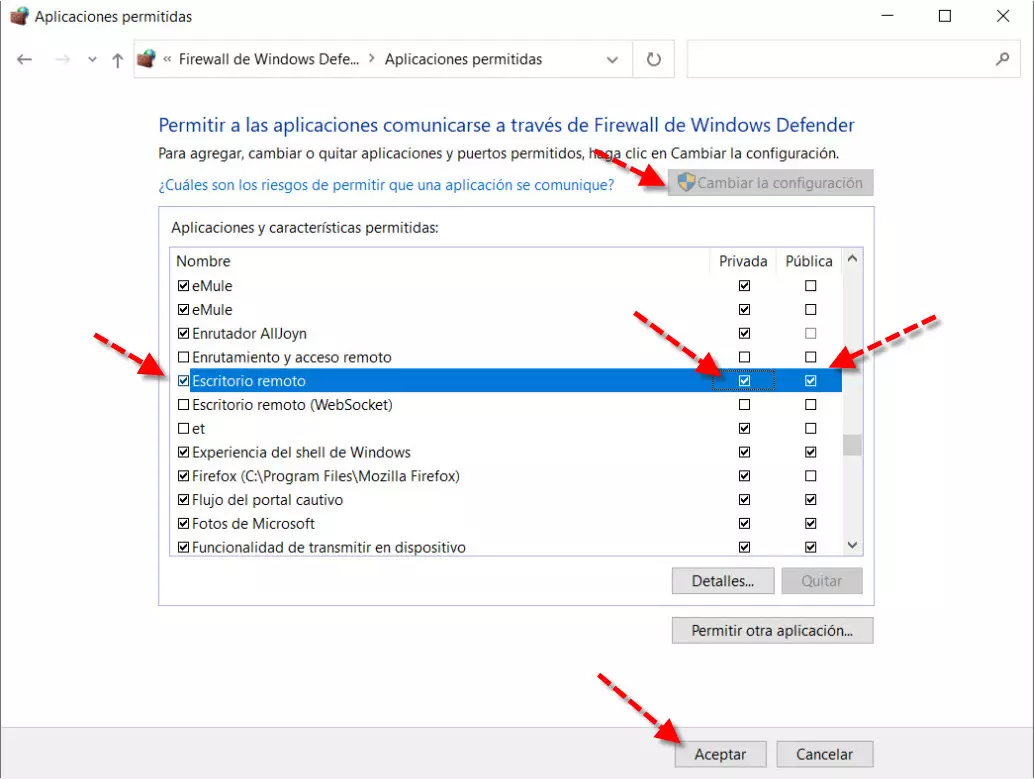
There we activate the private and public network boxes and click on the “Accept” button. Another thing to check if there are still problems is the port 3389 which is the one that remote desktop uses. In the event that the firewall was blocking it, we could not use it. Sometimes a quick reset of the firewall can fix this problem.
Router configuration as the source of the problem
Another thing that we have to take into account is that that PC has to be assigned a fixed local IP. We can do this in Windows in the TCP / IP configuration of our network adapter. The other option we would have would be to establish it in the static DHCP of the router, in this way, by entering the MAC address of our network card and a private IP address that we define, the DHCP server will always provide our equipment with the same IP address as we have indicated.
Next, inside the router, to that fixed local IP that we have put on our computer, for example 192.168.1.2, we have to open the port used by the remote desktop if someone is going to access it remotely from the Internet. As for the default port used is 3389, however, for security reasons, the ideal would be to use a random one between the range of 40000 to 60000. If you have a VPN server in your home or business, then we recommend using the VPN to connect to the local network, and later use private addressing to connect to the remote desktop, without the need to open any port for security.
Check the RDP status on a remote computer
One of the causes for the remote desktop not connecting may be related to the RDP status. This procedure is done using the registry editor. If we want to check that everything is in order, we will follow these steps:
- Start Menu.
- We are going to Run.
- There we write regedit.
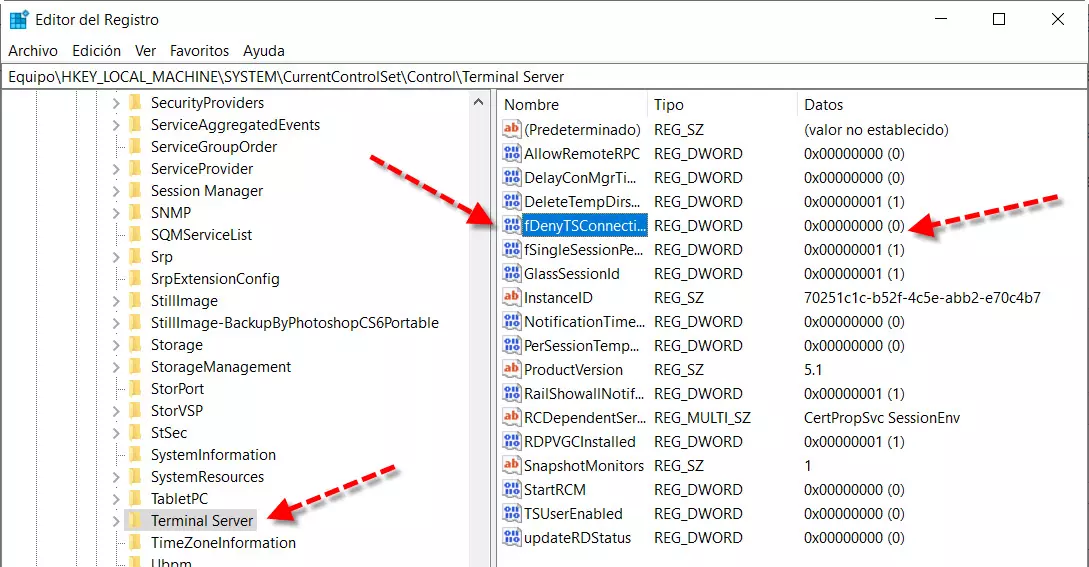
As it is a sensitive section, it is advisable to make a backup copy of the registry. In the editor we select the menu option File, we choose To export and we choose the location and the name of the file. Then we have to look for the following key in the registry:
HKEY_LOCAL_MACHINESYSTEMCurrentControlSetControlTerminal Server
Here we have to look at the value of the key fDenyTSConnections:
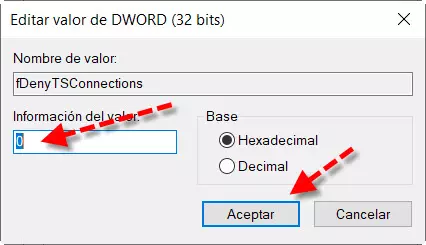
If we want to enable RDP on the remote PC, we change the value information from 1 to 0 to activate it. We simply double click on the key and edit it like this:
Remote desktop does not connect due to group policies
Let’s start by opening an execution window with the key combination Win + R. There we write gpedit.msc to open the Local Group Policy Editor. Then we have to follow the path «Computer Configuration / Administrative Templates / Windows Components / Remote Desktop Services / Remote Desktop Session Host / Connections».

Then we double click on Allow users to connect remotely using Remote Desktop Services. So we can modify its properties, in this case what we have to do is set the directive as Enabled.

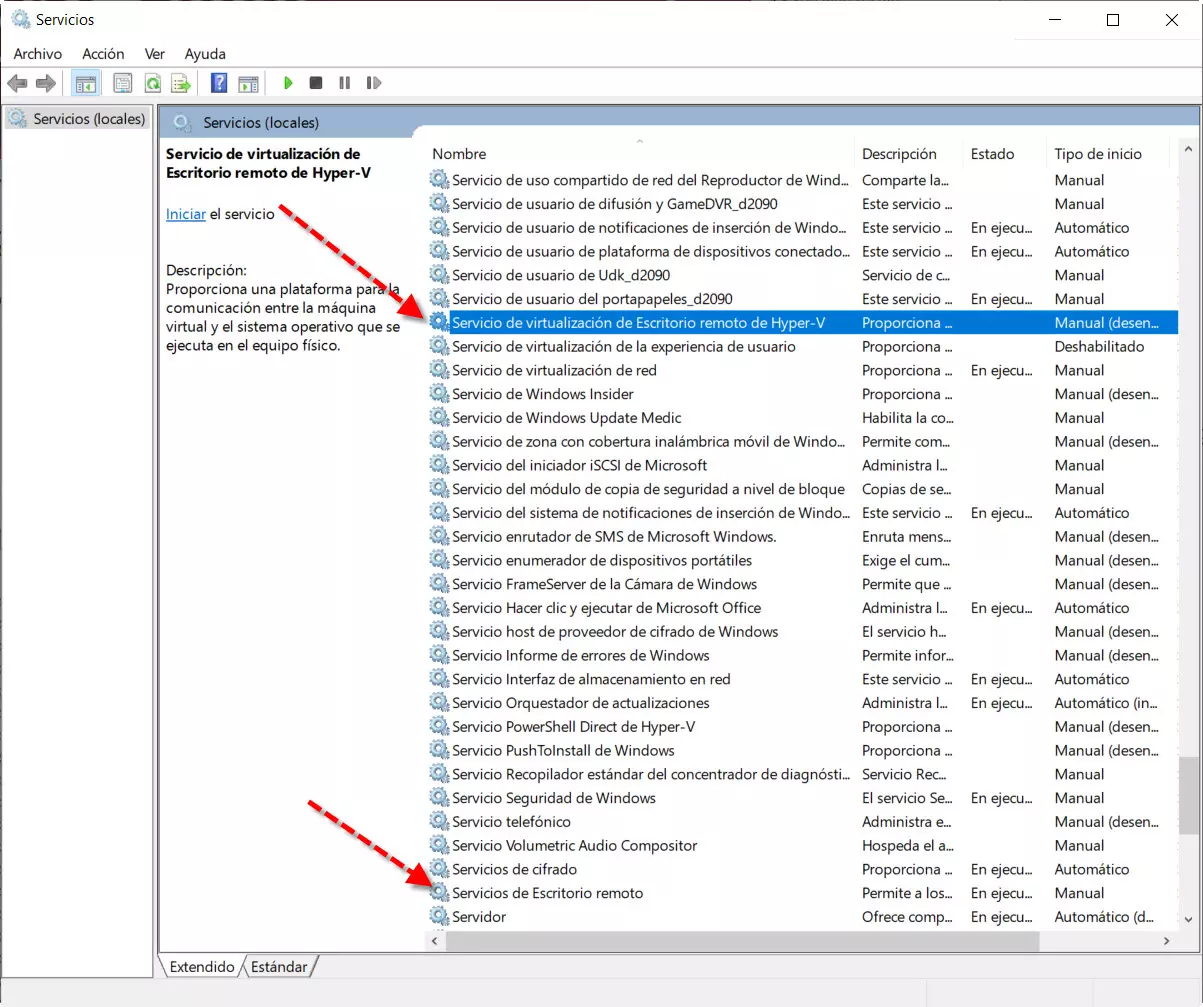
Again from an execution window with Windows + R we write the command services.msc to be able to work with the services. Next, what we have to do is locate these two services:
- Hyper-V Remote Desktop Virtualization Service.
- Remote Desktop Service.
Here you can see how we have already found them:
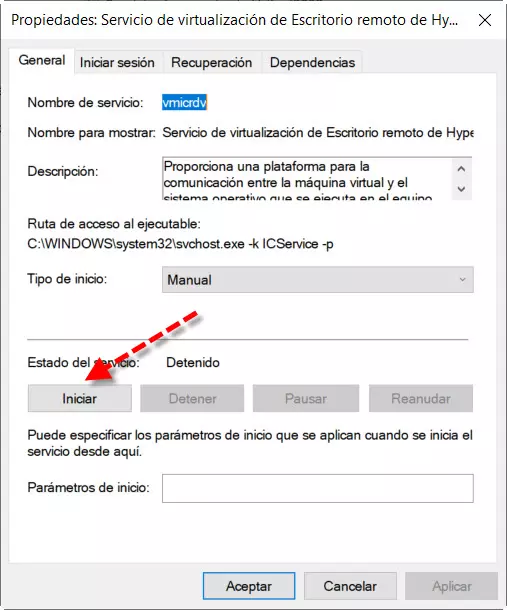
Then we double click on each of the two services to edit them and click on the button Start.
As you have seen, there can be many reasons why the remote desktop does not connect, and we also have several solutions depending on what the problem is.