Transfer music from iPhone to computer
The iPhone is undoubtedly a device where you can store a large amount of music that is downloaded from the internet. That is why you may be interested in having it in these cases synchronized with the computer itself to be able to manage it quickly and comfortably. Here we explain how you will be able to do it on a PC or a Mac.
On Mac computers
When you want to transfer music from iPhone to Mac, the most interesting thing is use Finder by physically connecting the mobile device. Although, you can also make the wireless connection through Wifi if you have it configured. To do this, the first thing you should always keep in mind is to be on the latest version of the operating system available. Once this consideration has been taken into account, you must follow the following steps to transfer music from iPhone to Mac:
- Connect your iPhone to the Mac.
- Click on the Finder icon that you will have in the Dock.
- In the sidebar, select your device.
- In the button bar at the top of the screen that will open, click on Music.
- You must select the option Sync music with iPhone in the box on the side.

In this case, the possibility of making a total synchronization of all the songs that you have stored, but also those of a specific genre, will be considered. In these cases you will always have to check the boxes for playlists, artists, albums or genres that interest you in that case. This is ideal to avoid having to share all your files with computers that are not yours.
Once you have chosen the filters you need to apply, you can click on the button at the bottom Sync up. Depending on the amount of information that you are going to synchronize, the time will vary. In addition, the transfer system will also influence, since cable can be much faster.
On Windows PC
In the case of Windows, the Finder option cannot be used, since it does not exist in this ecosystem. You should always opt for the use of the iTunes program that is developed by Apple. This program should always be updated through the Microsoft Store and will allow to be the point of passage between the iPhone and the computer. This is also because when the iPhone is connected with a PC you do not have access to a system of different folders where your files are located. This is something that can be seen on Android and that makes it much easier to transfer different types of files. But in the case of an iPhone, there is no access to the guts of the device through the file manager.
In order to carry out this process, you will simply have to follow the following steps:
- Connect the iPhone to your PC.
- Open iTunes and grant the permissions necessary to access the content of your mobile device.
- At the moment, you will see how in iTunes it appears in the upper left corner the iPhone icon.
- Click on the first section of Music that you will find.
- Check the box for Synchronize music.

In this case, you can choose the playlists, artists or albums or genres that you want to select to synchronize. In this case, always when you finish, you will click at the bottom, on ‘Accept’ or ‘Apply’ so that all this information that you have contained begins to be transferred.
And transfer music from computer to iPhone?
It may be the case that you need to transfer the music from your computer to the iPhone itself. In this way you can transmit it on the radio while you are driving or transmit it on a speaker wherever you are. Here we explain how you will be able to do it from a Mac with macOS, but also from a computer that integrates Windows.
It should be noted that we are going to have dinner if you have the file stored locally. In the case that you have it on an online platform, the way to transmit it is much easier as it is clearly synchronized. In this case it can be done through synchronization between iCloud, Google Drive or similar. Simply, the file must be uploaded to these platforms and downloaded to the iPhone through the platform. This is one of the most interesting features that synchronizing different types of information can have.
From computers with macOS
This reverse process can be done as we have previously commented using Finder. Synchronizing the music makes the same library that is in the iPhone is transferred to the Mac and vice versa. Although, in the event that you want to make a process much simpler, you must resort to other ways of transmitting information such as the now famous AirDrop. This can be used to stream numerous multimedia files. From photos or videos to the music that you might like the most to have on a Mac.
This is an ideal process especially when you want to transfer songs to an iPhone that is not yours. Here it is not interesting to synchronize all the songs, since it is possible that you only want to share with a friend of yours only a very specific song. Although several methods can be highlighted, such as transferring through secondary tools such as Telegram, the really interesting thing is to use AirDrop. To carry out this transfer process, you simply have to follow the following steps:
- Both on iPhone and Mac turn on the AirDrop option. In the first of these, you will find the option in the control center and on the Mac in the application that exists dedicated to AirDrop.
- Go to the exact location where you have your audio file that you want to send.
- Drag the audio file to the AirDrop application, or right-click and follow the path Share by> AirDrop.
- Select your iPhone from all the devices that will appear on the screen.
- At the moment on the iPhone you will receive a notification of approval of transfer.

From that moment you will see how the audio file appears on your iPhone in the section of downloads. With this you can choose choose the location where you want to store it and play it comfortably. That is why we are facing a fast and safe method, by staying within the company’s own ecosystem at all times.
If you use Windows
As we have previously discussed, not everyone has a Mac and an iPhone. That is why the process should also be discussed to carry out the process through a Windows computer. In this case, you must resort to a old reliable: iTunes. It is true that in macOS it cannot be used as it does not exist, but in the Microsoft operating system it is still present. That is why the first thing to do is the installation of this specific software owned by Apple that you will find in the Microsoft Store. Once you have it installed, you simply have to follow the following steps to transfer the songs:
- Connect the iPhone to your PC.
- Open iTunes and grant the necessary permissions to access the content of your mobile device.
- At the moment, you will see how in iTunes it appears in the upper left corner the iPhone icon.
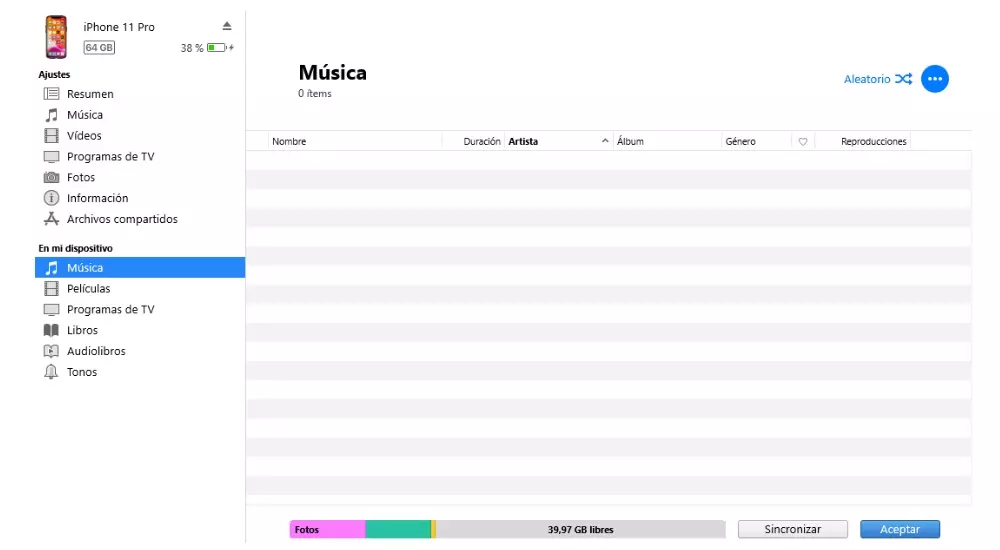
- Next, choose in the left bar the Music section within the group On my device.
- In this case, a list will appear with all the songs you have on your iPhone with the necessary information.
- Now you just have to click on each of these, click on the secondary button and choose the export option.
- To make sure that it was done correctly, it is advisable to click on the button ‘Synchronize’ at the bottom.
It is certainly a really simple process, although it requires that you always have iTunes installed. At first, as we have commented previously, the connection must be made through a physical connection. But if you want not to have to physically connect the device, you can make a wireless connection to perform the transfer through the Wi-Fi network itself.