How to give a letter manually
That we connect an external hard drive or pendrive to our PC and that Windows is not able to automatically assign a letter to the drive can be very frustrating. In this case we can assign them manually, something we must do from the Disk Management console.
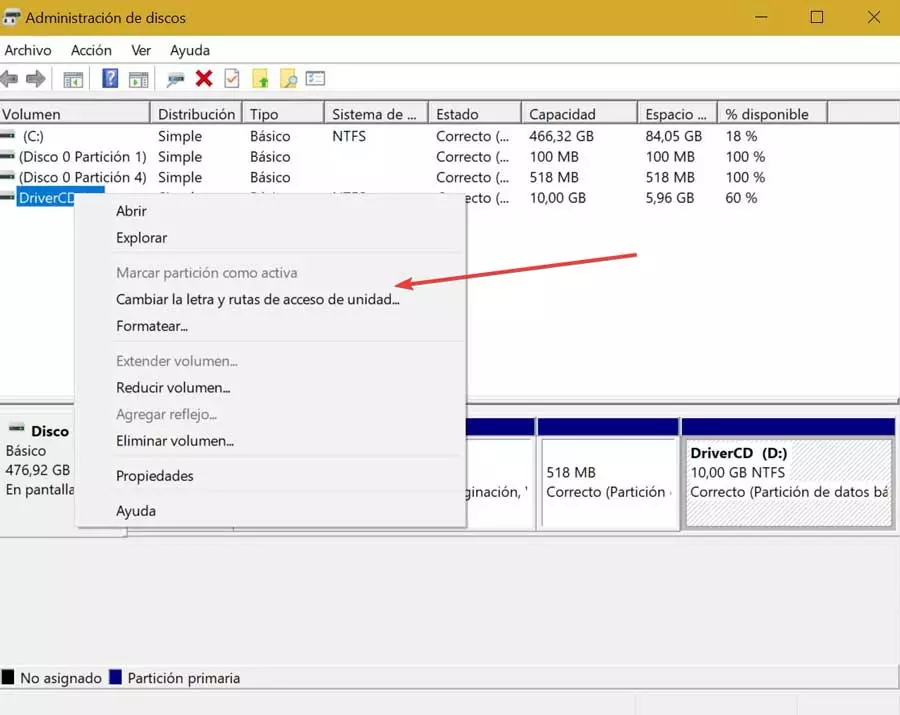
To do this we must use the keyboard shortcut “Windows + X” and in its options menu we choose “Disk Management”. Later in the panel with the list of units we must recognize the removable USB drive that we have connected. Later we click on it with the right mouse button and select “Change drive letter and path”. On the next screen, click on “Add” and then on “Assign the next drive letter” to select one of our choice.
If it is a process that can be carried out, it is still a nuisance to have to go through the Disk Management section every time we connect an external device to assign it a drive, especially when it is something that the operating system must do automatically.
Steps to fix the problem
Next, we are going to see different methods that can help us solve the problem that prevents the operating system from automatically assigning a drive to a USB-connected HDD or pendrive.
Enable virtual disk
If we find that the virtual disk service is disabled on our PC, we will have different disk problems, including the inability to assign letters automatically. In order to enable it we can do it in two different ways, either from the Services menu or using commands through the Command Prompt.
From Services
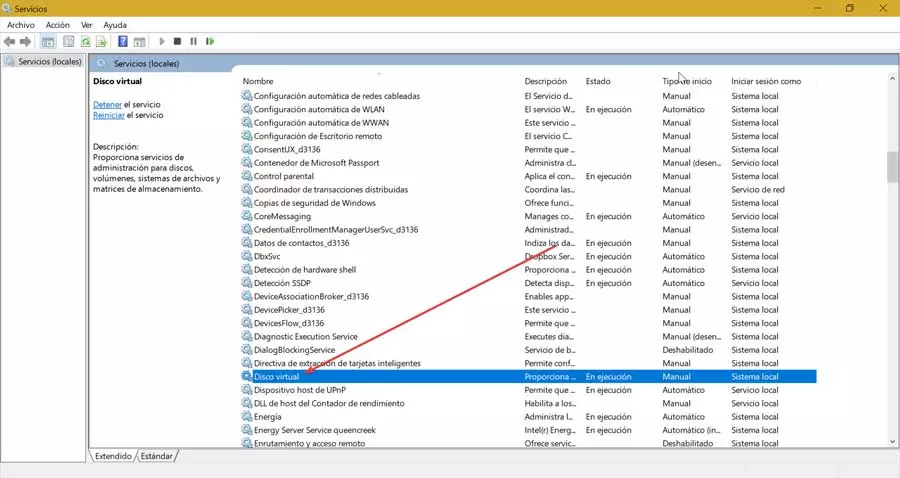
The first thing we must do is run the Windows + R keyboard shortcut to launch the Run command. Here we write services.msc and press Enter to open the Services menu. Next, in the list we must locate the «Virtual Disk service, right-click on it and select« Properties ». Then, in the Service Status section, we click “Start” in case the service is stopped. Even if it is enabled, it is advisable to restart the service and thus check if the problem persists.
Use Command Prompt
It is also possible to enable the Virtual Disk service by using some commands that we must execute from the Command Prompt tool. To do this, we write cmd in the Start menu search box and make sure to run it with admin rights.
Subsequently, we write the following command to know what the state is in which the service is and we press Enter to execute it:
sc query vds
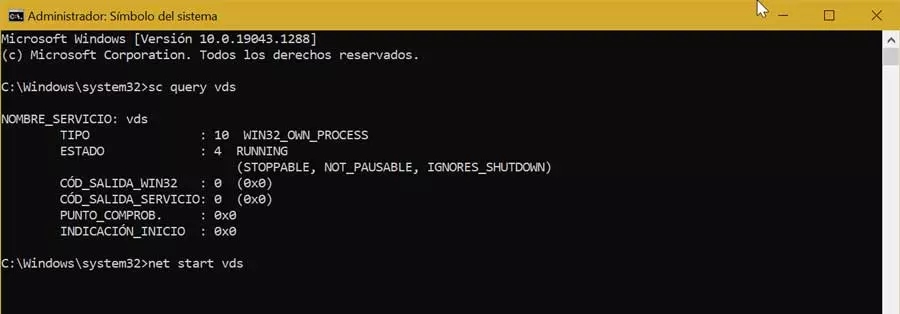
Next, if what we want is to enable it, we must write the following command and press Enter to execute it:
net start vds
Once the above command has finished, we remove and reconnect the device and buy if the problem is solved. We can also try to reinstall the driver if we have one from the manufacturer.
Check if automount is enabled
Another action we must take is to make sure that the “Automatic mounting of new volumes” is enabled, otherwise the system will not be able to assign drive letters. This is something that we must do through commands using the Command Prompt.
To do this we write cmd in the search box of the Start menu and execute it with administrator rights. Next, we write the following command and press Enter to execute it:
diskpart
Later, we verify if automount is enabled, so we must write the following command and press Enter:
automount
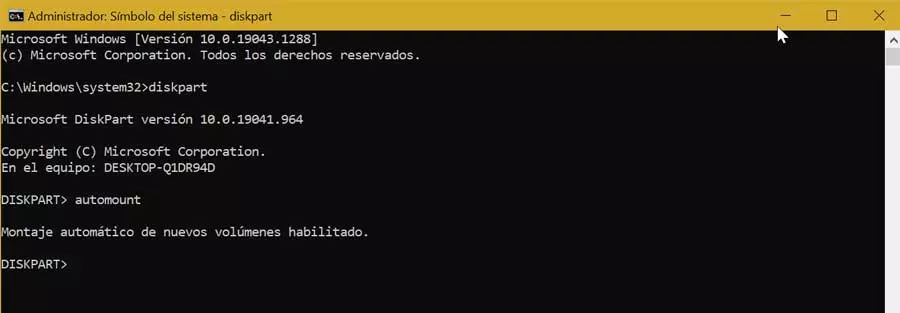
In the event that it is disabled, we must enable it by typing the following command and pressing Enter:
automount enable
Finally we leave the Diskpart directory by typing the following command and pressing Enter:
exit
Now we only have to restart the computer to verify if the problem has been solved.
Disable “Hidden” and “No drive letter”
If the previous two methods do not solve the problem and we still cannot see the drive letter, it is possible that the default attributes »Hidden» and «No drive letter» for that volume are found. enabled. Therefore, it will be necessary for us to deactivate them, something that we can do through commands executed in the Command Prompt.
To do this, we type cmd in the search box of the Start menu and execute the Command Prompt with administrator permissions. Next, we write the following commands one by one, pressing Enter to confirm each one:
diskpart list disk
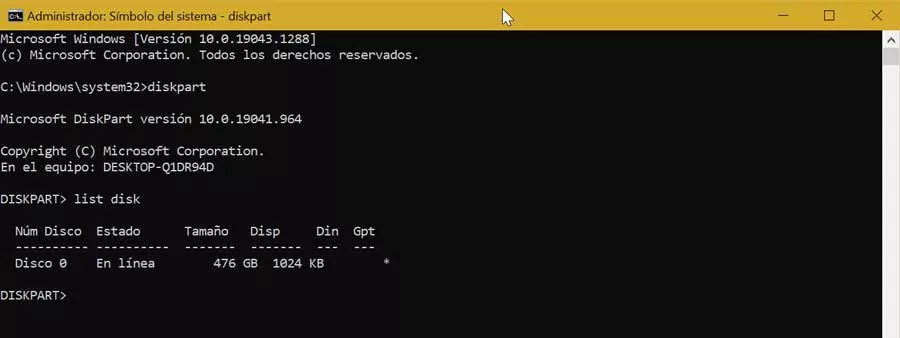
select disk 1
In the event that we do not know which disc to choose, we must find out by looking at their respective sizes in order to have a clear idea. Later we replace 1 with the number associated with the connected device.
Next, we use the following command to list all the partitions, in the case that we have more than one partition:
list part select partition 2
Here we replace the 2 with the number associated with the partition in question.
attributes volume
Now we must check if the “Hidden” and “No default drive letter” attributes are enabled. If so, we execute the following commands simultaneously:
attributes volume clear NoDefalutDriveLetter attributes volume clear hidden
Finally, we only have to exit using the command:
exit
Now we only have to restart the computer to see if the problem has been solved.