To help us dim the brightness and contrast of our PC to the optimal level, it automatically saves your system power and increases battery life. For example, you may notice that the system is brighter when on mains power and dimmer when on battery power. Although it is an important feature to keep your PC in good condition, it is not equally necessary for all users, therefore some may prefer to disable it.
That is why today we are going to talk about adaptive brightness control, we are going to see what it consists of and how it affects us in a positive way and in what cases it can be a problem. We will also check how to disable it from the Configuration panel of both Windows 10 and Windows 11, as well as making an optional modification to the Registry.
What is CABC and how does it work?
Content Adaptive Brightness Control (CABC) is a technology built into both Windows 10 and Windows 11 that takes care of adjust contrast and brightness on the screen to, in this way, extend battery life, depending on the content we are viewing. It should not be confused with adaptive brightness, since the latter, what it does is modify the brightness based on the lighting in the room.
With content-adaptive brightness control, screen brightness and contrast dynamically adjust. That is, it is an extension of existing screen brightness controls, such as manual adjustment and automatic adjustment of brightness based on light conditions (auto-brightness). A clear example is when we notice a change in contrast and brightness if we watch a video with a dark scene that is followed by a bright scene.
While CABC can be helpful in extending your PC’s battery life, there may be instances where sudden changes in brightness levels they can distract us, or if we work in photo and video applications where color accuracy is important to us, we can disable it at any time. Of course, when deactivating it, we must take into account that it can have an impact on a shorter battery life.
Disable or enable adaptive brightness control
Next, we are going to see how we can disable adaptive brightness control from the Settings menu of Windows 10 and Windows 11 with a few simple steps. Likewise, it is possible to disable this option in the same way on both operating systems from the Registry Editor.
On Windows 11
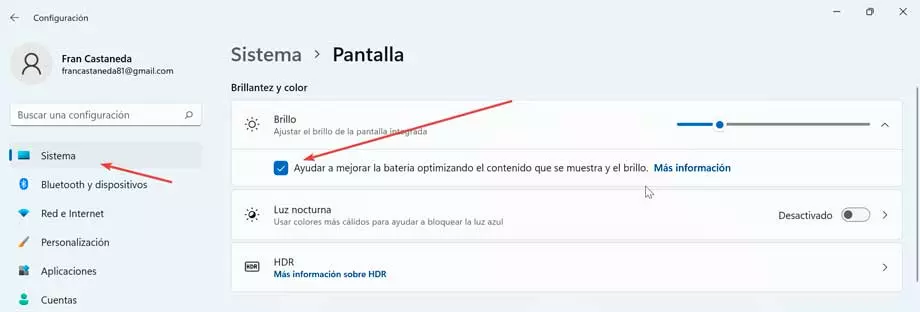
If we use Windows 11 as the operating system, we can disable the adaptive brightness control at any time from the Settings menu. To access it, just press the keyboard shortcut “Windows + I”. Next, we go to the “System” section in the menu on the left. Now, in the section on the right of «Brightness and color» we display the Brightness section.
Here we will find the option of Help improve battery life by optimizing the content it displays and brightness, so to deactivate it we will only have to check the box. Once finished we close the Configuration window to exit.
In the event that we want to reactivate the adaptive brightness control at any time, simply repeat the previous steps and re-check the Help improve battery by optimizing the content displayed and brightness box.
On Windows 10
When using Windows 10 as the operating system, the process is extremely simple. We only have to access the System Configuration menu, for which it is only necessary to press the keyboard shortcut Windows + I. Then we click on the System section.
Within the Brightness and color section, we find the option of “Automatically adjust contrast based on displayed content to help improve battery life”. We find this option just below the brightness slider and uncheck it to deactivate the function.
Depending on your computer, you may only see one or multiple checkboxes below the brightness slider. It is also possible that in the latest Windows 10 updates no longer show this optionso to be able to deactivate it we would have to access the energy options or make a small modification in the Registry.
From the Power Options
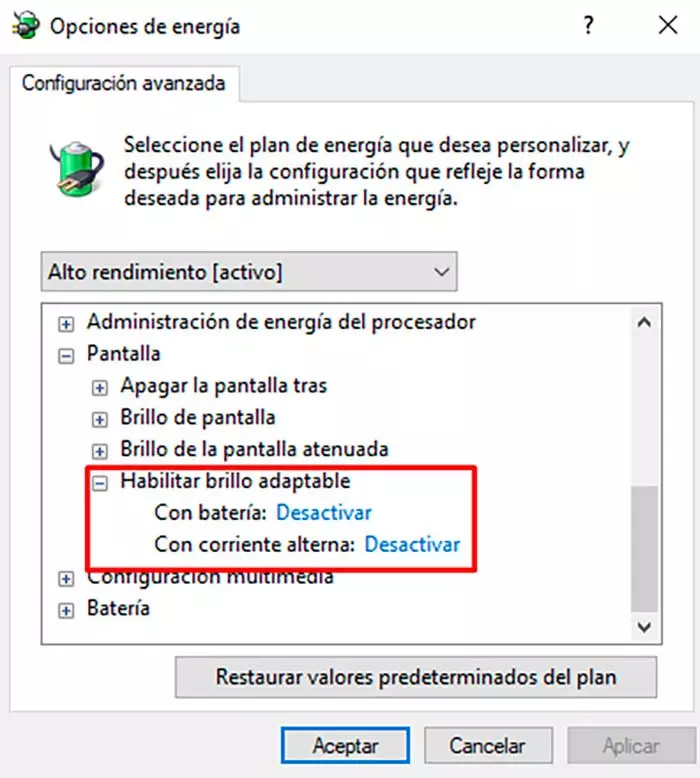
It is also possible to disable it from Power Options. To access it, simply type power options in the Start menu search box. Later we select the power plan that we are using and click on “Change plan settings”. Subsequently, a window will open with different options. There, choose Change advanced power settings. This will bring up a slightly smaller window containing the dropdowns. Here we must access the section of Screen, where will we find the option Enable adaptive brightness, from where we can deactivate it or reactivate it when we need it.
Modify Registry Editor
Regardless of whether we use Windows 10 or Windows 11, we can also disable adaptive brightness control by making a small modification to the Windows Registry. To do this, the first thing to do is press the Windows + R key combination to launch the Run command. Here we write regedit and press Enter or the OK button.
Once it is inside the Windows Registry, before modifying anything, we will make a backup, as a preventive measure, since any unwanted modification can cause damage to the system. To do this, click on “File” and “Export”. Then we specify All in the export range, give it a name, select the .reg format and click “Save”.
Next, we navigate to the following location:
HKEY_LOCAL_MACHINE / SYSTEM / CurrentControlSet / Control / GraphicsDrivers
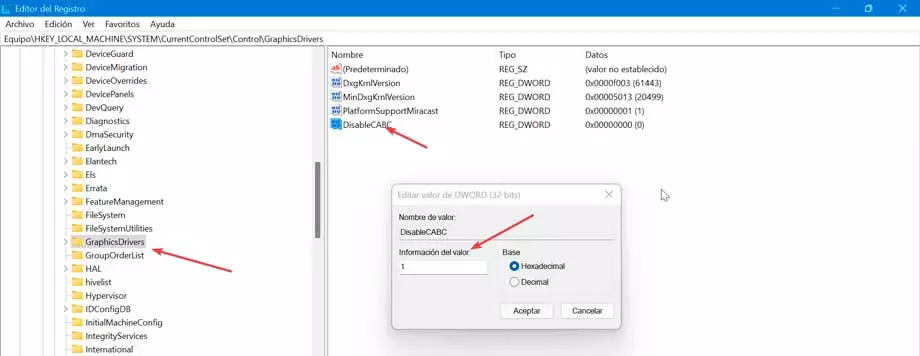
Now we right-click anywhere in the right pane and select the option New > DWORD (32-bit) Value. We change the name of this newly created value to DisableCABC. We double click on DisableCABC and in Value Date, type one. Finally, restart the PC to save the changes.
We can enable content-adaptive brightness control at any time by simply deleting the created Registry value or changing its value to 0.