Windows has an internal tool called systeminfo, which is responsible for collecting all this information, so by using it it is possible to easily see the installation date of our operating system. We can also know this information from the Properties of the Windows folder or from its Configuration section. Likewise, we will be able to know all the data reliably using some commands from Windows PowerShell.
Aspects to take into account beforehand
If we want to know what the installation date of our operating system is, the methods that we are going to see below work with modern versions of Windows, such as Windows 7, Windows 8.1, Windows 10 and Windows 11. more to know some situations that we can find depending on the operating system that we use and how we install it.
For example, if we have made a clean installation from scratch of Windows, all the methods that we will see below will offer us good results. However, if we have upgraded our version of Windows to a newer version, such as from Windows 10 to Windows 11, some of these methods will show us the Windows 11 installation date and not the Windows 10 installation date.
We must also bear in mind that, even if we keep the original operating system, in the event that we have received one or more important updates, most of the methods will show us the installation date of the last update or major version.
Ways to display the Windows installation date
Next, we are going to see different ways that we can check when the installation date of our operating system was. To do this we will use different tools integrated into the operating system.
With Command Prompt
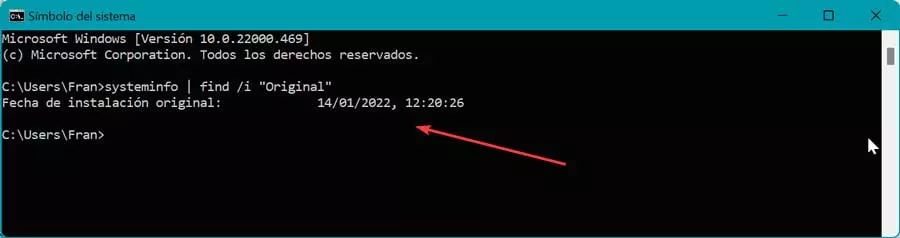
To check the installation date of our operating system we can use a tool such as the Command Prompt. To run it, just type cmd in the Start menu search box and run it with administrator rights. Whether we use Windows 10 or Windows 11 we can use the following command:
systeminfo | find /i "Original"
This command takes care of collect the information stored in systeminfo, and instead of showing all its content, it will only show us everything that matches «Original», that is, the date relative to the operating system. A few seconds later, we can see the installation date of our Windows. Of course, the date that will appear will be that of the last major update installed.
In the event that we are still using an old version such as Windows 7 or Windows 8.1, the process is quite similar, but in this case it will show us the actual date of installation and not that of the last update. To do this from the Command Prompt, we write the following command:
systeminfo | find /i "install date"
From File Explorer
Another method that we can use to know the installation date is the File Explorer in the event that we use Windows 10 or Windows 11 or Windows Explorer in the case of a previous version such as Windows 7. To open it, press the keyboard shortcut Windows + E and navigate to drive C: where the operating system was installed. Once here, we right-click on the Windows folder and choose Properties.

Later, within the General tab, we look for the “Created” field. Here it will show us the date the Windows folder was created on our computer, which will be the date it was installed. Although the date must match, it is possible that this does not happen and it shows us a different date than the real one, since it may be the date that Microsoft created the folder for your ISO file.
Use Windows Settings
Another option that we have available is to use the Settings menu, both in Windows 10 and Windows 11. To do this, we only need to use the “Windows + I” key combination. Then click on the “System” section and then on “About”. Here, we will find a field called Windows Specifications.
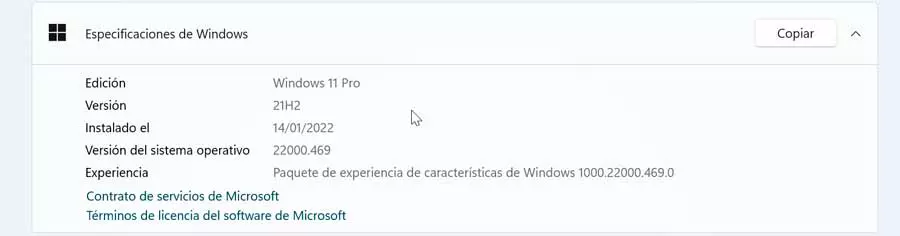
Here we will find the installation date in the “Installed on” section. Again, we must take into account that appears the date of the last major update. In the event that we originally had Windows 10 and have updated to Windows 11, the date of its installation will appear.
Know the original date with Windows PowerShell
This last method is responsible for using PowerShell to be able to extract all the information Windows Registry and convert it into a readable and interpretable format. It is the only method that allows us to know the original installation date of Windows, something difficult to find out if we have recently upgraded from Windows 10 to Windows 11 or received important updates over time.
So, we type powershell in the Start menu search box and run it with administrator rights. Next, we must write these two commands as shown in the screenshot:
$OS=@(Get-ChildItem -Path HKLM:/System/Setup/Source* | ForEach-Object {Get-ItemProperty -Path Registry::$_}; Get-ItemProperty 'HKLM:/SOFTWARE/Microsoft/Windows NT/CurrentVersion') $OS | Select-Object ProductName, ReleaseID, CurrentBuild, @{Name="InstallDate"; Expression={[timezone]::CurrentTimeZone.ToLocalTime(([datetime]'1/1/1970').AddSeconds($_.InstallDate))}} | Sort-Object "InstallDate"
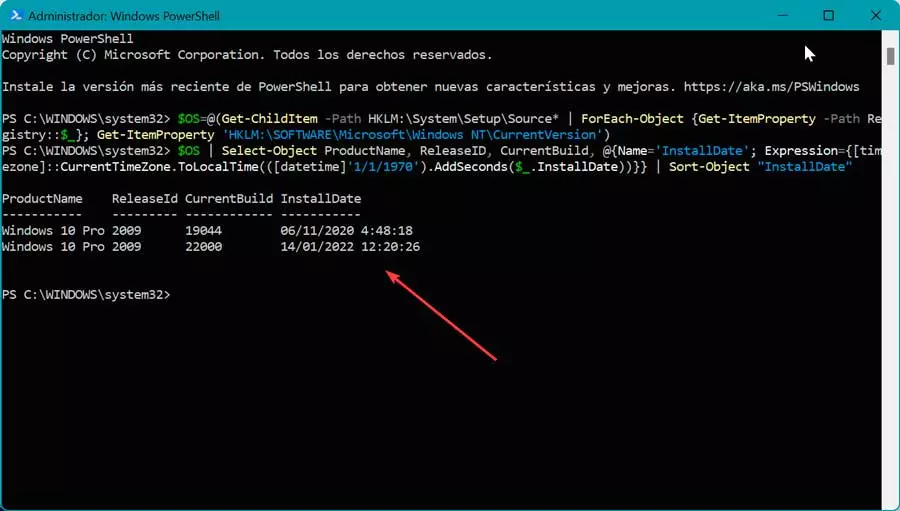
Once this is done, we will see the dates of the different Windows updates with the exact time they occurred.
Check how long the system has been on
In addition to being able to see the original installation date of our operating system, it is also possible to know how long it has been running consecutively without having to resort to other third-party applications. This is something that we will be able to know using the tool of the Task Manager.
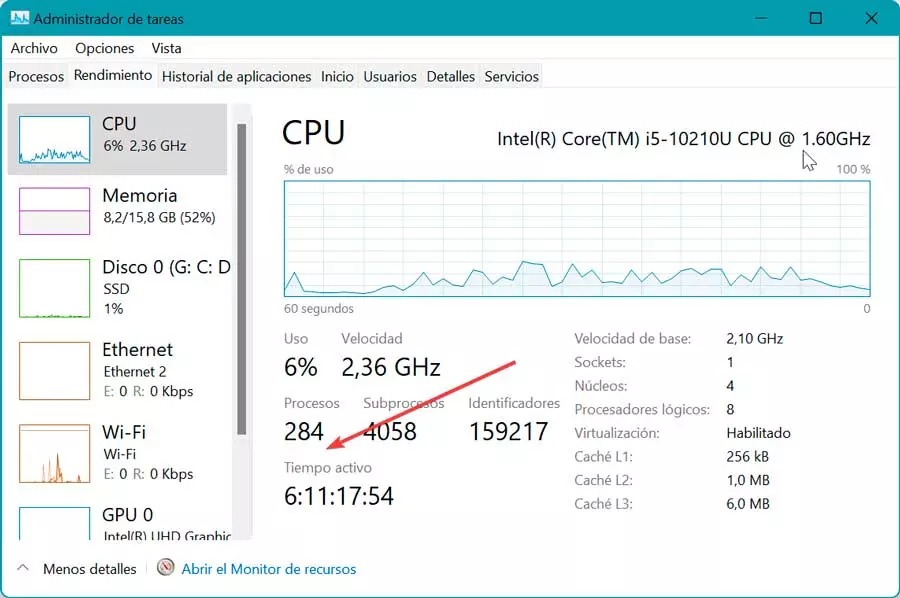
To do this, you just need to press the keyboard shortcut “Ctrl + Alt + Del” and select it. Once opened, click on the “Performance” section. Here, within the CPU section, we find at the bottom the section of “active time”which will show how long our Windows computer has been running consecutively.