We say all this because the applications presented by both software giants have some interesting basic tools for editing this content. Together with all the functionality that they initially offer us, their developers also try to make things easier for users. novice users. If we focus on Photoshop, all those who work professionally editing photos will also find everything they need here.
However, on most occasions the use that we will make of this program will be relatively basic. This means that many situations we need to use easy retouching functions to help us improve the photo, but without complications. A clear example of all this can be found in one of the most common functions or modes of use. Specifically, we refer to the possibility of lighting, in a more or less intense way, a certain image.
This is a fairly common practice when editing photos to, for example, later share them with our family and friends. It is for all these reasons that we are going to show you how to achieve this, both with the Adobe program and from Windows. The truth is that both are quite easy to use.
Fix dark photos in Photoshop
As you can imagine, the first thing we are going to do to achieve this objective that we are commenting on, brighten any photo, is to load it in the Adobe program. On many occasions we are going to find ourselves in the situation where we notice a lack of lighting in the original image that we are going to edit. Therefore, first of all, we are going to show you how you can add that necessary light manually.
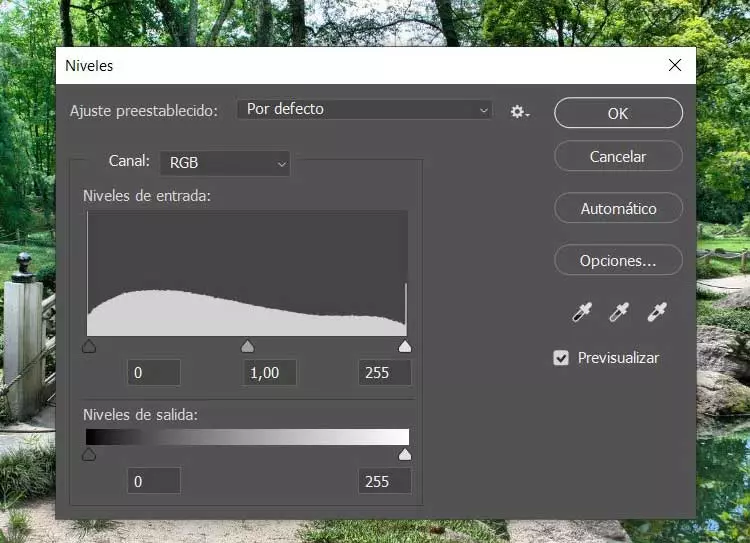
This system will allow us to have much greater control over the editing process. At that moment we are in the menu option Image / Adjustments / Levels. From that moment we will see on the screen a new window with a graph that represents the luminosity of our photo. In this way and manually we can adjust the three selectors that we find in the graph to correct the darkness of that multimedia content with the level that we need.
As we said before, with this method we will have the possibility of adjusting this level of luminosity in the photo that we have loaded. However, it may be the case that we do not want to complicate our lives at all for this task. Precisely for this reason, the program offers us a button that allows us to automate the process.
In the window that we mentioned before, we find that button that says precisely Automatic. In this way, it is enough that we click on it so that Photoshop itself is in charge of adjusting the lighting and brightness of the image. Later we can use the manual function to modify those changes and adjust the photo to our needs.
Use Windows to fix the problem with photos
But it may be the case that we do not have the aforementioned Adobe program and we still have to correct this problem with dark photos. It is worth mentioning that the Windows operating system itself offers us a pre-installed application that will help us a lot in these tasks. It’s about the UWP Call Photos that we can boot without installing anything.
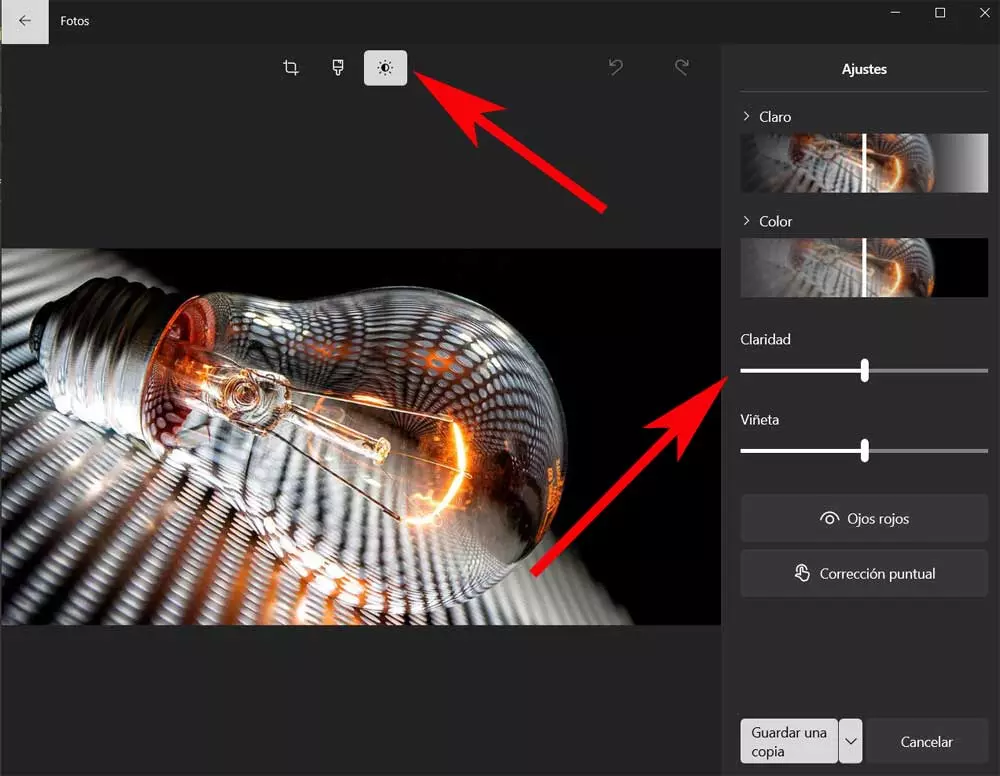
Next, we only have to load the photo as such to click on the Edit image button. Through the sun-shaped icon that we see in the interface that appears, we will have the possibility of giving more light to that image that we are commenting on and thus eliminating the annoying darkness from the original file.
