Creativity when playing with the photographs taken is becoming more and more important. For this, Photoshop has tools that allow us to obtain perfect designs without having to carry out laborious editing tasks. To do this, it has the Photomerge function with which to make a panoramic image from several captures in a simple and attractive way.
Panoramic photography and its use in Photoshop
When we talk about a panoramic image we are not referring to a photo that is made up of smaller images joined together to form a single shot. When we talk about this type of shot, we usually associate it mainly with landscapes and they can be taken both horizontally and vertically and in any size.
The most current mobiles usually have a panoramic mode that allows you to take an elongated capture without having to join several photos. But this is not the only way to obtain them since Photoshop has a function called Photomerge with which to be able to create our own more creative distortions with which to be able to obtain a wider angle of vision than the camera lens allows to create.
With the use of this command we can combine different photos to create a single continuous image. For example, we can take three overlapping photographs of the horizon of a forest and later combine them to create a panoramic view, being possible to combine both horizontally and vertically segmented photographs.
Tips for creating perfect panoramas
When using the Photomerge function, it is important that the photos taken follow certain guidelines so that the composition is as perfect as possible. Here are some tips to keep in mind:
- Always use a focal length: even when we have a magnifying lens, we should not enlarge or reduce the focal length when taking the captures.
- Use a tripod to keep the camera level: if the captured shots have different inclinations or degrees, it can cause errors when creating the panorama, so it is advisable to use a tripod with a rotating head that helps us always maintain the same position and point of view of the camera. camera.
- keep the same exposure: Flash and non-flash shots should be avoided, as extreme light differences can make alignment difficult. In addition, we must make sure that our camera does not change the exposure automatically so that all the photos come out in the same conditions.
- Do not change position when taking photos: all must have the same point of view and be stable, so the presence of a tripod is also appreciated to help stabilize it and keep the point of view stable.
- Overlay the images: Photos must overlap between 40 and 70%. If it is less, they may not be able to automatically join the panorama and if it is greater, they may not be able to be merged.
With these practical tips we can make ideal captures that we will later use in Photoshop to quickly create a panorama with very artistic results.
Steps to create perfect panoramas
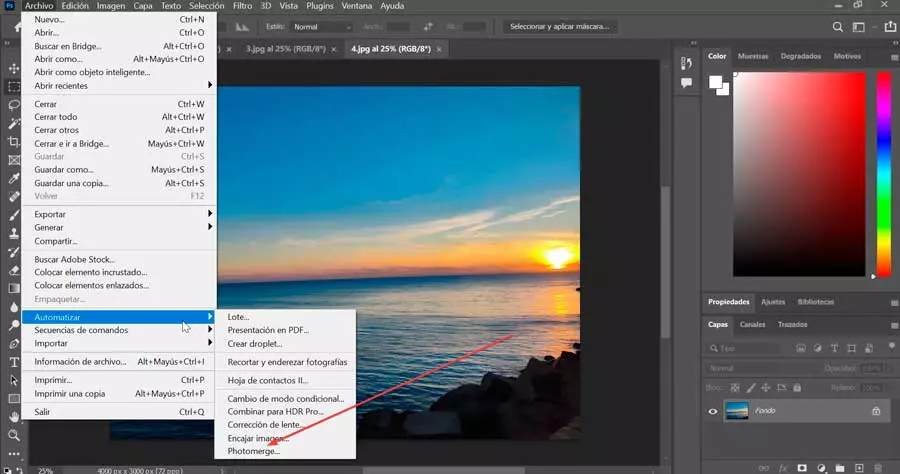
Once we have selected the photos that we are going to need, we must open them in Photoshop. It is recommended that we only have open the files that we are going to need and that we close any other that does not interest us. This is because to carry out this process requires a high processing power. Next, we click on “File”, which will open a drop-down menu where we will select “Automate” and finally, we click on “Photomerge”.
This will cause the Photomerge window to open. From here we click on “Add open files” so that the images that we have previously added are added. If we want to select one more image, we can click on Explore. This will open File Explorer so we can select any other images.

Use a composition mode
In the left column we can find some design options, starting with the Automatic which is marked by default, and which is usually quite efficient when it comes to joining the photos. We also have other options to choose from such as:
- Perspective: It takes care of using the center image as a reference to later adjust all the others around it.
- Cylindrical: Attempts to reduce the distortion of wide panoramas as much as possible and displays each image as an open cylinder, making it interesting for creating wider panoramas.
- spherical: This composition mode aligns and transforms the images creating the impression of looking at a 360-degree panorama, so it is especially recommended if you have selected 360-degree panoramas with which to obtain very attractive results.
- Collage: Aligns the layers of the images and makes them match the overlapping content, being able to rotate or scale them to make them fit perfectly.
- change position: Takes care of aligning the images to make the overlay content match, but does not distort or reshape the images to create the panorama.
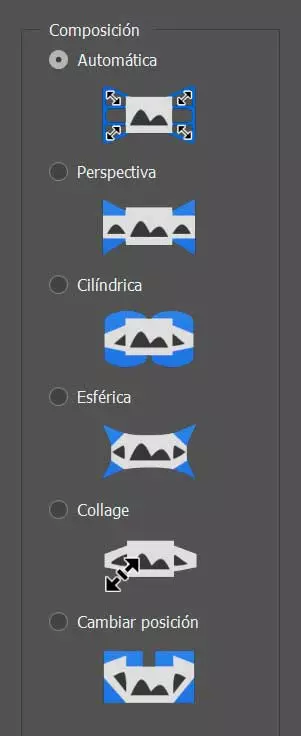
Among these composition options we must choose the one that best suits the result we are looking for. It can always be recommended to start with the Automatic, and if it does not give the expected results, opt for other more specific models.
Choose design options
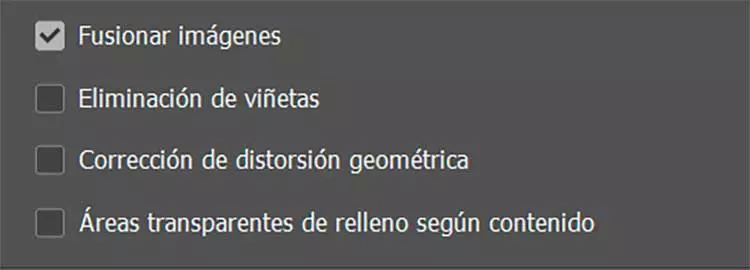
At the bottom we find some check boxes where we can find design options that will allow us to adjust the panorama. By default we will find that the checkbox next to merge images is marked. It may be convenient to leave it as Photoshop is able to make good use of combining images.
We also find other options such as:
- Vignette removal: Takes care of removing or applying exposure compensation to images with darkened edges that may have been caused by lens failure.
- Geometric distortion correction: Compensates for distortion caused by fisheye.
- Content-Aware Padding Transparent Areas: is responsible for filling the transparent areas with the content of images of a similar environment.
Once finished, we click on the “OK” button. This will make Photoshop take care of creating an image with several layers starting from the images that we have added to create a fusion where they are superimposed. Later we can edit these layers or adjust them to provide greater precision to the different areas of the panoramic image.
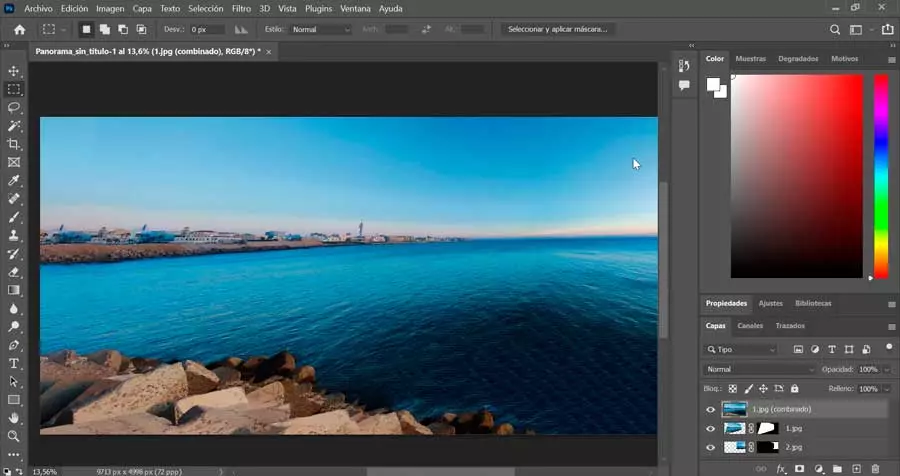
All parts taken from each image will be displayed as individual layers within a single file. This process requires some time, the amount of which will depend on the number of photos, the option boxes that we select and the power of our computer.
Edit the panorama obtained
Although the results with Photoshop’s Photomerge function are usually quite good, it may be the case that in complex situations the result is not as perfect as we would like. Therefore, we can choose to edit it manually so that it is completely to our liking.
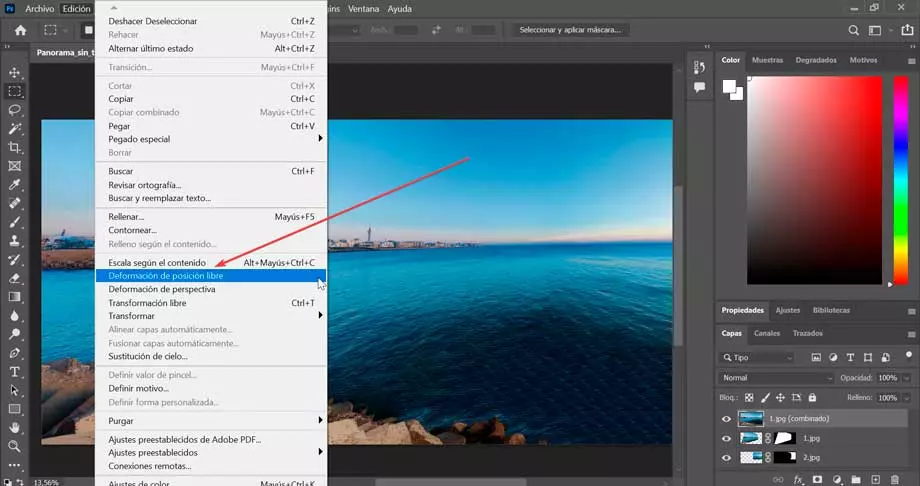
To do this, click on the “Edit” tab and within the options that appear in the expandable menu, select the “Free Position Deformation”. This tool acts directly on a layer, so that we can perform non-destructive editing. In this way, we can recover the initial image at any time. Thanks to it we will be able to cut and place the selected image so that it is correctly in its place and without any imperfection.