The following models of ASUS routers that you can buy right now, are compatible with AiMesh, either to use them as the main one or as an AiMesh node:
The first thing we must do is configure our ASUS router with the operator that we have at home. Depending on the operator, we will have to configure a different type of Internet connection and a VLAN in the LAN/IPTV section. In essence, the configuration in all the operators is very similar, although it is highly recommended that you put the operator’s router in bridge mode, so that the ASUS router has the public IP address of the connection. Otherwise, we will have double NAT and everything that entails.
Add a new router to the AiMesh network
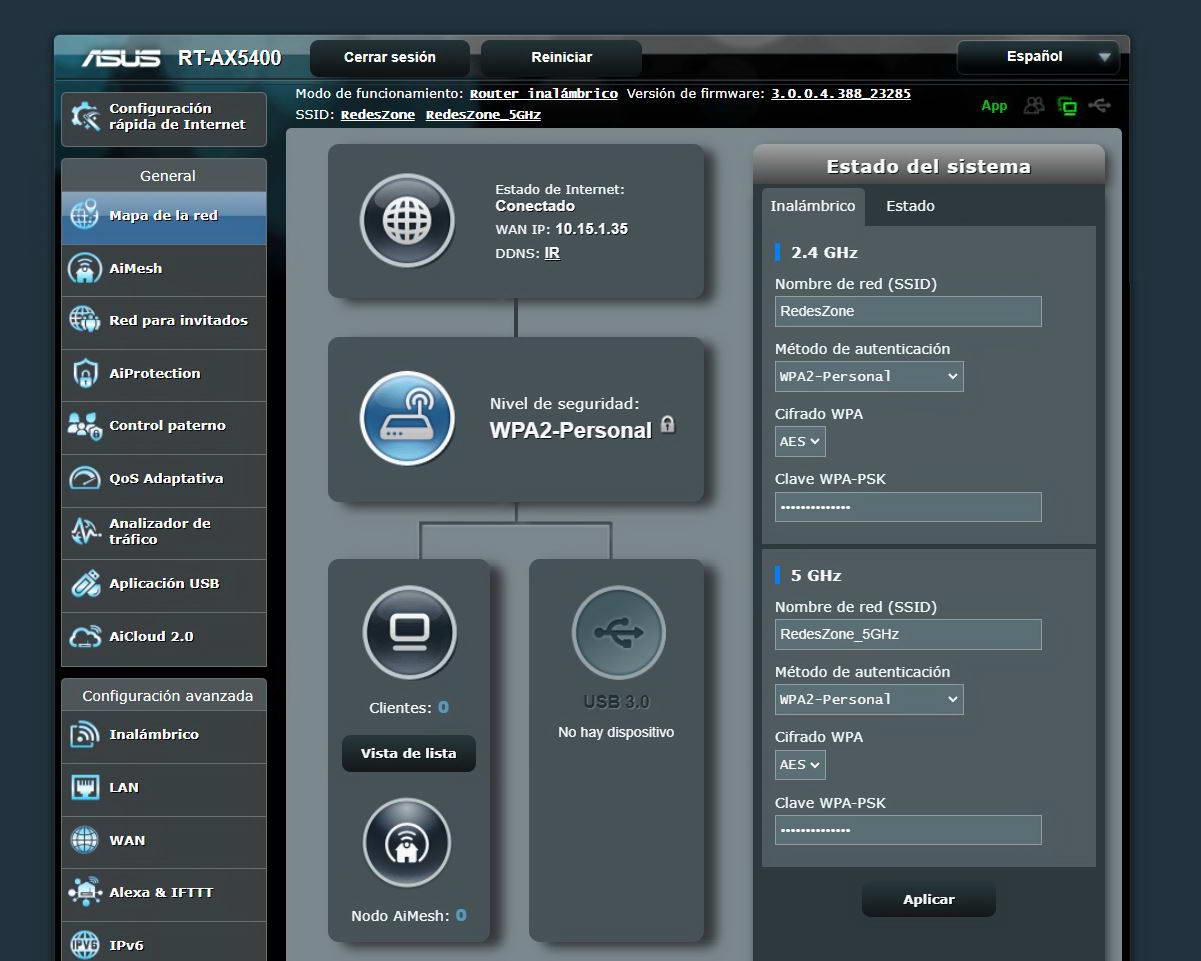
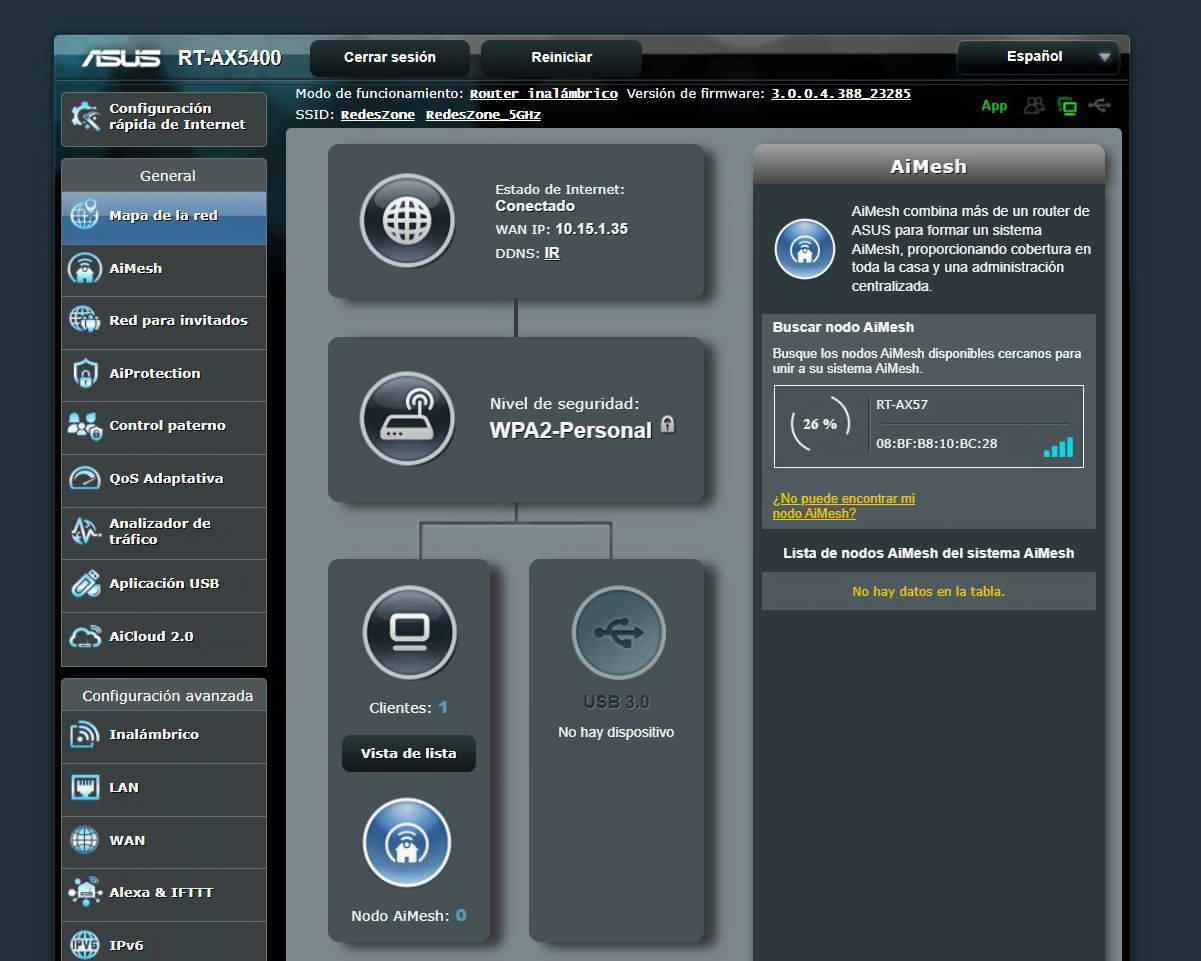
In the main menu of the Asuswrt firmware, we must make sure that we have the Internet connection working, and also that the two frequency bands are activated and fully operational. In the example that you can see below, we have an ASUS RT-AX5400 router, but any manufacturer’s model would work, because they are all extensible routers. In this case, it is a simultaneous dual-band model with Wi-Fi 6 and AX5400 class.
At this time, it is necessary that we connect the secondary router that we are going to use as an AiMesh node to the electrical current. It is very important that we wait approximately three minutes, until it is at full capacity to proceed to put it inside the mesh network.
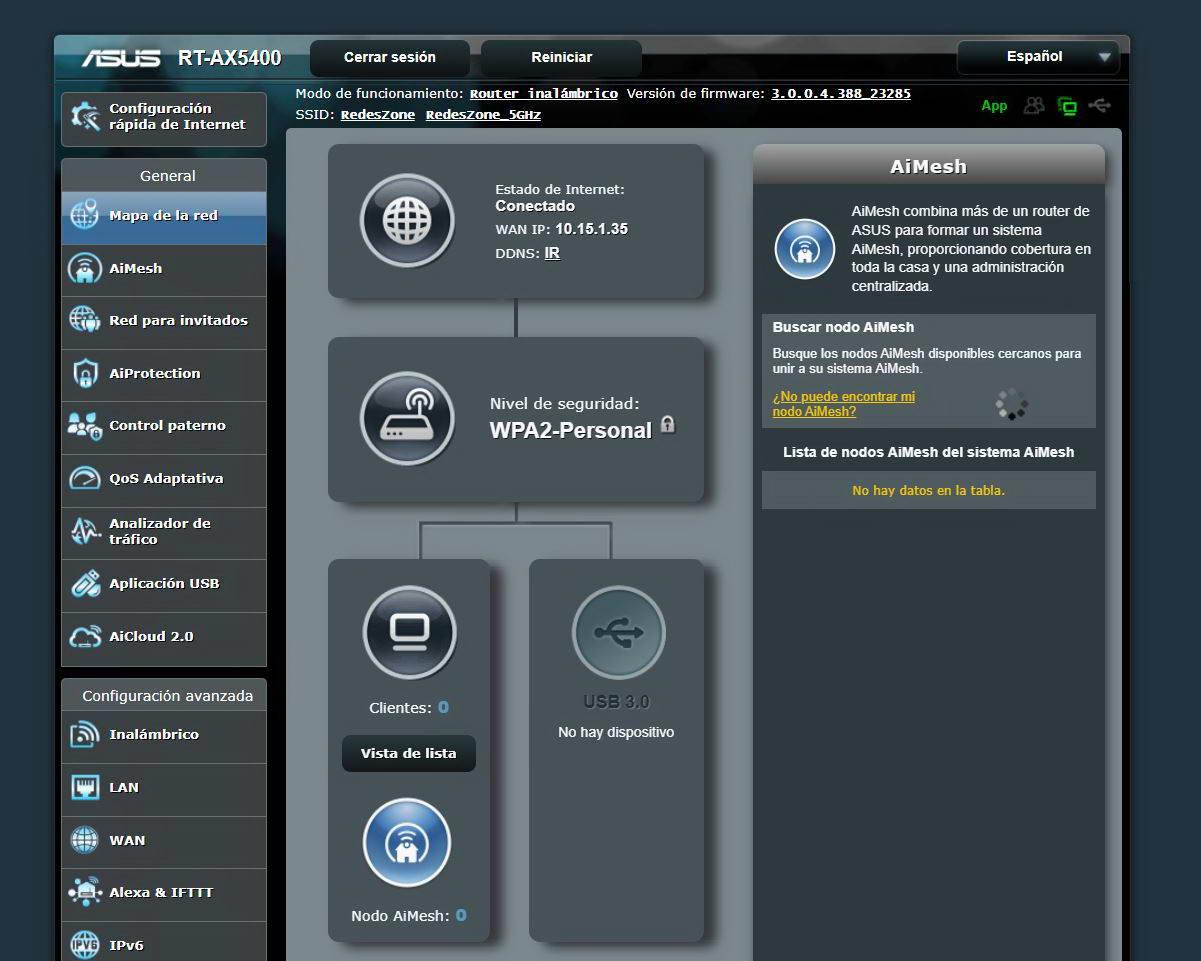
In the main menu section, we must click on the icon «AiMesh Node» to proceed to the search for other ASUS routers that we have turned on. This process takes about 30 seconds, and each and every unconfigured router will start to appear on the right hand side.
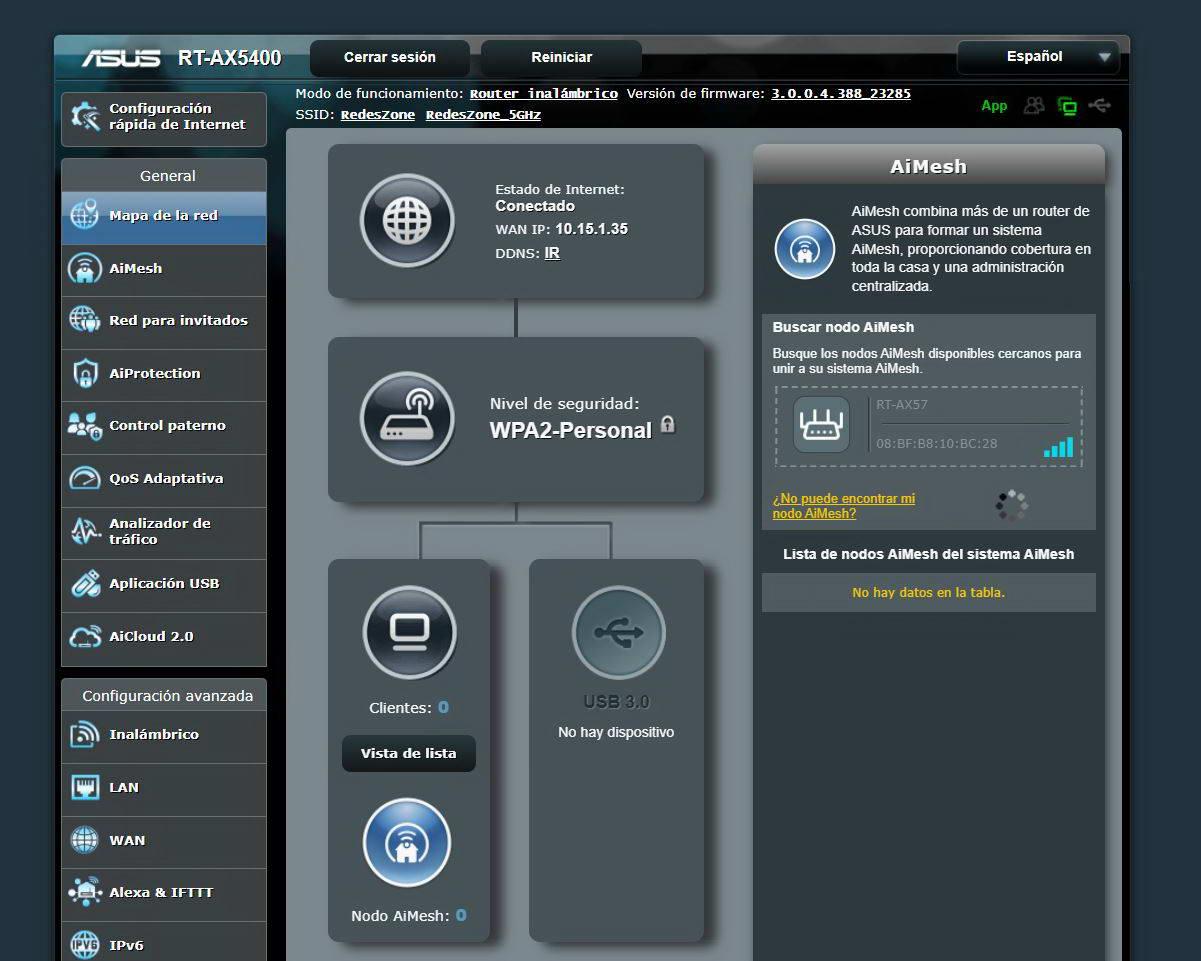
After waiting a few seconds, the RT-AX57 router will appear, which will be our AiMesh node for this example. All we have to do is click on it, it will show us what its MAC address is and also the coverage it has.
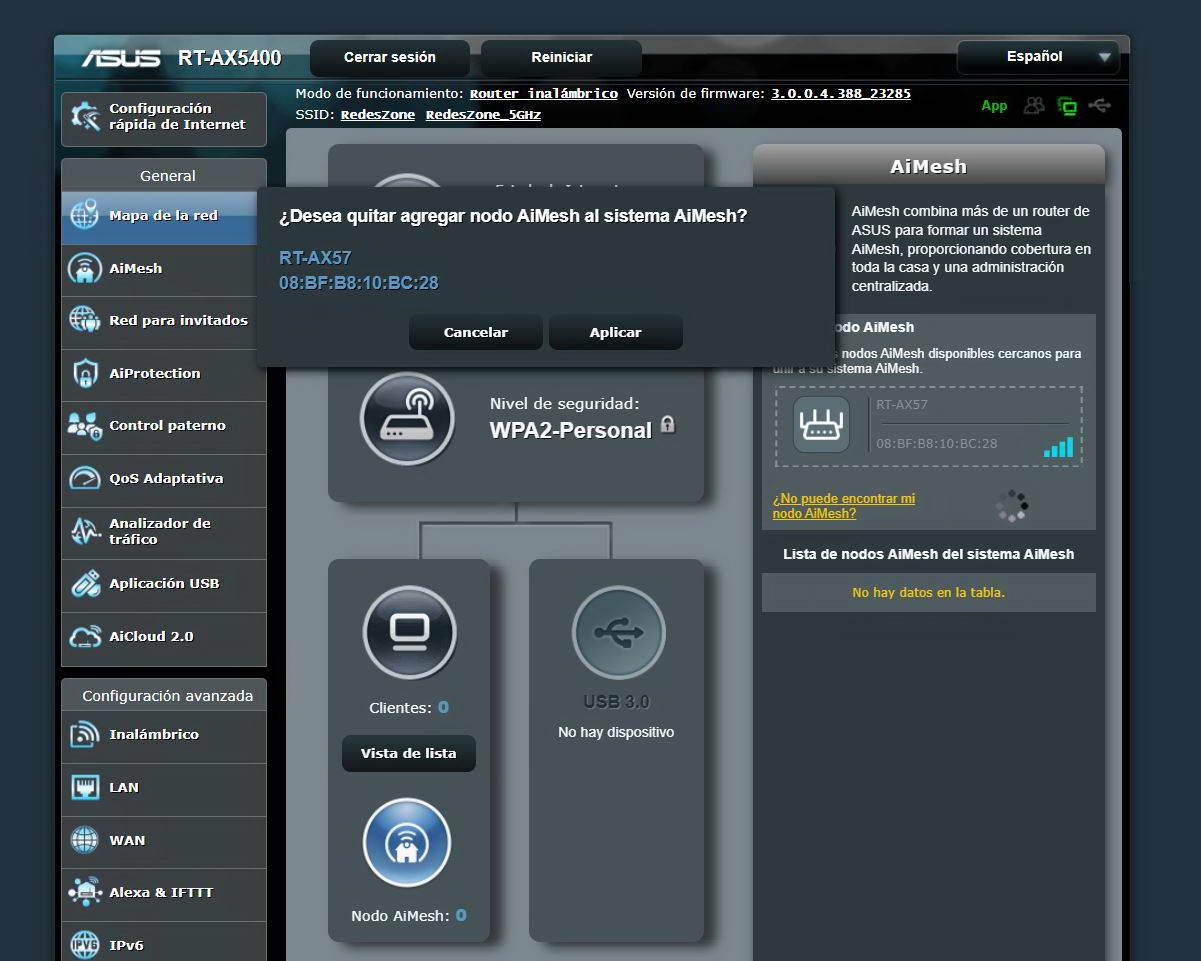
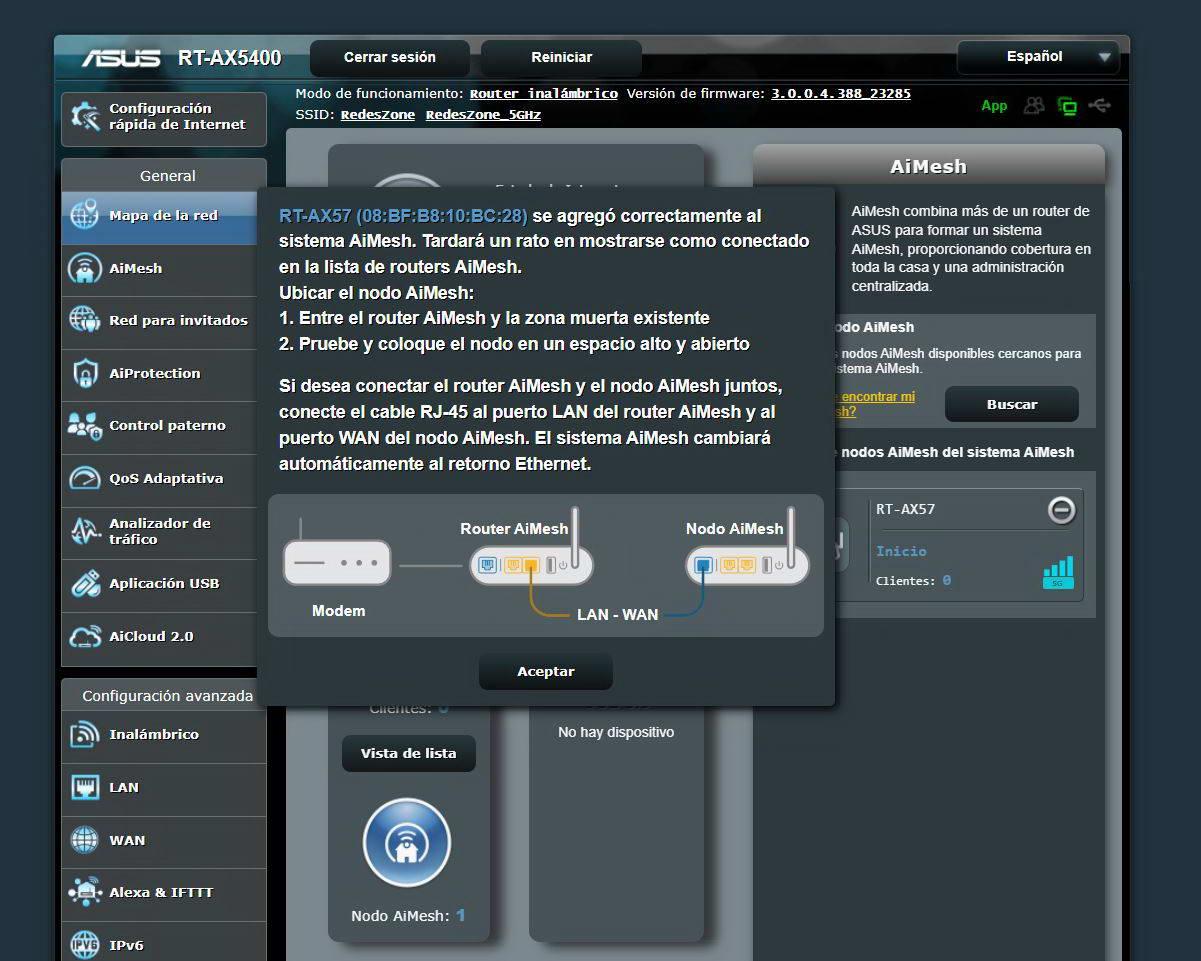
If we click on it, it will ask us if we want to «add AiMesh node to AiMesh system«, click on «Apply» and the automatic configuration process will begin.
This process can last approximately a minute and a half, at all times it will inform us of the process as a percentage.

It is very important to know that if we have several AiMesh nodes to add, we will have to do it one by one, we cannot add them all simultaneously.
Once we wait a minute and a half, it will inform us that the RT-AX57 It has been added correctly, and now it gives us a series of recommendations to place it in our home. In addition, we also have the possibility of connecting the AiMesh router to the node via cable, perfect for having the best possible performance.
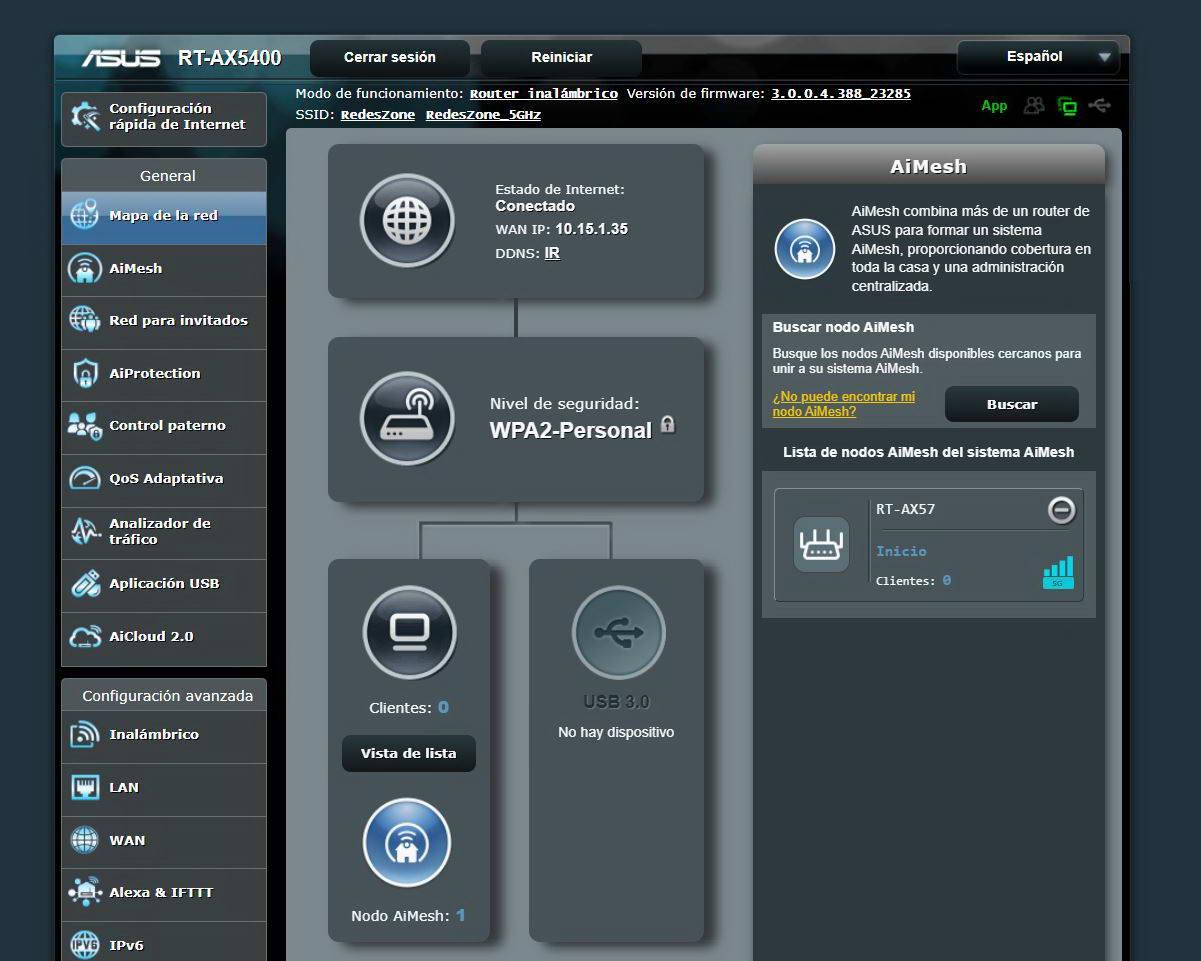
Now in the menu «AiMesh Node» we can see that the RT-AX57 has been added perfectly, we can see the location of the device, the number of connected clients, and also the coverage and the frequency band where the trunk link has been connected. An important aspect is that we can remove the AiMesh node at any time by clicking on the “-” button that you see just to the right of the router model.
As you have seen, adding an extensible router from the manufacturer ASUS to an existing network is really easy, also, we must not forget that we can add several AiMesh nodes without any problem, with the aim of further expanding the wireless network in our home.
AiMesh Configuration Options
In the main menu of «AiMesh» we can see the network architecture and the current state of the entire mesh network. If we click on the node or nodes, we can see the quality of the connection, change the location of “Home” to “Kitchen” or any other name that we want, we can also see the complete list of wireless and wired clients.
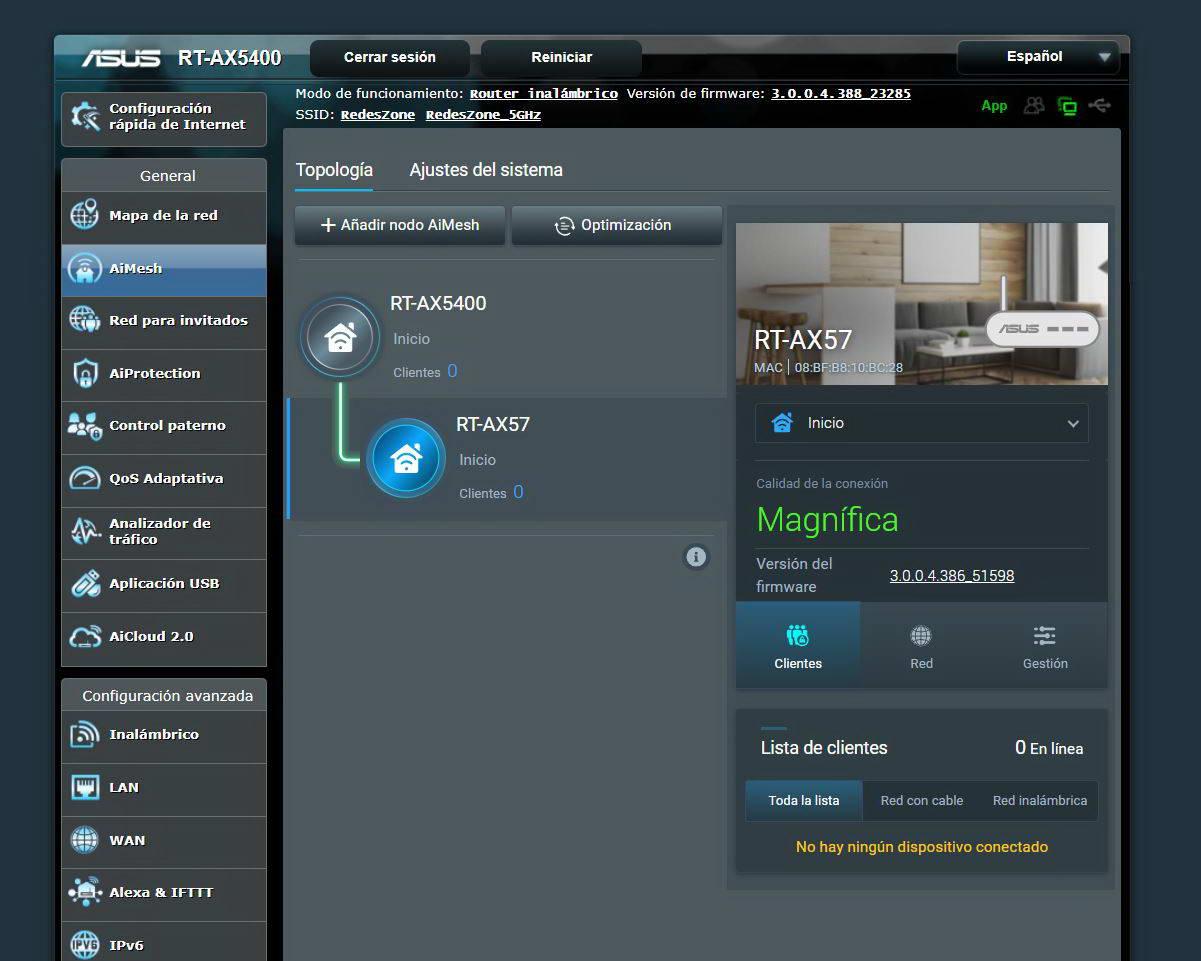
If we click on the section «Grid» we can see the type of uplink, synchronization speed, as well as the bandwidth that is being used right now in the WiFi network. We can also go to the «Management» where we can turn the node status LEDs on and off, as well as configure the connection priority with the main router, enable or disable different radios, configure the LAN/Switch part to activate Jumbo Frames or Link Aggregation if the node has it , as well as perform a global optimization of the mesh network, reboot the node or remove the node permanently.
All node configuration options are in this section of «AiMesh«. Also, something that we really liked about ASUS is that we can “force” which “uplink” node to connect to, in case we have more than two nodes, choose a specific node or the main router. ASUS does this automatically, but if we believe that connecting one node to another will provide us with better performance, we can force this configuration.
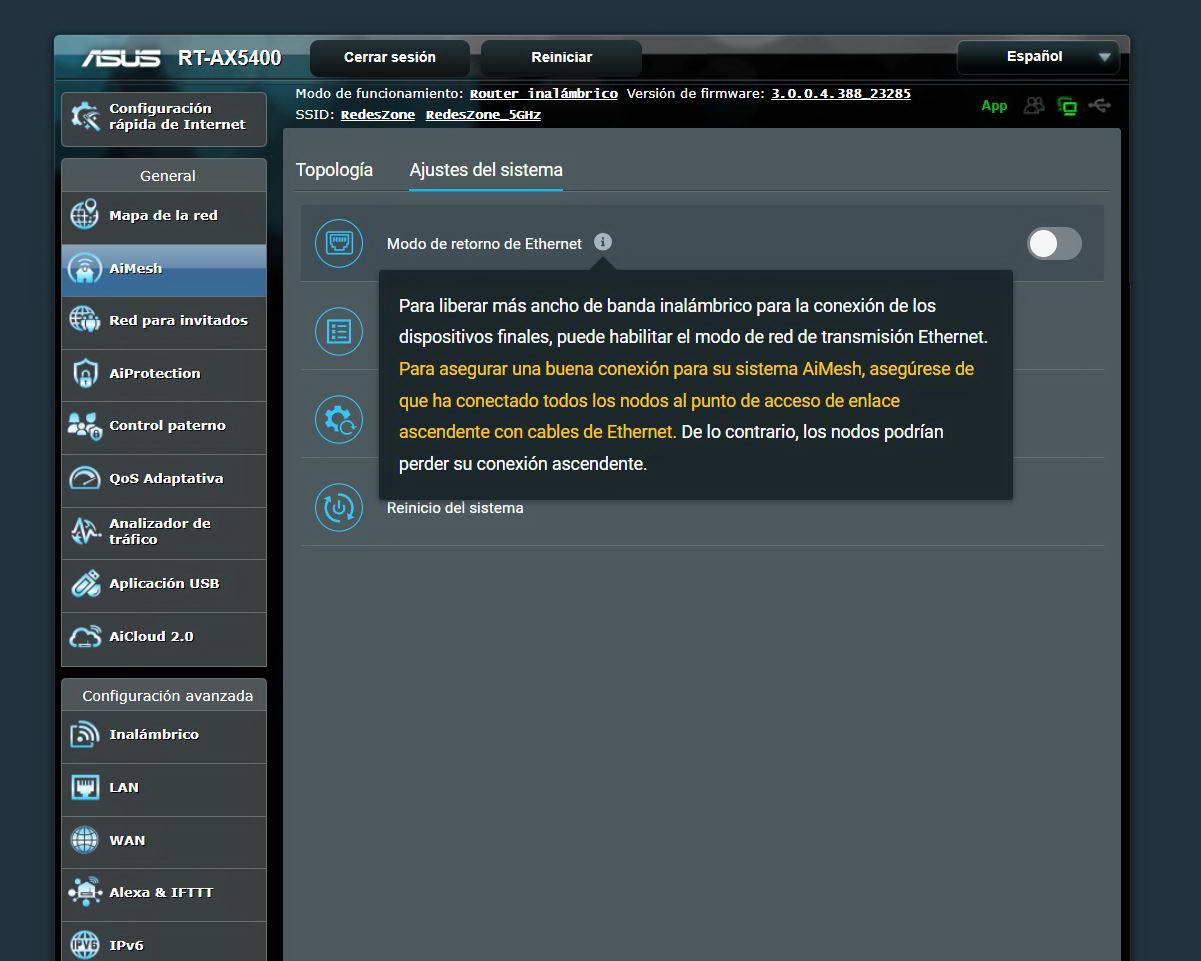
If we go to the section «System settings«, we have the possibility of activating the Ethernet return mode for all the equipment, although it is necessary that you previously cable all the AiMesh nodes with the main router, either directly to the router or through a switch. If you don’t do this, the AiMesh nodes will lose connection to the mesh network.
Other options that we have in this menu is that we can force the blocking of roaming for certain wireless clients, it will take us directly to the “Wireless” menu to register the different MACs that we want to block for roaming. The rest of the options are to perform a complete system optimization, as well as to reboot the system completely.
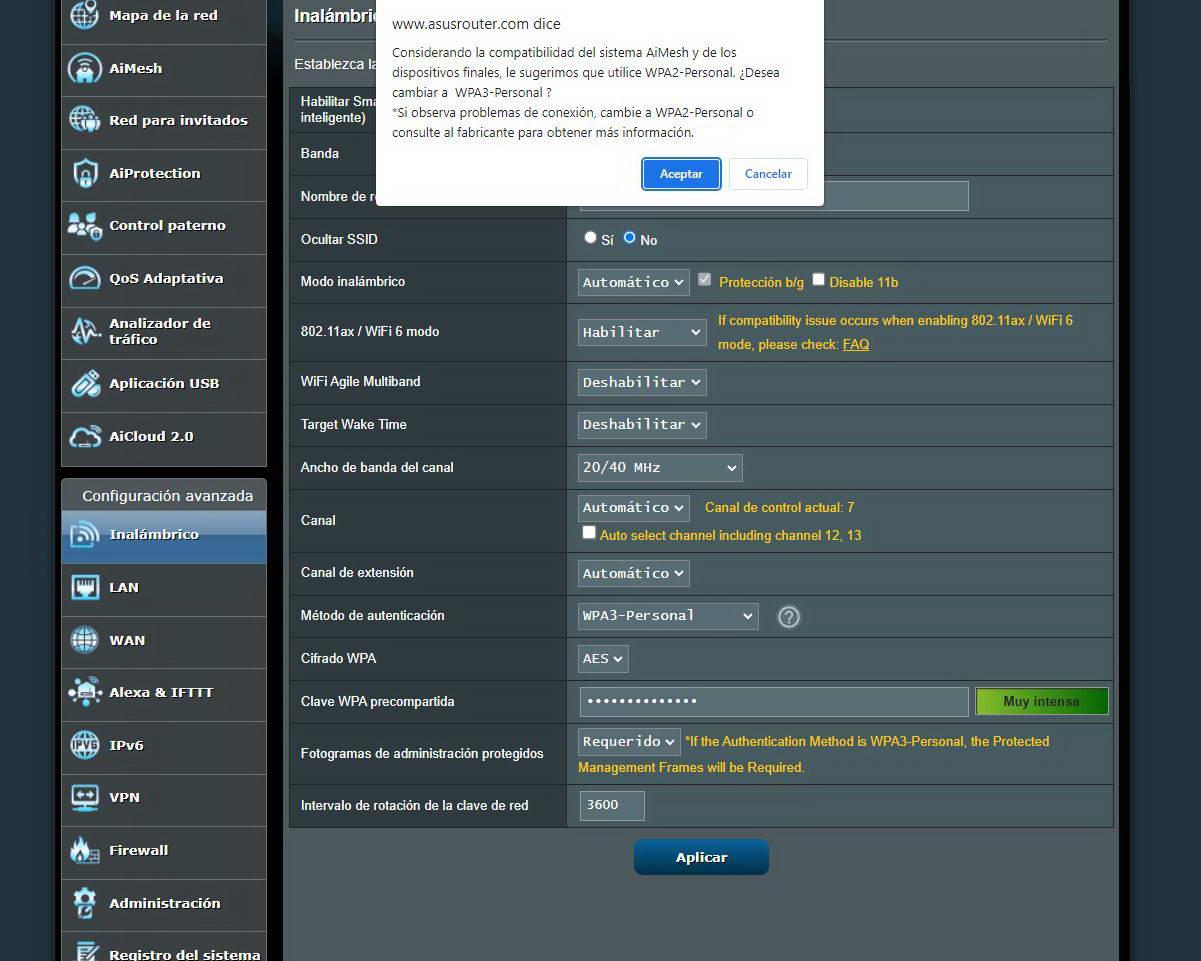
If we change any configuration option in the “wireless“, the AiMesh nodes will automatically take the configuration and restart to apply the changes. Whenever we make a change to the wireless section, all nodes will be disconnected and then reconnected. Of course, if you change something as important as the type of encryption, we will get a warning indicating that it could cause compatibility problems.
ASUS implemented a few years ago the possibility of forming a AiMesh network using WPA3-Personal, so we don’t have problems in this regard, but it is possible that you can’t connect different wireless clients to the network because they are not compatible. For this reason, ASUS advises us of this and recommends us to use WPA2-Personal to maintain backwards compatibility with older devices.
ASUS AiMesh technology uses the WPS protocol to connect the different nodes with the main router, for this reason, we cannot disable it if we want to add new nodes. If we have already added all the nodes, then we can deactivate it without any problem because the nodes will have already imported the configuration and will no longer use the WPS protocol to proceed with the authentication.
Because ASUS routers are extensible, we can create a high-performance mesh WiFi network with all the usual features, such as WiFi roaming between nodes using 802.11k/v protocols, as well as band-steering to unify the band. 2.4GHz and 5GHz in a single WiFi network name (SSID).
As you have seen, the process is quite simple and we can form a complete WiFi Mesh network in a couple of minutes, also, thanks to the advanced configuration options that we have available in the AiMesh section, we can adapt the Mesh system to The perfection.