In a world where files contain more and more information, sending compressed files is a quick and easy way to send the information our co-workers and friends need. Therefore, knowing how to compress and decompress files can help us work much more smoothly, since we don’t need to use additional applications like WeTransfer. In this article, we are going to see, we can zip and unzip files on Mac and iPad.
Compress and decompress files on Mac
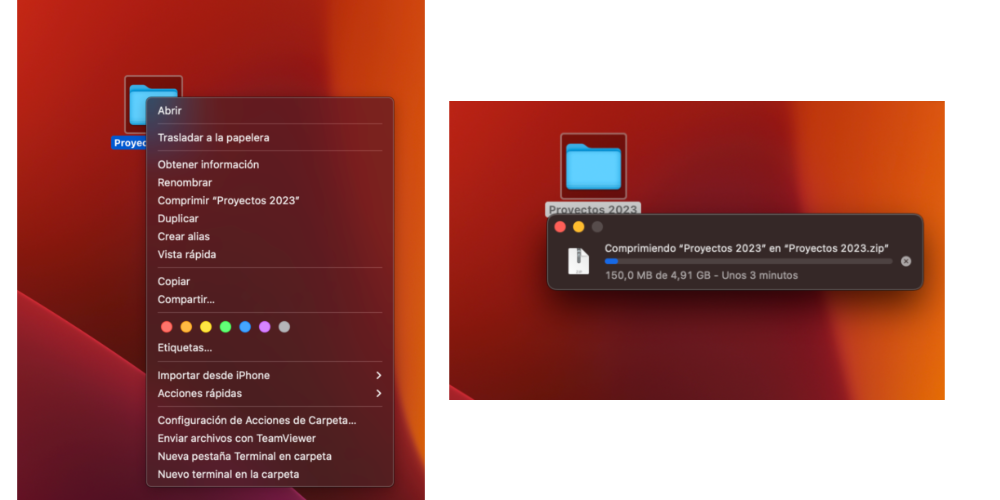
The process of compressing files on Mac is a very simple. Plus, best of all, you can select multiple files holding down the ‘Command’ key as you click on each file. We will describe the process below:
- Choose one or more files that you are going to compress
- Right-click on the selected file or folder and choose “Compress” in the context menu.
- macOS will automatically generate a ZIP file that is the same as the original file or folder and saves it to the same location. The process of compressing a file would be complete.
Once we have seen the process of compressing a file, we are going to see how you can carry out the following process, that is, unzip a file once you have reached your destination. The process consists of the following steps.
- Locate the ZIP file that you want to unzip. It is probably located in the Downloads folder, since it is the default site estimated by macOS.
- Beam Double click in the ZIP file. The system will automatically extract the files contained in the ZIP file and create a new folder with the same name as the original ZIP file in the same location.
- If you want to extract the files in a different location, Right click on the ZIP file, select “To open with” and choose “File Utility”. Next, click “Extract” and select the location where you want to save the extracted files.

Zip and unzip files on iPad
In the same way that we can compress and decompress files in macOS, iPadOS, and its functions designed for productivity, also includes this possibility. However, to be able to compress files from the Apple tablet, you need third party apps, many of them known as iZip, WinZip and Documents by Readdle. Next, we are going to see how you can compress a file.
- Download and install your favorite app from the App Store. The most recommended is iZip
- Open the app and grant the necessary permissions to access your files.
- Navigate to the location of the files or folders you want to compress.
- Choose the files or folders
- Once all the elements have been selected, click on the button » zip» at the bottom of the screen.
- Choose the name and location for the ZIP file and click on “Save”.
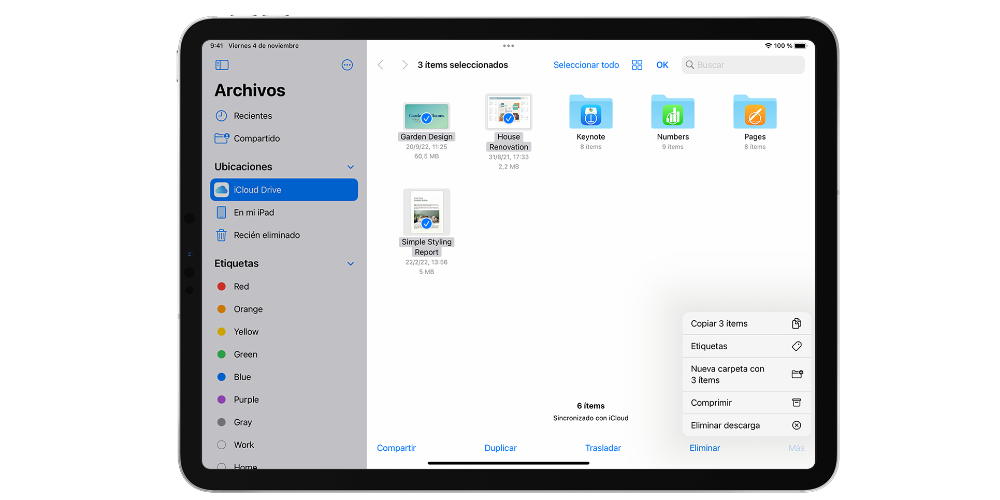
To conclude this article, we are going to see how we can unzip a file on iPad in any of its market segments. The process is very simple and similar to the previous one. It consists of the following four steps:
- Locate the ZIP file you want to unzip in the archive app or compression app you are using.
- Choose the compressed file and click on ‘Extract’. If you’re using another app, follow that app’s specific instructions for extracting files.
- Choose the location where you want save the extracted files and click on ‘Save’ or ‘Extract’ depending on the application you are using.
- Once the extraction process is complete, you can access files unzipped to the selected location.