One of the purposes of the Today at Apple that the Cupertino company carries out in its Apple Stores is to teach users how to get the most out of their devices, including the iPhone. If you are going to attend one of the workshops in which they will teach you how to use your smartphone camera like a professional, surely the tricks that we tell you in this post will help you to be better prepared and take advantage of it much more.
5 Tricks to take better photos with the iPhone
One of the most popular workshops among all those offered by Apple are those related to photography and video. Fortunately, you have them of all types, each adapted to the knowledge that users have. Well, then, we are going to tell you 5 tricks that you have to know to take better photographs and thus, go more and better prepared to these workshops to make the most of them.
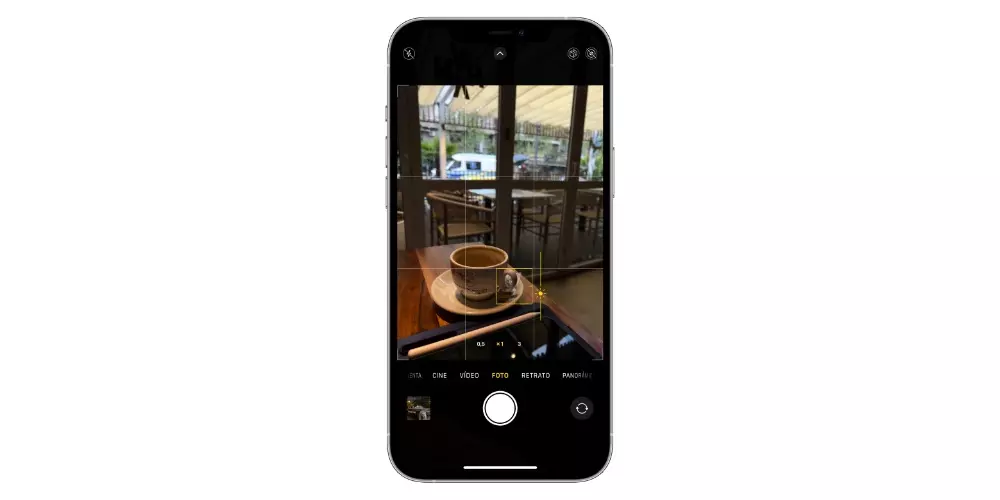
- The first of all has to do with your iPhone’s camera settings and is surely the most basic, but perhaps also the most important and the one that will help you the most at first. Is about activate the camera grid. This will help you in all your photographs to be able to frame them much better, as well as to keep them straight whenever you want. In order to activate the grid you just have to follow the following steps.
- On your iPhone, open Settings.
- Tap “Camera.”
- Activate “Grid”.
- The fact of activating the grid on the iPhone will allow you to take advantage of this next trick, and that is that always keep in mind the rule of thirds. This is one of the most basic rules of photography, it consists of dividing the image into three thirds, both horizontally and vertically, so activating the grid will come in handy. To begin with, the most recommended thing is that when taking photographs you always place the subject in the center or on one of the vertical lines, just as if you are going to take a landscape photograph, the horizon is placed on one of the horizontal lines.
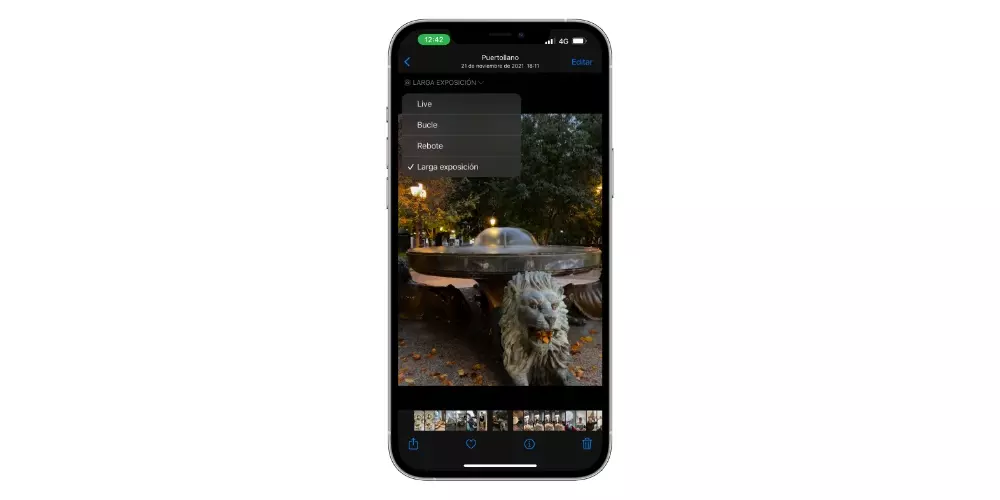
- One of the photography modes that the iPhone has is “Live”, which allows you to capture the moments before and after the shot. Well, if you take pictures with this setting activated, then you can transform into long exposure photographs. These are the typical images where it seems that the water is flowing or where the lights take on movement. To do this, you just have to take a photo in Live and carry out the following steps.
- In the upper left, click on “LIVE”.
- Select “Long Exposure.”
- A trick that will come in handy to take more original photographs is flip the phone, in this way you can place the cameras in a lower position and we assure you that the perspective will change a lot. This is much more profitable if you take pictures vertically.
- Lastly, something you have to always take into account is the exposure of the photograph. While Apple doesn’t provide users with the opportunity to tweak manual settings in the native camera app, it does give you the ability to slightly tweak the exposure of photos. To do this, you just have to follow the following steps.
- Open the Camera app.
- Tap on a part of the image.
- A square will appear with a vertical line to its right and a sun.
- Move your finger up and down this line to increase or decrease the exposure.


