Once we have it enabled, we can check how a watermark appears on our desktop screen, just on the right side, which indicates that this mode is enabled. In this case, if we have been aware and have enabled it by ourselves manually, there is no problem. However, if we have not enabled it, it is likely that we do not need to use it, so it is always advisable to have it disabled and avoid installing drivers or software that are not signed.
Ways to run it on Windows
When it comes to activating it, we have different ways, either from the “Command Prompt” or from the “Advanced Mode” of Windows. It is also true that you have to be careful, as some applications, such as Trackpad ++ (a trackpad controller with gestures and multi-touch functions) are capable of automatically enabling this mode. In this way, it can be installed in the operating system despite not having the corresponding signature.
In the event that we need to execute it, we must follow the following steps.
From the Command Prompt
One of the ways to activate the Windows Test Mode is on the command line through the so-called Command Prompt. In order to activate it we must write cmd in the search box of the Start menu. Once it appears, we must make sure that we click on “Run with administrator rights”, otherwise it will not be possible to execute the necessary command.
Later, the Command Prompt window appears, we must write the following command and press Enter.
bcdedit.exe -set TESTSIGNING ON
Once executed, a message will be displayed informing that it has been successfully activated. Now we just have to restart the system and the desktop will show the watermark in the lower right, where it indicates that Windows is enabled in Test Mode.
We must also bear in mind that, in case we have activated the Secure Boot in Windows, this mode will be blocked. In that case with lusing this command will not help us. On the contrary, if it is deactivated, we will have no problem enabling the Test Mode and being able to install unsigned software and drivers on the computer.
From Advanced Mode
We also have another method to be able to start the PC directly from Test Mode, such as from the advanced Windows start screen. To access we must press the keyboard shortcut “Windows + I” that will take us to the “Settings” menu. Later we click on “Update and security”. In the new window, in the menu on the left we select “Recovery”. Finally, on the right side we find the “Advanced startup” section, so we must click on “Restart now”.

This will cause the computer to restart and during this process we can access the “Troubleshoot” mode. Here we must click on «Advanced Options». Later we must access the “Startup Configuration”, by clicking on the “Restart” button that we find in the lower right part.

Once it restarts, a new screen will appear where we can modify any of the parameters, so we will press F7 to “Disable the mandatory use of signed drivers”. This will cause the computer to restart again. From now on, if we install unsigned drivers, a warning will appear informing us of the consequences of installing this type of driver.
How to disable it
As long as we have the Test Mode activated, every time we restart Windows we will continue to be in Test Mode. That is why, when we no longer need to use it, we must deactivate it to return to the original state of the system, preventing the installation of unsigned software and drivers.
To do this, we run the Command Prompt by typing cmd in the search box of the Start menu and running it with administrator rights. Once in the window we must write the following commands and pressing Enter after each one to confirm:
Bcdedit.exe -set TESTSIGNING OFF
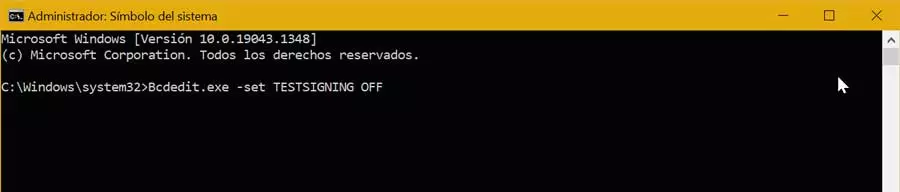
Once these commands have been executed in the Command Prompt in Test Mode, the message “The operation was completed successfully” will appear. Now we only have to restart the operating system so that the changes take effect and this mode is correctly deactivated. In addition, we can verify that Windows now starts up normally, incorporating the drivers or unsigned software that we have installed.
Error message when deactivating
In the event that when trying to deactivate it an error message appears, it may be that Windows requires special permissions to disable the Test Mode. From the Command Prompt started with administrator rights we write the following command and press Enter
Bcdedit.exe -set loadoptions ENABLE_INTEGRITY_CHECKS

Later, we write this other command and press Enter
Bcdedit.exe -set TESTSIGNING OFF
Once this is done, the message should appear indicating that the operation was carried out correctly, and restarting the PC, the Test Mode should have disappeared.