Why should I configure it in bridge mode?
The bridge mode allows us to get the most out of a neutral router or WiFi Mesh system that we connect to the Movistar router. Thanks to this mode of configuration of the Movistar router, the router that we connect behind will have the public IP address, in order to take advantage of all the advantages of the neutral router that we buy. In addition, if we choose a router that has a firmware with support for the Movistar Triple VLAN, then we can take full advantage of the triple-play service of the blue operator, since this neutral router will be in charge of managing the Internet, VoIP and also the part of IPTV with the Movistar decoder.
In many Movistar routers we have the possibility of configuring it in bridging mode easily and quickly in the advanced configuration menu, however, unfortunately in this Askey RTF8115VW model we do not have it, so we have to do a much more « manual ”, in order to make the most of the router we buy.
Inside the router, what we achieve with this bridge mode is to pass the three VLANs (Internet, VoIP and IPTV) with the 802.1Q standard tag, that is, we pass all the VLANs in «Tagged» mode, with the aim that the router that we connect behind takes care of its management.
What is the difference with the single-user mode?
The single-user mode that Movistar offers us through the basic configuration allows us to connect a neutral router or WiFi Mesh system using the operator’s PPPoE, without the need to use any VLAN ID on this neutral router or WiFi Mesh system. Internally, what the router does is provide the Internet connection in VLAN ID 6 untagged mode, so it is not necessary to use VLANs in this case. This configuration mode is valid if you only want to have Internet in the neutral router or WiFi mesh system, and that the Movistar router itself is in charge of managing the IPTV part and also the VoIP part.
If you are interested in managing all VLANs and services (Internet, VoIP and IPTV) then you must configure it in full bridge or bridge mode. If you are interested in that only the neutral router manages the Internet connection, and the rest of the services (VoIP and IPTV) take care of the Movistar router, then the most advisable thing is to use and activate the single-user mode that Movistar provides us.
Step-by-step setup
The first thing we must do is access the firmware configuration menu via the web, to do this, we must open a web browser and put in the address bar http://192.168.1.1, we enter the password that we have at the bottom of the router (on the sticker) and click on «Enter».
Once inside, we will see the basic menu, we have to go to the “Menu” section in the upper left, and select the “Advanced Settings” option. Once we click on “Advanced Settings” we have to click on “OK” to enter this menu.
The first thing we will see in the advanced configuration menu is the Askey RTF8115VW router model, we will also see the hardware version, the firmware version, the GPON status and other details of the general status of the router.
Once we are in the advanced configuration menu, we must perform a total of three actions to put this router in bridge or bridge mode.
Remove the interfaces on the WAN Interface
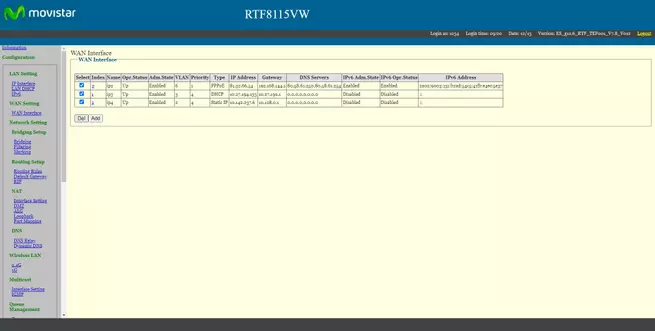
The first thing we should do is go to the “WAN Setting / WAN Interface” section. In this menu we will have the different interfaces for the Internet (with its public IP address), the part of IPTV and VoIP. From here we have to take and save the static IP address that belongs to VLAN 2 of the IPTV, the name is “ip4”. We have to save both the IP address and the default gateway, the subnet mask, if the neutral router asks for it, we will have to calculate it based on the IP and the default gateway. In our case, the subnet mask is 255.128.0.0.
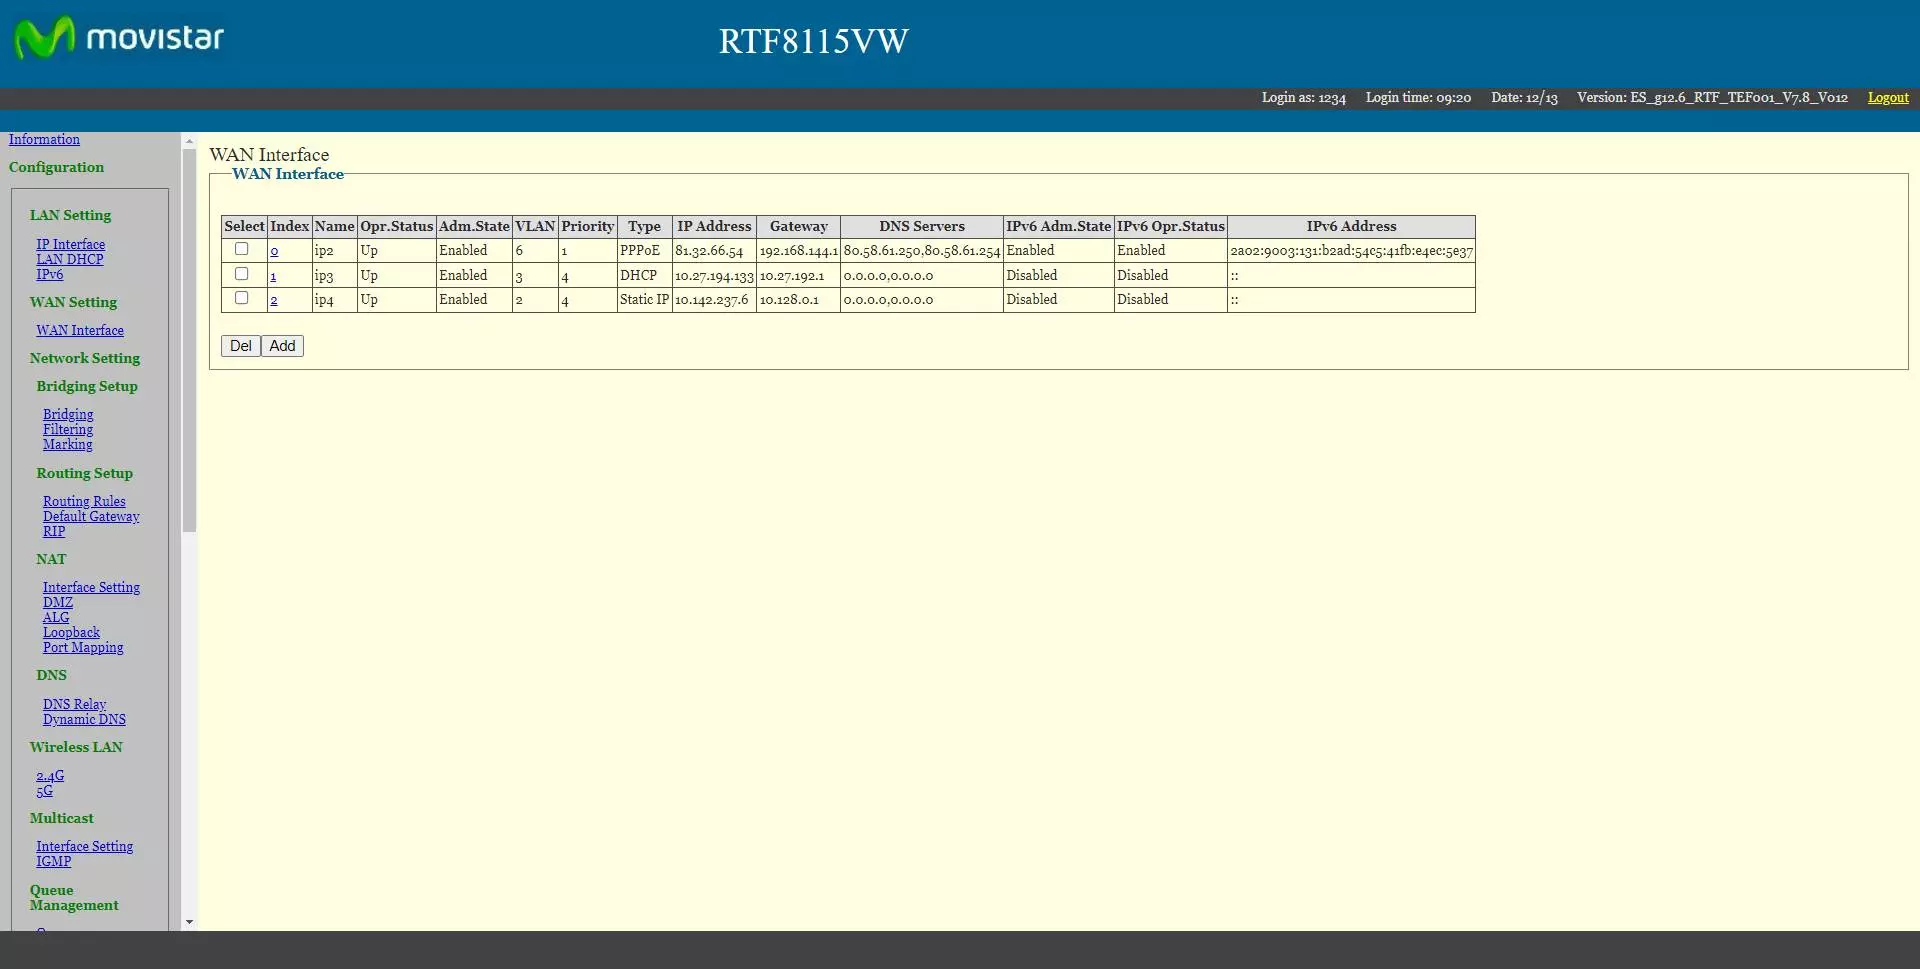
We select the three interfaces and click on «Del» to eliminate them. Once we have eliminated them, everything will appear completely empty, this is how it should be.

Now we are going to see the “Bridging” section.
See the Bridging Setup section in Bridging
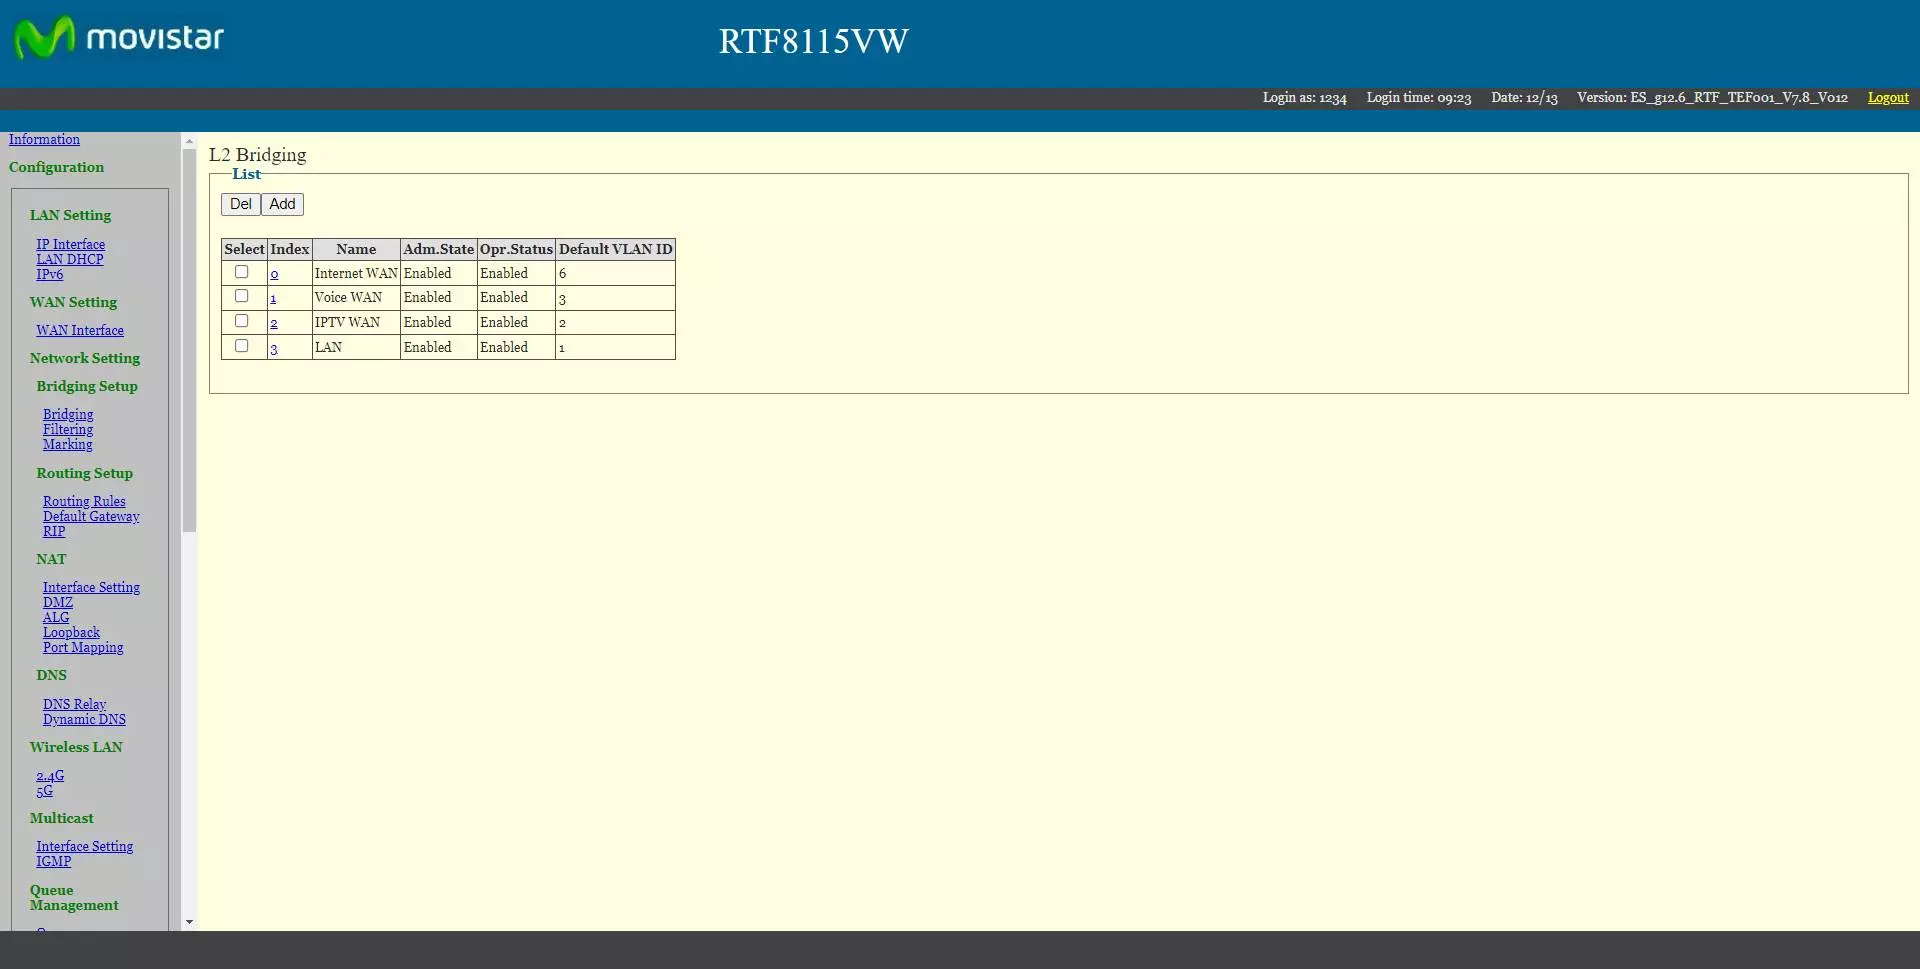
If we go to the «Bridging Setup / Bridging» section we will be able to see the different interfaces at L2 level that we have in the router, as you can see, we have a total of four, the triple-play plus the part of the LAN, with its corresponding VLAN IDs. All of them are enabled and working correctly, even if we have deleted the WAN Interfaces.
Now we will have to configure both the “Filtering” part as well as the “Marking” part.
Configure Filtering in Bridging Setup
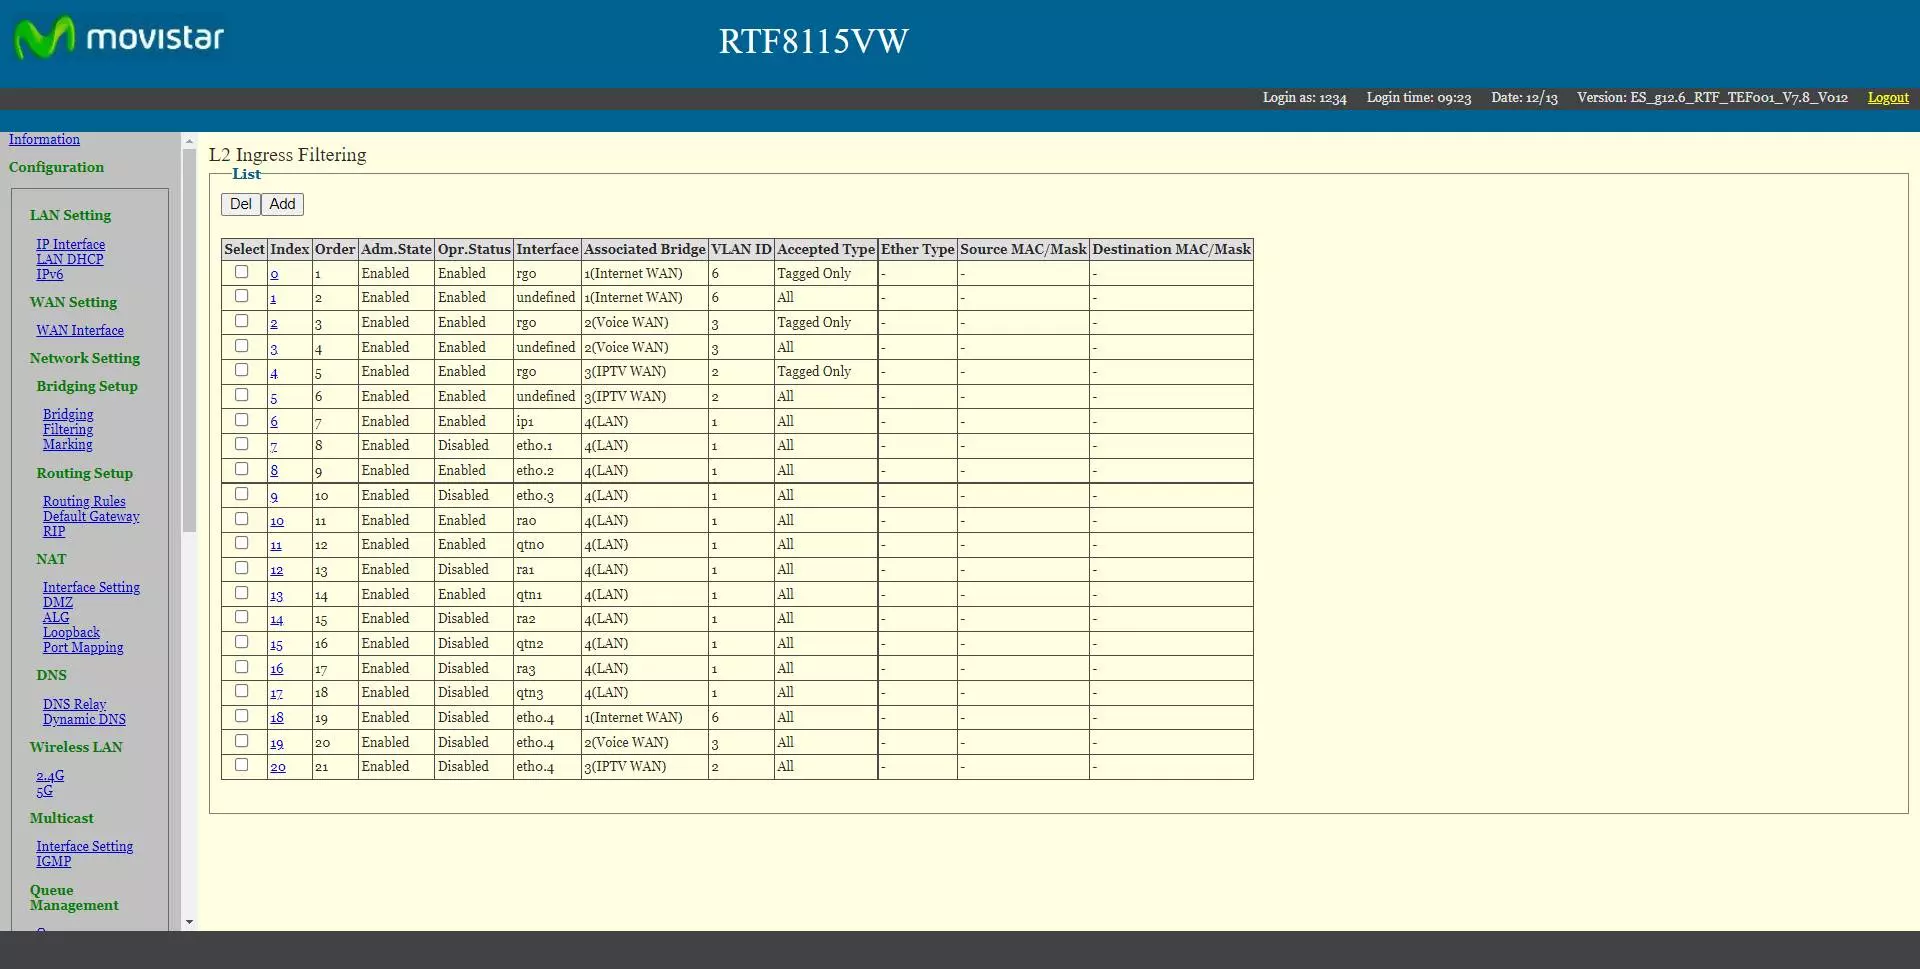
We come to the important moment of configuration. Before doing anything, we must decide which Ethernet port of the router we are going to use for this bridge. This Ethernet port must be connected with a network cable to the WAN port of the neutral router or WiFi Mesh system. In the example that we give you below, we have used the Ethernet LAN 4 port to use it as a bridge, therefore, we have a cable from the LAN port 4 of the Movistar router to the Internet WAN port of the neutral router or WiFi Mesh system.
The first thing we must do is select the port «eth0.4» that we have, and delete it by clicking on «Del».
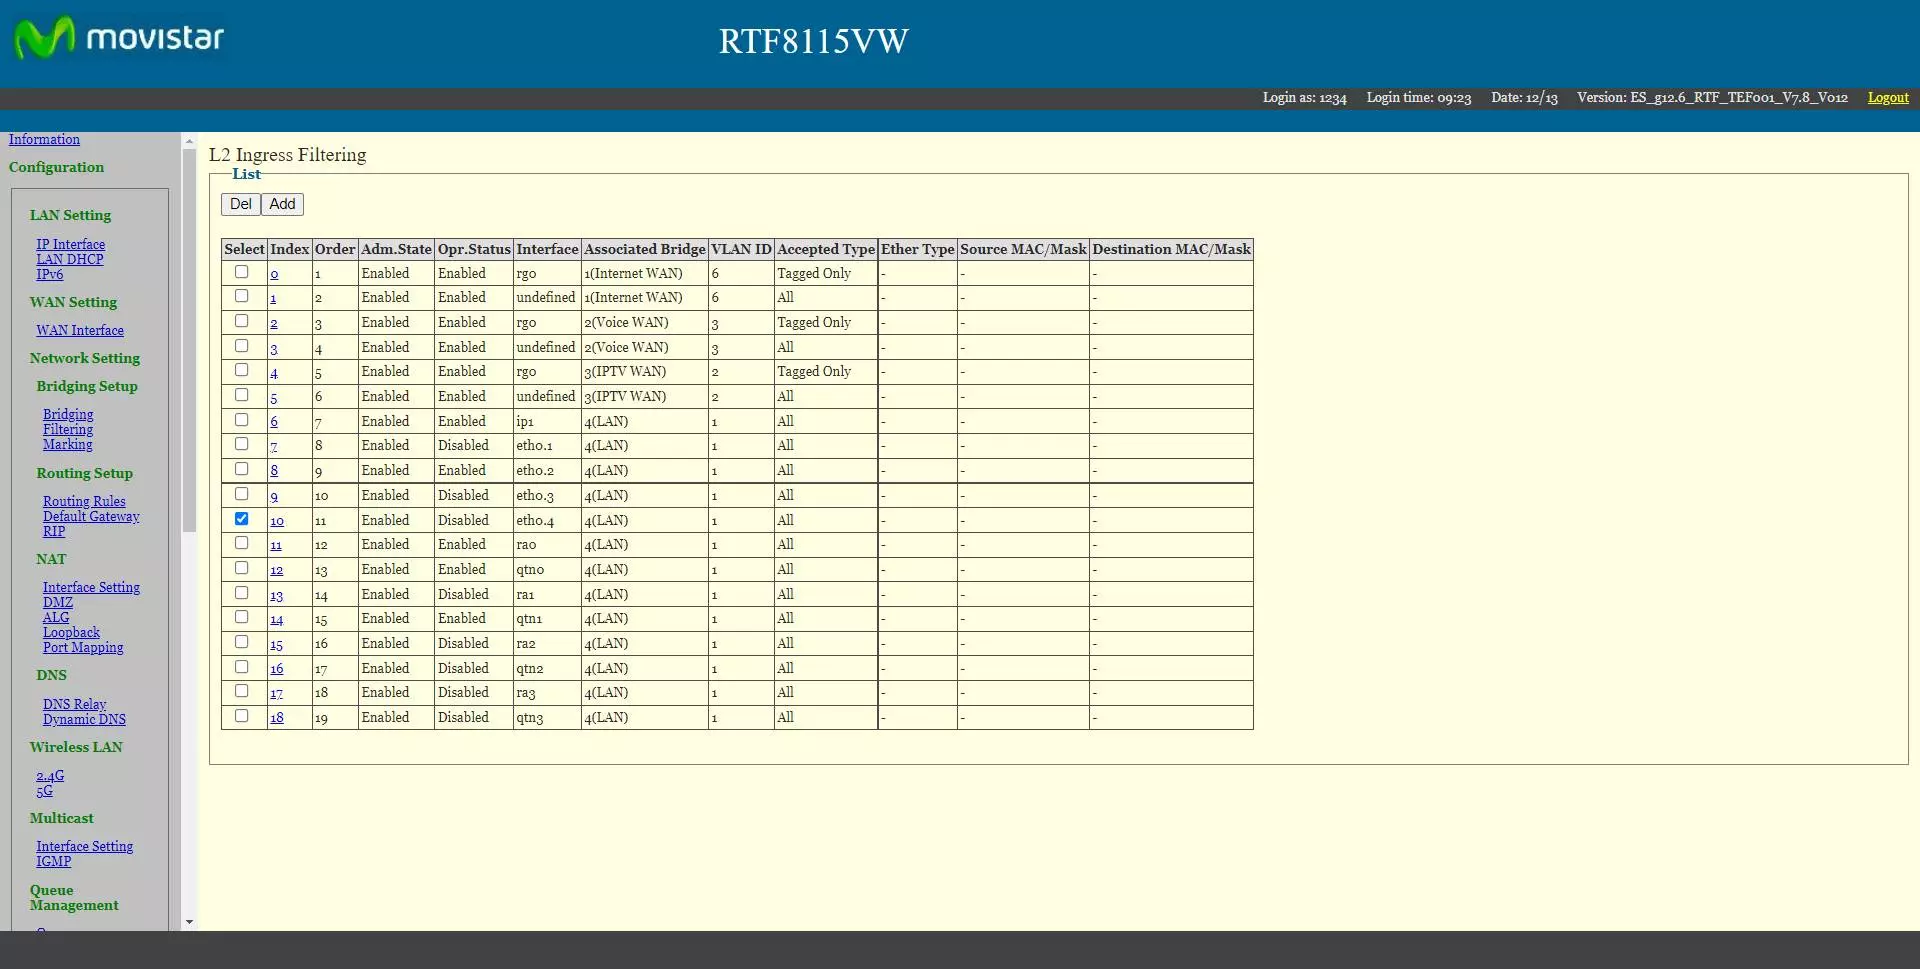
Once deleted it will disappear:
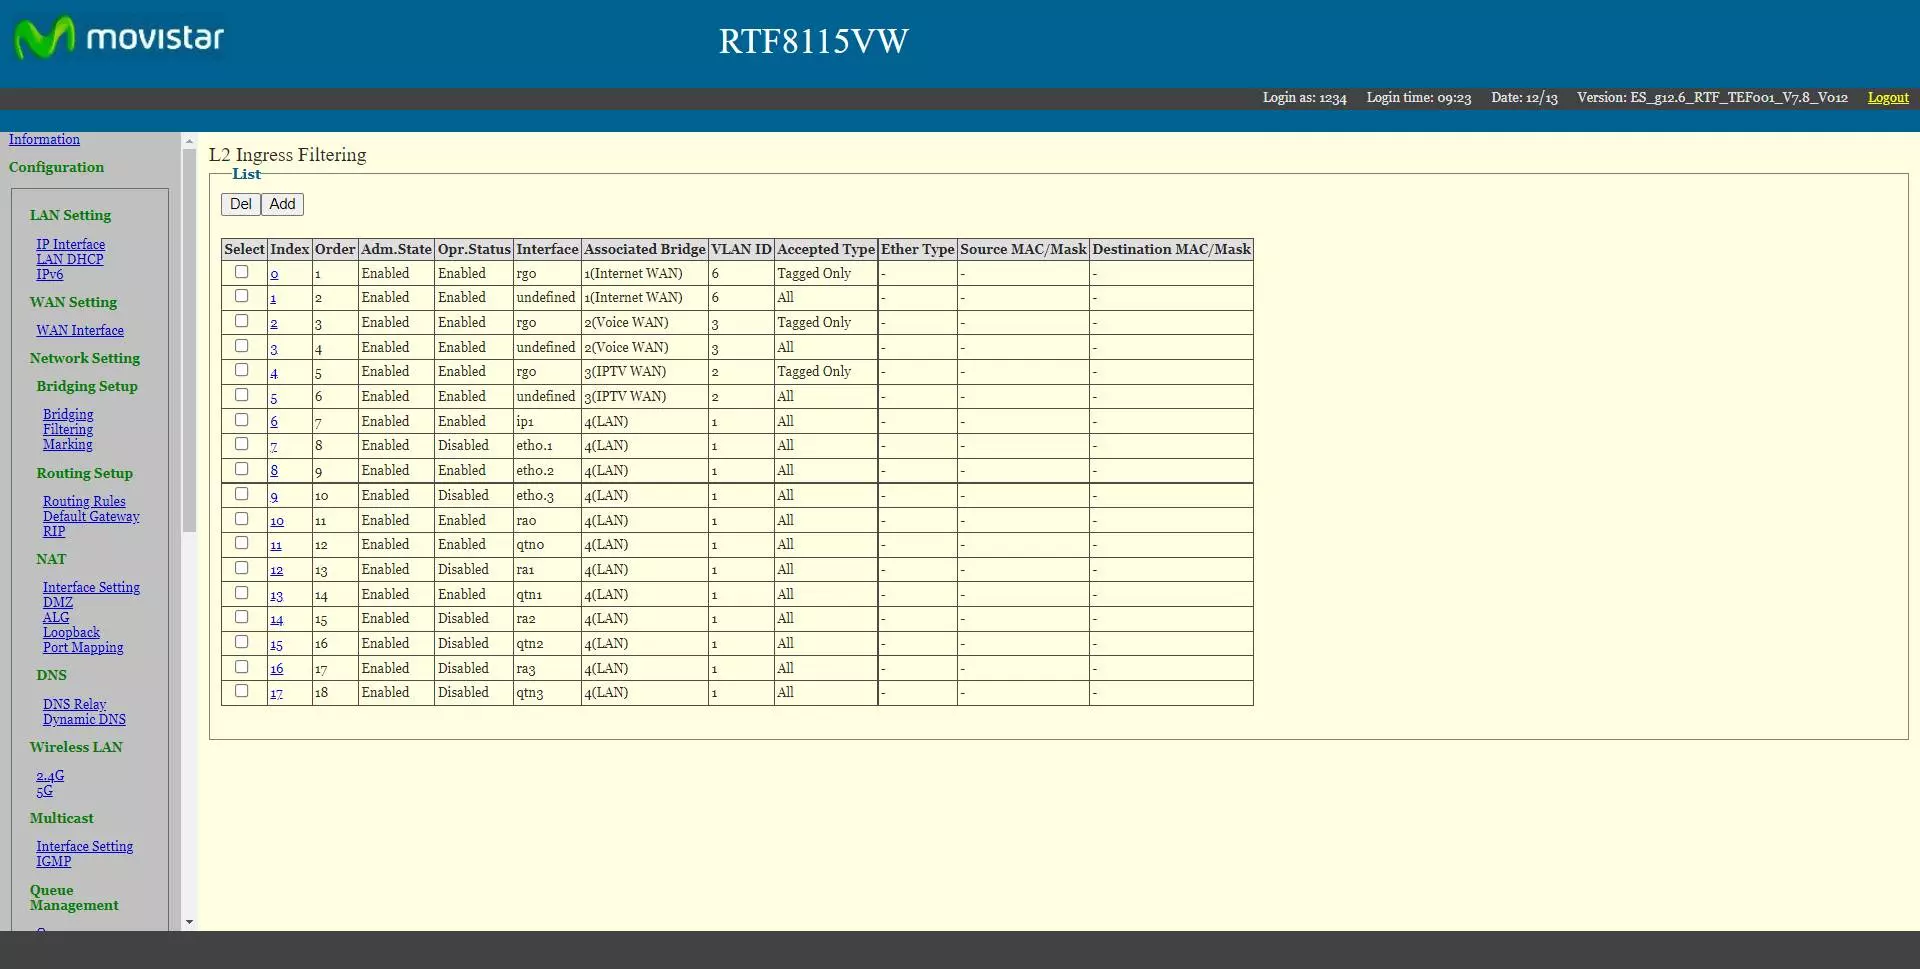
Now we have to create a total of 3 rules, one for each VLAN that we want to put in bridge mode.
The configuration for the Internet VLAN would be the following:
- Adm.State: Enable
- Order: lowest (to put it at the bottom of the list of rules).
- Ingress Interface: eth0.4
- Associated bridge: 1 (Internet WAN)
- Ingress Packet: «All»
- VLAN ID: 6 (or we leave it blank, it will take it automatically when relating it to the «associated bridge»).
The configuration for the VoIP VLAN would be the following:
- Adm.State: Enable
- Order: lowest (to put it at the bottom of the list of rules).
- Ingress Interface: eth0.4
- Associated bridge: 2 (Voice WAN)
- Ingress Packet: «All»
- VLAN ID: 3 (or we leave it blank)
The configuration for the IPTV VLAN would be the following:
- Adm.State: Enable
- Order: lowest (to put it at the bottom of the list of rules).
- Ingress Interface: eth0.4
- Associated bridge: 3 (IPTV WAN)
- Ingress Packet: «All»
- VLAN ID: 2 (or we leave it blank)
We do not touch the rest of the options, and we click on «Apply».
Once we have finished the configuration, we should see the following in the main «Filtering» menu:
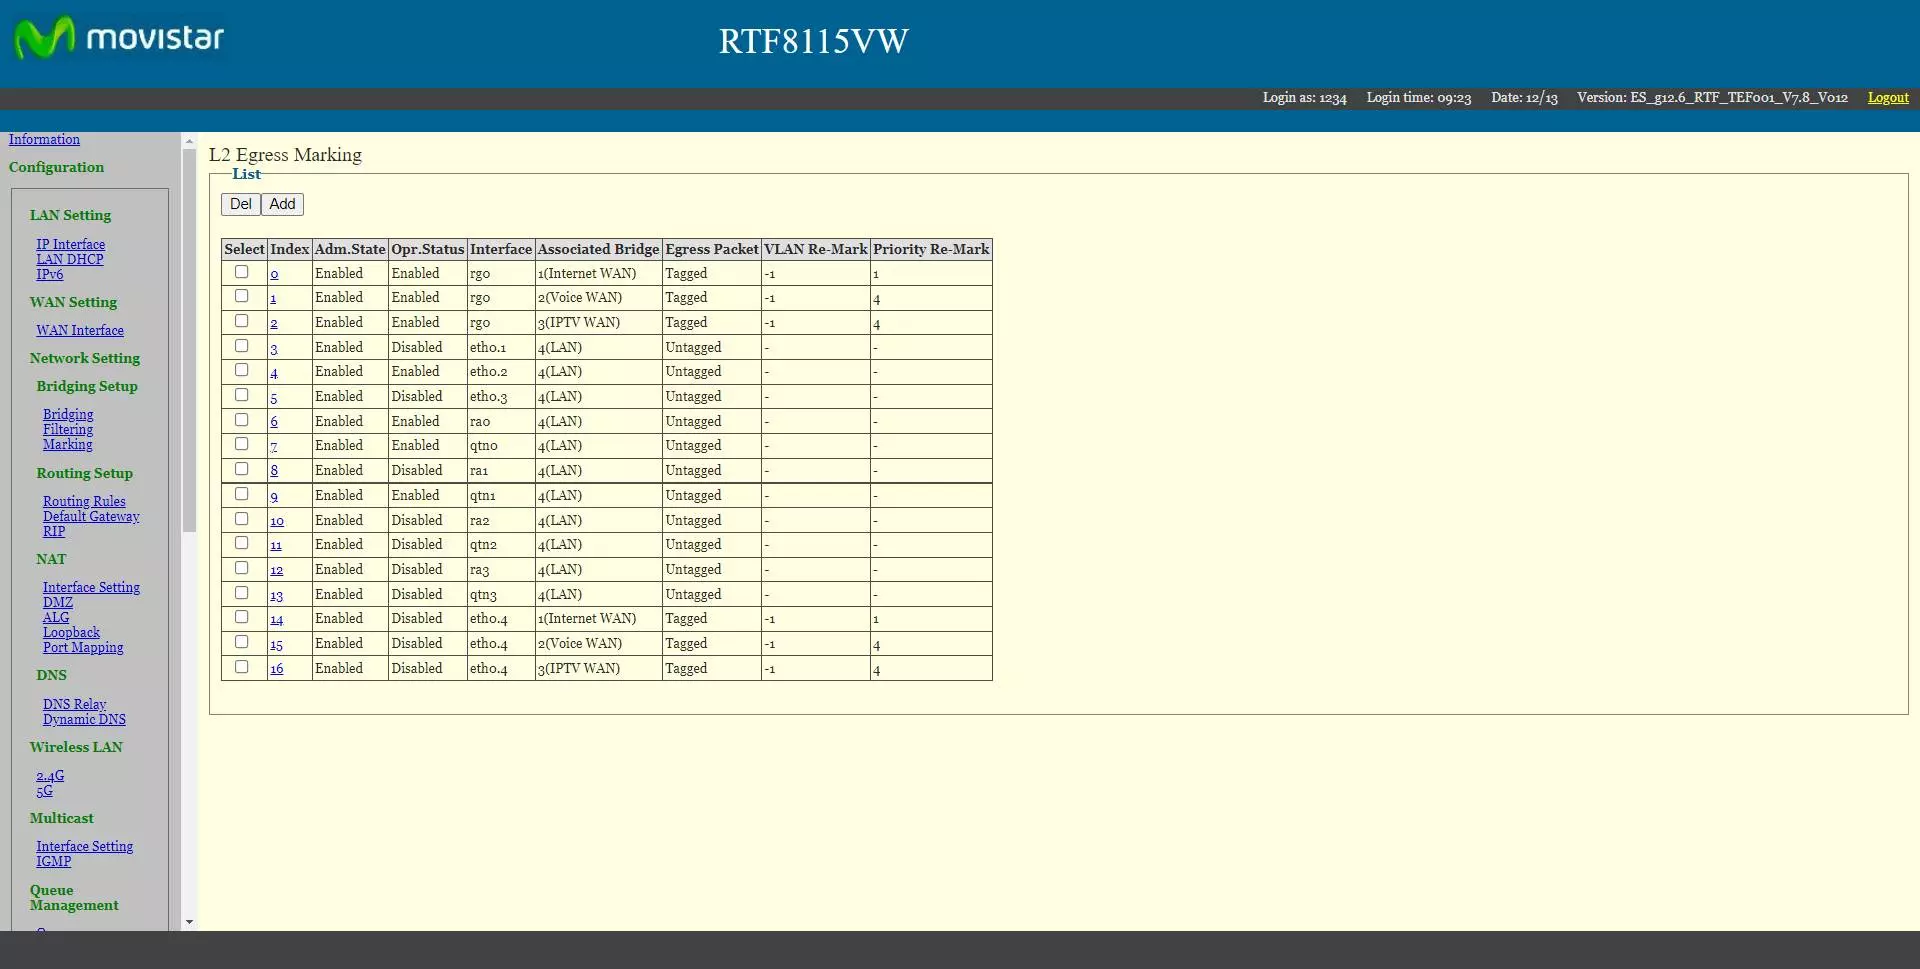
Now we have to configure the «Marking».
Configure the Marking in Bridging Setup
The first thing we should do on the «Bridging Setup / Marking»Is to eliminate the configuration of the eth0.4 interface that we are using as a bridge with all the VLANs.

Now we have to create a total of 3 rules, one for each VLAN that we want to put in bridge mode.
The configuration for the Internet VLAN would be the following:
- Adm.State: Enable
- Ingress Interface: eth0.4
- Associated bridge: 1 (Internet WAN)
- Egress Marking:
- Accepted Type: tagged
- VLAN ID: -1
- Priority re-mark: 1
We click on «Apply».
The configuration for the VoIP VLAN would be the following:
- Adm.State: Enable
- Ingress Interface: eth0.4
- Associated bridge: 2 (Voice WAN)
- Egress Marking:
- Accepted Type: tagged
- VLAN ID: -1
- Priority re-mark: 4
We click on «Apply».
The configuration for the IPTV VLAN would be the following:
- Adm.State: Enable
- Ingress Interface: eth0.4
- Associated bridge: 3 (IPTV WAN)
- Egress Marking:
- Accepted Type: tagged
- VLAN ID: -1
- Priority re-mark: 4
We click on «Apply».
The summary of the configuration made in the section «Bridging setup / Marking” is the next:
Now we can turn off the router and turn it on again, to make sure that all the changes have been applied correctly.
In these moments, if we connect a neutral router or WiFi Mesh system, we will have to configure the Internet connection with the typical configuration of PPPoE and VLAN ID 6. If your device supports Movistar’s triple VLAN, you will have to configure it correctly to manage the part of IPTV and VoIP, and everything will work as long as the manufacturer has support for this functionality.