Most users currently have hundreds or thousands of photographic files that are stored on their computers. Whether for use professional or personal, on many occasions these images require some type of treatment. That is not to mention the professionals who are dedicated to this type of work and who need programs that adapt to their needs. Along these same lines, we want to focus on the aforementioned software proposal, which is sure to be more than familiar to most.
This is an application that adapts to all kinds of uses and people. Thanks to its innumerable functions we will have the possibility of both performing a basic edition of our photos, how to carry out the more advanced tasks. Everything will depend on what we need in each case, as well as the knowledge we have of the application. It is true that getting the most out of Photoshop is not easy, but most of us are not going to need it either.
Some basic functions that Photoshop offers us
We already told you before that despite the progress of this software solution Generally speaking, it also offers the most basic users some very interesting features. These allow most to adapt and make some changes to their own images before, for example, sharing them on Internet.
There are several tools of this type at the user level with little knowledge that the program offers us. In addition, we can take advantage of all its benefits quite easily. On the left side of the main interface that serves as a work desk, we find a vertical bar with many of them. These will allow us to cut out a part of the photo with a couple of clicks, add a custom text, clone some section, etc.
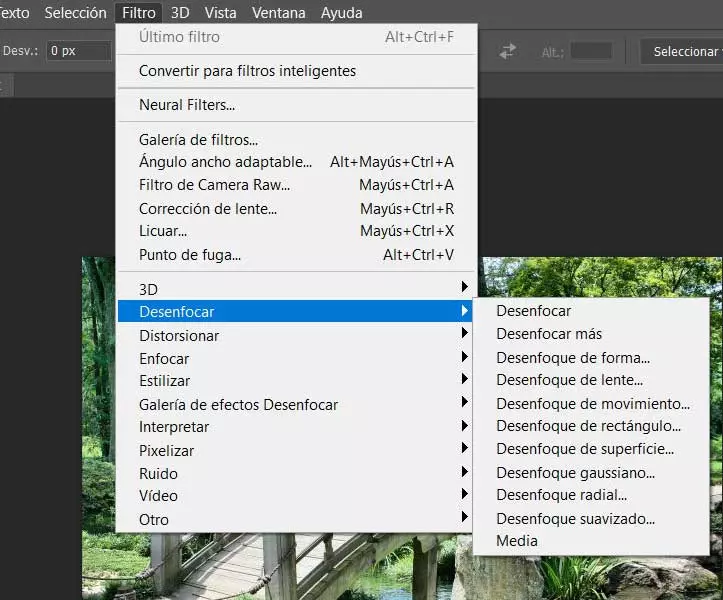
To all this, we can add the enormous number of filters that we can apply to our images and thus give them a completely renewed and professional appearance. In addition, these filters are completely customizable and do not require any prior knowledge in the photo editing sector. The changes we make with them are carried out in real time and we can undo them in case of error. This opens up a wide range of possibilities when it comes to working with our own images and achieving spectacular results. To work with these filters we only have to go to the Filter menu and display all those sections that we find here to access these elements.
But let’s use the functionality we use, in most cases we will need to make the photo larger to work better on these images.
Different ways to enlarge photos
Therefore, in the event that we need zoom in or out of the image in Photoshop To get a better view, we have several ways to achieve it. In fact, bringing the section that interests us closer to the program’s work desk will allow us to carry out a much more detailed editing work. Therefore, it could be said that this type of action becomes almost essential when working here.
Something that we must bear in mind is that using the Crop tool is not the same as enlarging the image. With the second we only change the way the image is seen on the screen without affecting the appearance or size of the final image. For all this that we comment on below we will talk about the methods that you can use to get closer to a picture in Photoshop.
Use the program’s built-in tool
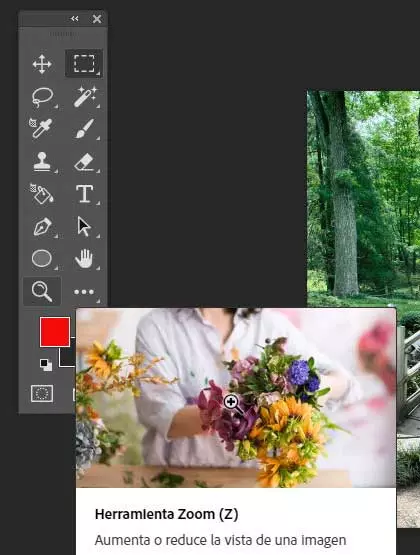
The program itself presents us with a specific tool for this type of task that we comment on. In this case, we just have to select the corresponding Zoom tool in the bar that we mentioned above, located on the left side of the desktop. It is worth mentioning that the button is found with an icon in the form of a magnifying glass, although we can also use the Z key on the keyboard to activate this functionality.
In order to enlarge the image as such, we click on the section of it that we need to see in more detail. Thus, each time we click, we will approach one level until we reach the maximum level that Photoshop presents us.
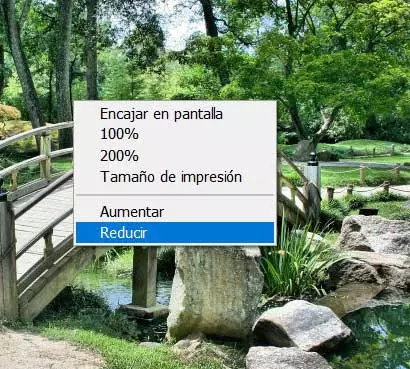
Something that we must also take into account that to zoom out we click on the enlarged section with the right mouse button. Then really in the contextual menu that appears we will see an option that says Reduce.
Benefit from the mouse wheel
The central wheel that we find in most of the current mice can be very helpful in mute programs. In fact, we can make use of this element for certain functions, as is the case at hand and that we did not know at first. Therefore, if we need to make the photo larger on a certain part of the image quickly and easily, we can use this element that we are commenting on.
Specifically in this case we will have to locate ourselves on the specific area that we want to enlarge the image loaded on the desktop. Next, we press and hold the Alt key on our keyboard, while we use the mouse wheel. By moving it forward we will see how the image is enlarged at that moment. If we carry out the same operation, but moving the wheel backwards, we move it away.
Enlarge the image in Photoshop with the percentage value
This method is a bit slower, but allows you to be more precise when zooming in on an image. adobe program. If we take a look at the bottom left of the work desk of Photoshop, we will see a small box with a percentage. This refers to the current level we are working with.
Therefore, it is easy to imagine that we can click on that same box to edit that percentage by typing a new magnification value. One of the main advantages that we find here is that we have the possibility of using decimals.


