Lights, camera, action! Are you ready to unleash your inner filmmaker? Look no further than MiniTool MovieMaker, a free video editing software for creating stunning movies. Whether you’re an aspiring director or a casual video enthusiast, this software is designed to make the movie-making process a breeze. With its user-friendly interface and powerful editing capabilities, MiniTool MovieMaker 6.1 is sure to take your videos to the next level.
Whether you are a professional filmmaker or an aspiring content creator, this powerful video editing software will provide you with the tools and capabilities to bring your creative vision to life.
Features and Benefits of MiniTool MovieMaker 6.1
This version of MiniTool MovieMaker is packed with an array of features and benefits that make it an essential tool for video editing. Let’s dive into some of its standout features:
Intuitive Interface
One of the key strengths of this software is its user-friendly interface. Upon launching the software, you will be greeted with a clean and intuitive layout that allows for easy navigation and seamless workflow. Whether you are a beginner or an experienced editor, you will find yourself quickly familiarizing yourself with the interface, saving you time and effort.
Wide Range of Editing Tools
The MiniTool MovieMaker 6.1 offers a comprehensive set of editing tools to help you unleash your creativity. From basic trimming and splitting to more advanced features such as adding overlays and adjusting playback speed, this software has it all. The precise control over every aspect of your video ensures that you can achieve the desired result with precision and finesse.
Professional-Quality Effects and Transitions
With MiniTool MovieMaker 6.1, you can elevate your videos to a professional level by incorporating stunning effects and transitions. The software provides a vast library of pre-designed effects and transitions that you can easily apply to your footage. From cinematic fade-ins and fade-outs to dynamic wipes and slides, these effects will add a touch of visual flair to your videos and captivate your audience.
How to Download and Install MiniTool MovieMaker 6.1
Downloading and installing MiniTool MovieMaker 6.1 is a straightforward process. Follow the steps below to get started:
- Visit the official MiniTool website at www.minitool.com and navigate to the MovieMaker 6.1 download page.
- Click on the “Download Now” button to initiate the download.
- Once the download is complete, locate the installation file in your designated download folder.
- Double-click on the installation file to launch the setup wizard.
- Follow the on-screen instructions to proceed with the installation. Choose your preferred installation directory and select any additional options as desired.
- Once the installation is complete, you can launch MiniTool MovieMaker 6.1 and start creating your masterpiece!
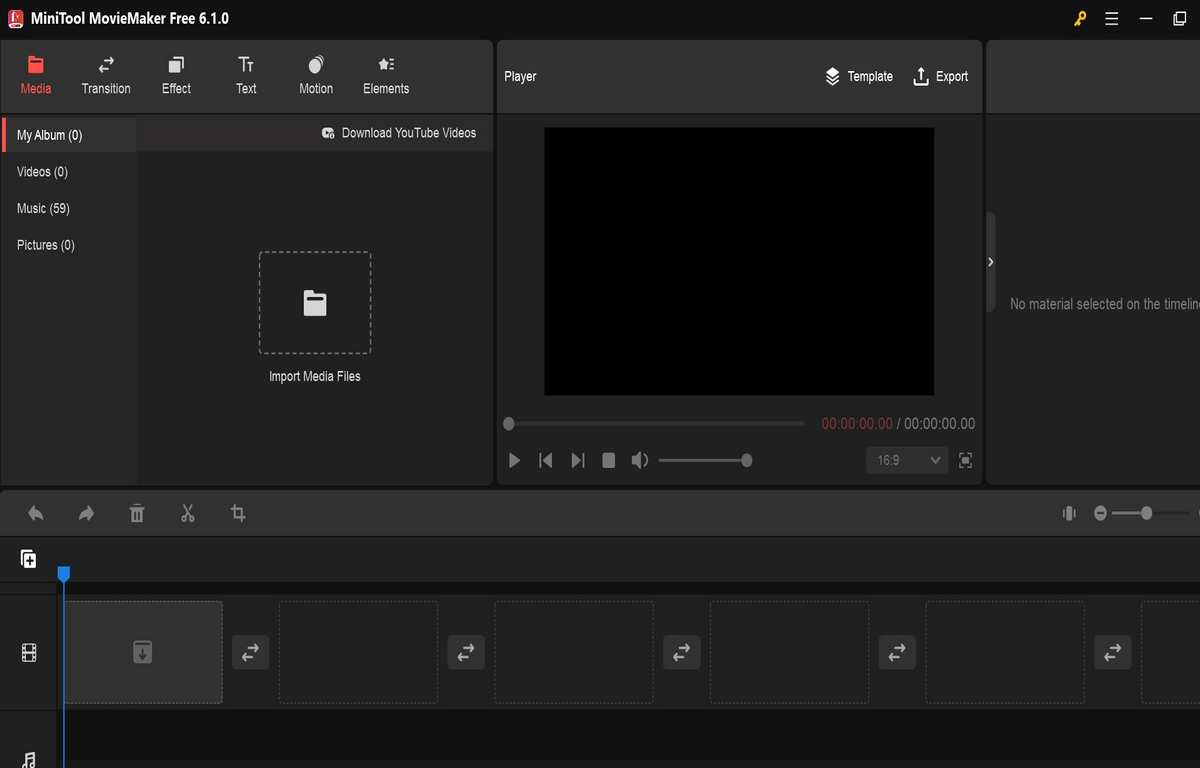
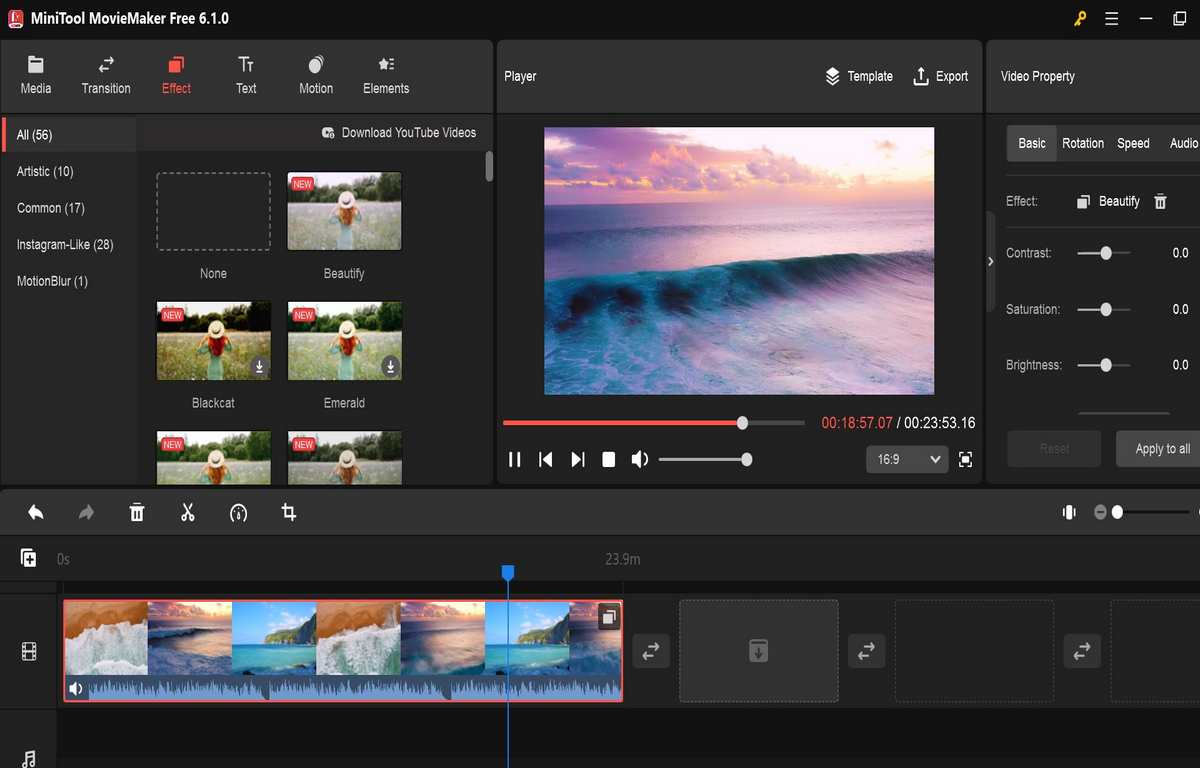
Understanding the Main Interface of MiniTool MovieMaker 6.1
Upon launching MiniTool MovieMaker 6.1, you will be presented with its main interface. Familiarizing yourself with the various elements of the interface will help you navigate the software with ease. Let’s take a closer look at the main components:
Media Library
The Media Library is where you import and manage your media files. It displays a thumbnail view of all the files you have imported, making it easy to locate and organize your footage. You can drag and drop files into the Media Library or use the “Import” button to add files from your computer.
Timeline
The Timeline is where you arrange and edit your video clips. It provides a visual representation of your video project, with each clip displayed as a separate track. You can drag and drop clips onto the Timeline, trim them, and adjust their position to create a seamless flow.
Preview Window
The Preview Window allows you to preview your video in real-time as you make edits. It provides a clear and accurate representation of how your video will look once exported. You can play, pause, and scrub through your video directly in the Preview Window to fine-tune your edits.
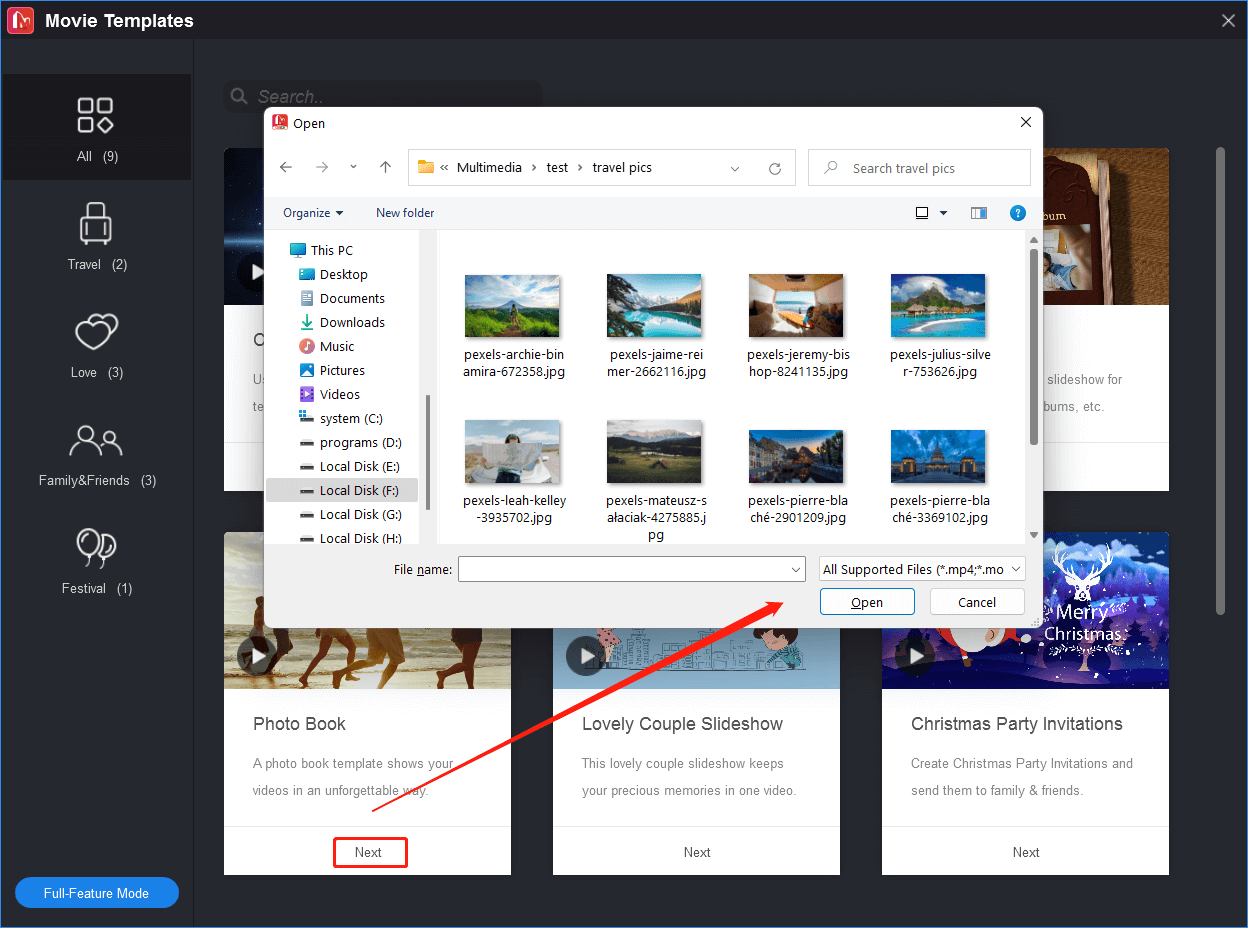
Importing Media Files into MiniTool MovieMaker 6.1
Before you can start editing your videos, you need to import your media files into MiniTool MovieMaker 6.1. Follow the steps below to import your files:
- Launch MiniTool MovieMaker and choose Movie Templates in the project library window.
- Click Next to import media files.
- Navigate to the location on your computer where your media files are stored.
- Select the files you wish to import and click on the “Open” button.
Editing Tools and Effects in MiniTool MovieMaker 6.1
This video editing software offers a wide range of editing tools and effects to enhance your videos. Let’s explore some of the key tools and effects available:
Trim and Split
The Trim and Split tools allow you to precisely trim and split your video clips. You can remove unwanted sections from your footage or split a clip into multiple segments for further editing. Simply select the clip on the Timeline, position the playhead at the desired location, and click on the Trim or Split button.
Crop and Rotate
If you need to adjust the framing or orientation of your video, the Crop and Rotate tools come in handy. You can crop out unwanted areas or rotate your video to the desired angle. These tools give you full control over the composition of your footage and allow you to create visually appealing videos.
Speed Control
The Speed Control feature enables you to adjust the playback speed of your video clips. You can create slow-motion or fast-motion effects to add drama or emphasize certain moments. Simply select the clip on the Timeline, click on the Speed Control button, and adjust the speed slider as desired.
Adding Transitions and Text to Your Videos
Transitions and text are powerful elements that can enhance the visual appeal and storytelling of your videos. Let’s explore how you can add transitions and text to your videos in MiniTool MovieMaker 6.1:
Adding Transitions
Transitions help create smooth and seamless transitions between your video clips. MiniTool MovieMaker 6.1 offers a variety of transition effects to choose from. To add a transition, follow these steps:
- Select the desired clip on the Timeline.
- Click on the “Transitions” tab in the toolbar.
- Browse through the available transition effects and select the one you want to use.
- Drag and drop the transition effect between two clips on the Timeline.
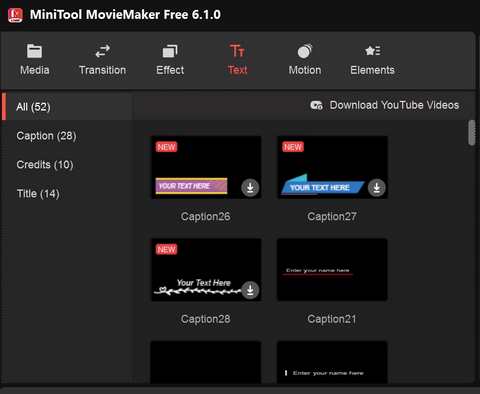
Adding Text
Text overlays can provide context, information, or captions to your videos. MiniTool MovieMaker 6.1 allows you to easily add text to your videos. Here’s how you can do it:
- Select the desired clip on the Timeline.
- Click on the “Text” tab in the toolbar.
- Choose from a variety of text styles and templates.
- Drag and drop the selected text style onto the clip on the Timeline.
- Customize the text by double-clicking on it and typing your desired content.
Applying Filters and Visual Effects
Filters and visual effects can transform the look and feel of your videos, giving them a unique and artistic touch. MiniTool MovieMaker 6.1 offers a range of filters and visual effects to help you achieve your desired aesthetic. Let’s explore how to apply filters and visual effects:
Applying Filters
Filters allow you to adjust the color, tone, and mood of your videos. MiniTool MovieMaker 6.1 provides a selection of filters that you can easily apply to your clips. To apply a filter, follow these steps:
- Select the desired clip on the Timeline.
- Click on the “Filters” tab in the toolbar.
- Browse through the available filters and select the one you want to use.
- Drag and drop the filter onto the clip on the Timeline.
Applying Visual Effects
Visual effects can add a touch of magic and creativity to your videos. MiniTool MovieMaker 6.1 offers a range of visual effects that you can apply to your clips. To apply a visual effect, follow these steps:
- Select the desired clip on the Timeline.
- Click on the “Effects” tab in the toolbar.
- Browse through the available visual effects and select the one you want to use.
- Drag and drop the visual effect onto the clip on the Timeline.
Adding Music
Music and sounds play a crucial role in enhancing the atmosphere and emotion of your videos. MiniTool MovieMaker 6.1 allows you to easily add music and sounds to your projects. Let’s explore how to do it:
To add background music to your video, follow these steps:
- Click on the “Media” tab in the toolbar.
- Browse through your local music library or choose from the provided music tracks.
- Select the desired music track and drag it onto the Timeline.
- Adjust the length and position of the music track to sync it with your video.
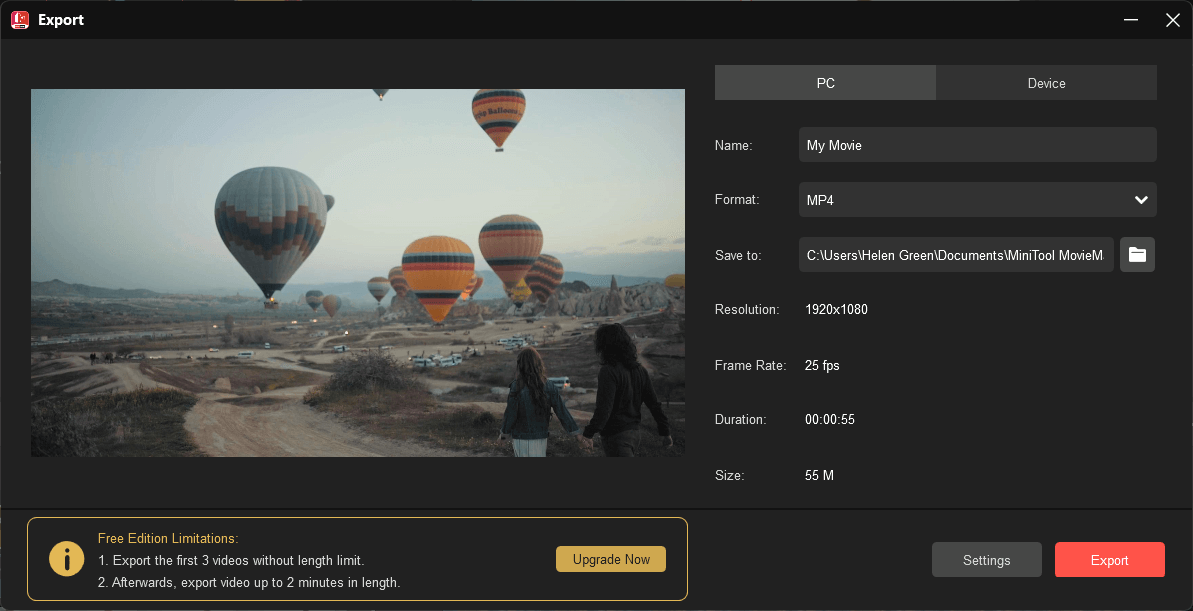
Exporting and Sharing Your Videos
Once you have completed editing your video masterpiece, it’s time to export and share it with the world. It provides various options for exporting your videos. Follow these steps to export your video:
- Click on the “Export” button in the toolbar.
- Choose the desired output format, resolution, and quality settings.
- Specify the output destination for your video.
- Click on the “Export” button to start the exporting process.
Once the exporting process is complete, you can easily share your video on social media platforms, video sharing websites, or directly with friends and family.
Conclusion
In conclusion, MiniTool MovieMaker 6.1 is a powerful and user-friendly free video editor that empowers you to unlock your creative potential. With its intuitive interface, wide range of editing tools and effects, and seamless exporting capabilities, this tool is the ultimate tool for bringing your creative vision to life. Whether you are a professional filmmaker or an aspiring content creator, MiniTool MovieMaker 6.1 has everything you need to create stunning videos that will captivate your audience. So why wait? Download MiniTool MovieMaker 6.1 today and start unleashing your creativity!