With the introduction of Touch ID and later Face ID, users can easily unlock their terminals without having to enter a security codeavoiding the need to hide so that no one sees them introduce it.
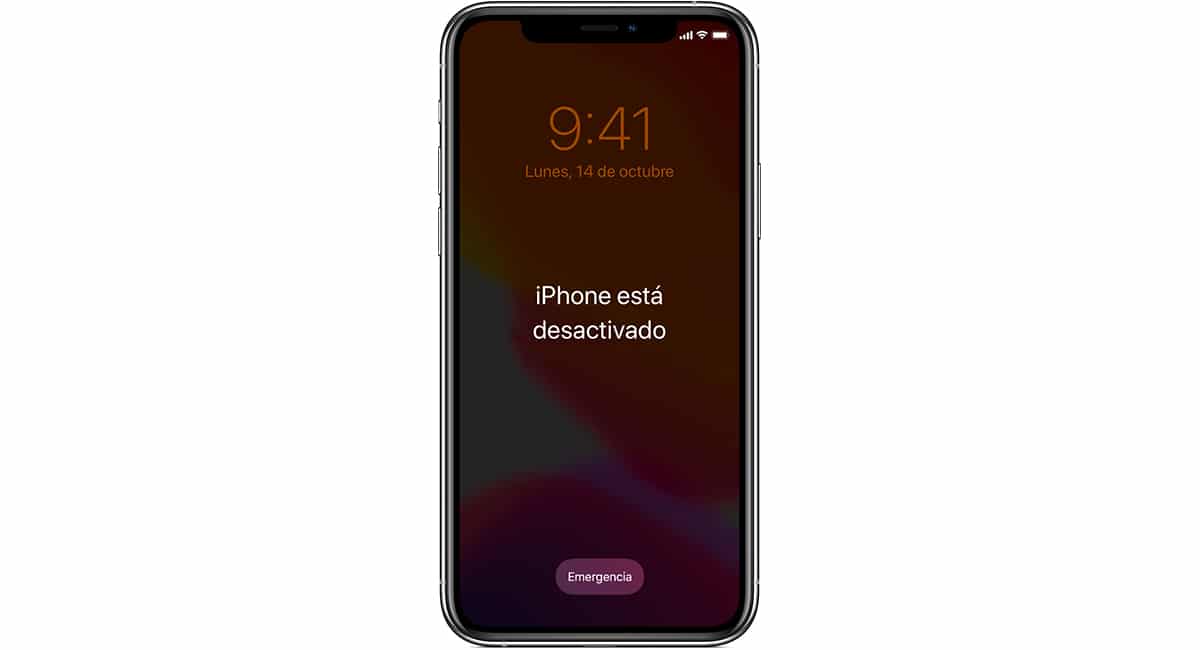
However, it is a double-edged sword. And I say this because, if we forget to use it so little, we can completely block the phone if we enter the code incorrectly up to 10 times. At that time, the message will be displayed iPhone is disabled.
Why does the message iPhone is disabled appear?
As a security measure, when we incorrectly enter the unlock code of our device 5 times, this it will be locked for one minute, giving us time to reconsider and make sure what the security code of our device is.

Related article:
How to edit PDF files on iPhone
After the first minute, we will have 2 more tries before the terminal crashes again. This time, we will have to wait 5 minutes.
If we make a mistake for the eighth time, the terminal will again be disabled, but this time, during 15 minutes. After failing the ninth attempt, the cooldown will be extended to 60 minutes.
The tenth attempt is the last that Apple offers us to be able to unlock our terminal before block it permanently and it will show us the message iPhone disabled.
How to fix a disabled iPhone
Depending on how careful you have been, we can find a problem. If you have contracted space in iCloud, all the content on your iPhone is stored in the Apple cloud.
But if not, and you’ve recently backed us up, we’ve got a problem. The problem is that the only solution to this message is restore our device from scratchwhich implies losing all the content that is inside it.

Related article:
How to put a ringtone on the iPhone
Apple should implement a feature that would allow, through iCloud, unlock terminal access without seeing the need to delete all content that is inside.
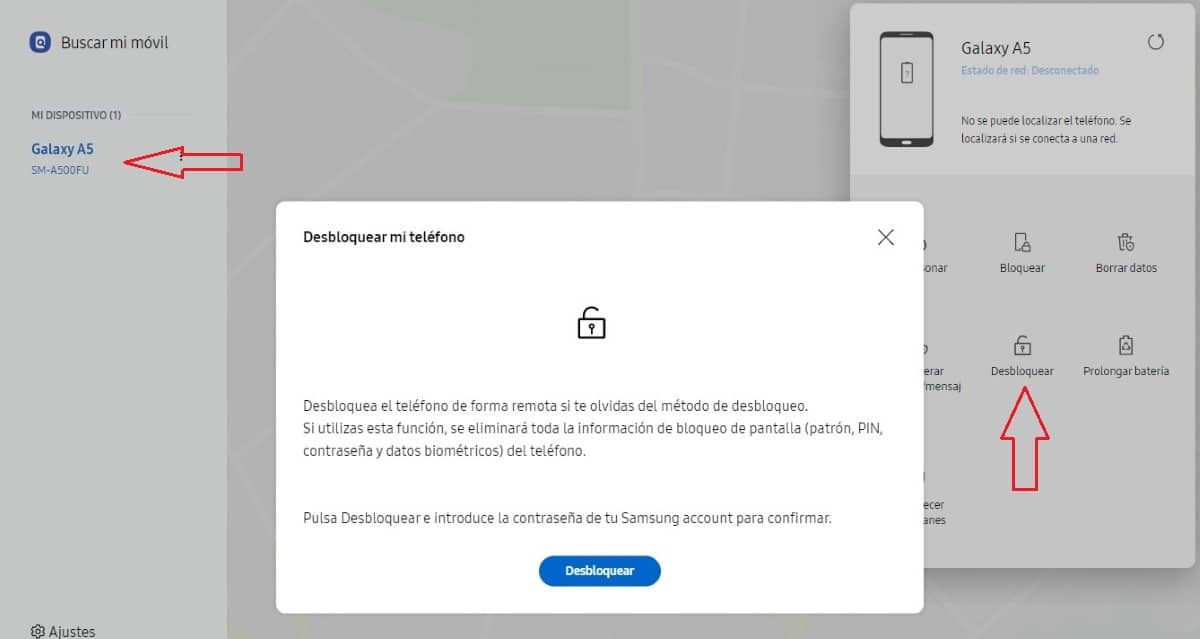
The Korean company Samsung, allows us to unlock our terminal if we have forgotten the lock codepattern or the device does not recognize our fingerprint or face without deleting.
Of course, as long as we have registered the terminal in our name with a Samsung account. Once we have unlocked it, will invite us to create another lock code, pattern or re-scan our fingerprint or face.

Related article:
How to share Wi-Fi from iPhone
Hopefully Apple include this option in the not too distant future as it will avoid many headaches.
to fix an iPhone offwe must perform the steps that I show you below.
turn off the device
To perform this process, a PC with iTunes installed is required (you can download it from the Microsoft Store) or a Mac which, depending on its version, will include iTunes as an app or built into the system (starting with macOS Catalina).
The first thing we must do is turn off the devicea process that varies depending on the iPhone model.
Turn off iPhone 8, iPhone X or later, and iPhone SE 2nd generation:

We press the volume down button and screen off button until a slider to turn off the device is displayed on the screen.
Turn off iPhone 7 / iPhone 7 Plus and earlier, iPhone SE 1st generation:

Long press the power button the screen until a slider appears to turn off the device.
Once we have turned off the device, we must wait a minute to make sure it’s completely turned off.
Activate recovery mode
Just as there is no single method to turn off an iPhone, to enter recovery mode, to activate iPhone recovery mode, we have perform a different operation depending on the model.
Activate recovery mode iPhone 8, iPhone X or later and iPhone SE 2nd generation:

How to activate recovery mode iPhone 7 and iPhone 7 Plus

Activate recovery mode iPhone 6s and earlier, iPhone 1st generation

Once we have located the button that will allow us to activate the recovery mode of our iPhone, we must keep it pressed while we connect the iPhone to our PC or Mac.

Once the image above (or similar) is displayed, we stopped pressing the button. Now, we have to use the computer.
Restore iPhone
Windows PC – macOS Mojave and earlier
If we use a Windows PC or a Mac with macOS Mojave or earlier, we proceed to open iTunes.
macOS Catalina and later
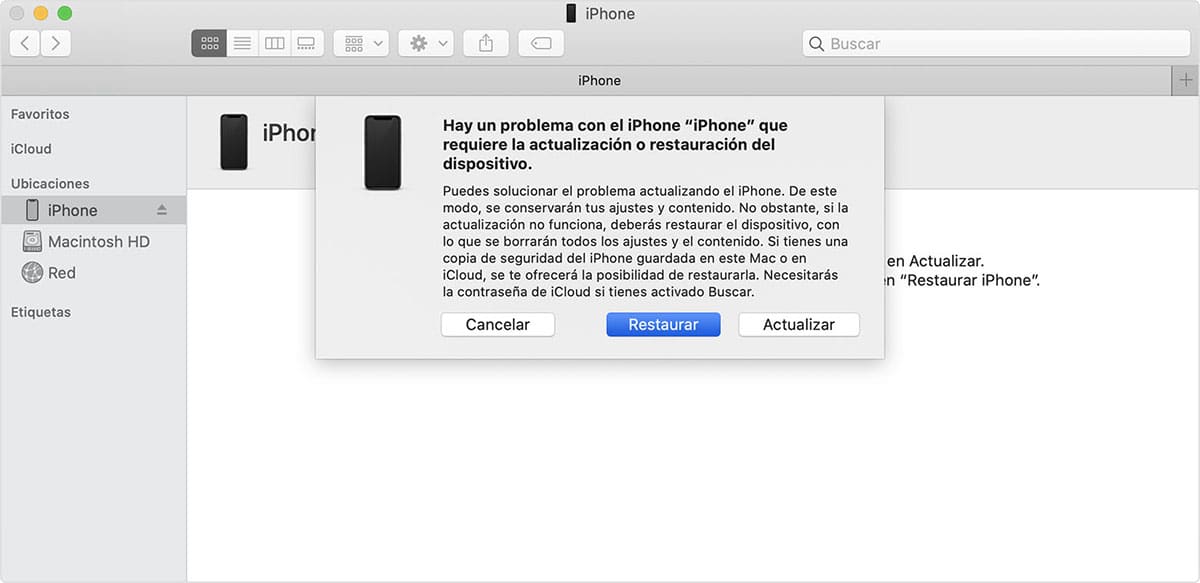
If we use a Mac with macOS Catalina or higherwe must locate the device in the left column and select it.
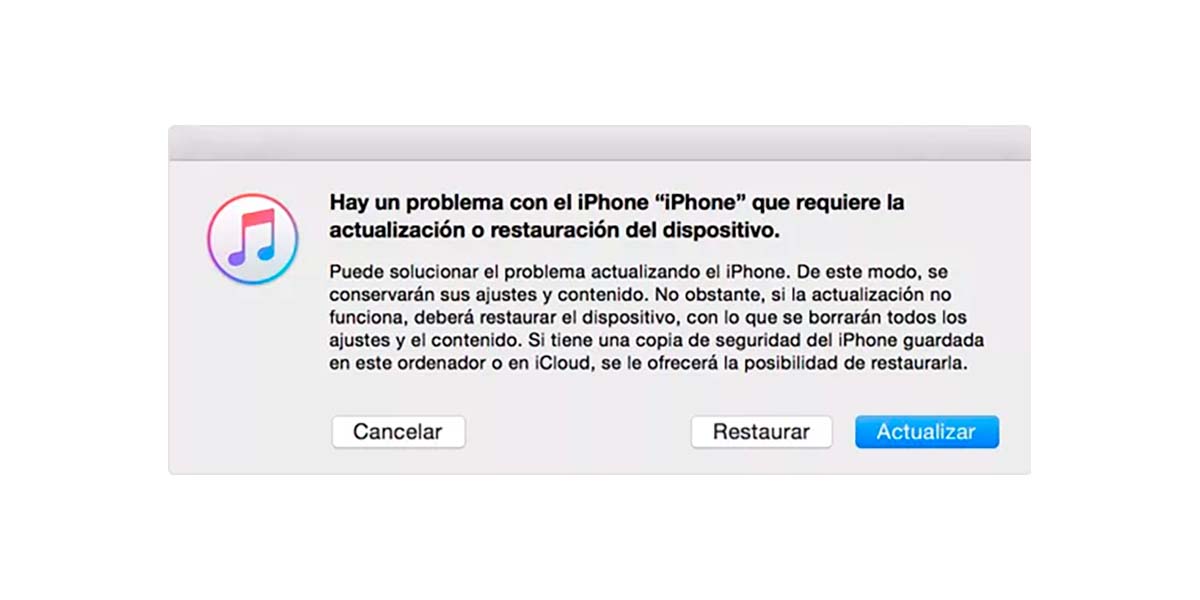
Once the device has been recognized by the device, iTunes or the Finder (depending on the version of macOS) it will detect that it is in recovery mode and it will offer us two options:
- Restore. By clicking on this option, all the content stored inside it will be deleted. If we have a backup on that same computer we will be able to restore once the process has finished.
- To update. This option does not fix the problem when the terminal is locked, but is used when the device is having trouble starting properly.
Some tips
If you have a hard time remembering what your device’s unlock code is and you don’t want to risk losing all the data you have stored on your device when you recover it, you should consider the possibility of contracting iCloud.
If you want to keep a copy of all the content you create (photos, videos) or copy to your device, the ideal solution is to use iCloud. Through iCloud, you will have at all times a copy of all the content on your device in the Apple cloudcontent that you can restore once you have regained access to your device.
Apple puts at our disposal 3 paid storage plansin addition to the 5 GB offered for free:
- 50 GB for 0.99 euros per month.
- 200 GB for 2.99 euros per month.
- 2 TB for 9.99 euros per month.
If you already have contracted storage space in the cloud with another platformyou can take advantage of the free 5 GB to keep your address book, calendar, tasks, notes, and more in iCloud.
With the application of the cloud access platform that you use (OneDrive, Dropbox, Google Drive…) you can configure the application so that upload all the new content that comes to the Photos app.
Another option is to use iTunes on Windows or Mac to back up regularly to avoid losing as many photos and videos as you have taken with your device.
This option is also available in computers managed by macOS Catalina or later.