We must bear in mind that 100% security does not exist, however, the more security measures we implement, the more difficult we will make it for cybercriminals.
Activate AiProtection Pro
ASUS routers have the AiProtection Pro security suite, a fundamental feature to protect the router from attacks from the Internet, but it will also allow us to protect the devices on the local network from such attacks. In addition, a very important feature is that it will be able to detect if any computer on our local network is infected. If it is infected with any malware, the router will be able to block it to prevent other computers on the local network from being infected as well. .
The only thing we have to do to activate it is go to the “General / AiProtection«, In this menu we proceed to enable the protection of AiProtection. This process takes a few seconds, and when it is activated we can see the menu as follows:
By activating this security feature, we have the possibility to carry out an evaluation of the router, if we click on «Scan» we will be able to see all the security recommendations provided by ASUS. In principle, they should all be green, and optionally, we can change the username. Of course, the admin user’s password should be very strong, to avoid dictionary or brute force attacks.
The rest of the options available in ASUS routers are the following:
- Blocking malicious sites: This security suite is capable of blocking access to certain websites that are malicious, so that we do not get infected with malware.
- Bidirectional IPS: the vast majority of ASUS models have an intrusion prevention system, it will analyze all incoming and outgoing traffic to detect attacks and stop them before they succeed.
- Detection and blocking of infected devices: is capable of detecting if any PC on the local network is infected, it will be in charge of blocking network traffic and isolating it so that this virus does not affect other connected devices.
In order to keep us promptly informed of any problem, we have the possibility of configuring the router’s SMTP server to send us AiProtection alert emails, this functionality is quite important because it will inform us in real time of everything that happens.
As you can see, AiProtection is great software built into all ASUS routers to provide additional security. Also, unlike other manufacturers, it is completely free and forever, we do not have to pay an additional subscription to use it continuously.
Disable UPnP
The UPnP protocol is responsible for opening ports in the NAT automatically for client applications that require it. On many occasions, there are IP cameras or different programs that open ports in the NAT without need. We have found in the past that some IP cameras would open ports for direct remote access, with the risk of security and privacy, even if we had configured the camera not to use UPnP.
For this reason, the best thing you can do is disable UPnP directly from the router, in this way you are 100% sure that no application or device is going to use this functionality to open ports in NAT autonomously.

If you disable this feature, you may need to open ports specifically in the “WAN / Virtual Server«, but you will have perfectly controlled which ports you have open.
Enable firewall and DoS protection
All ASUS routers have a firewall enabled by default, however they do not have DoS protection enabled by default. In this menu, what we must do is enable DoS protection and click on «Apply«. The rest of the configuration options are perfect, nothing else should be touched. A positive aspect is that the option of «respond to ping request from WAN» is disabled, in this way, if someone pings our public IP address we will not answer.

If you use the IPv6 network protocol, you should know that you also have the firewall activated by default, to protect us from external attacks.
Change password to a strong one
In the section of “Administration / System» is where we have the possibility to change the access password, we must put a strong one if you have not already done so. In addition, by default we have a captcha that will allow us to prevent automated attacks from trying to enter the router. In this way, if we fail to enter the router’s administration password, we will get a captcha that we must solve, otherwise, we cannot log in.

The rest of the options that we have in this menu must be left by default, since they do not affect the security of the router.
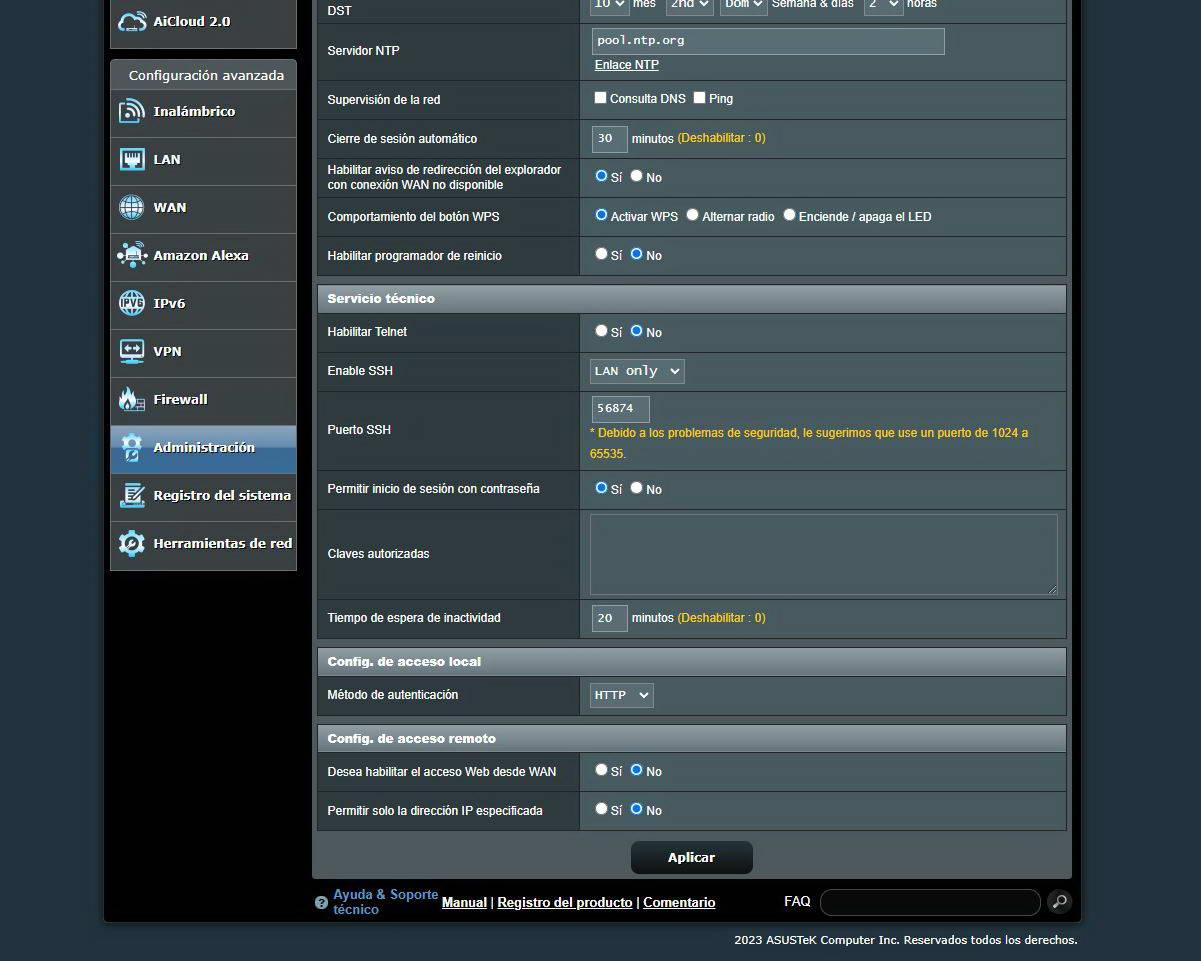
Telnet disabled and SSH well configured
In the section of “Administration / System» where indicates «Technical service«, we must always keep the Telnet protocol disabled for security. In the event that you want to access the router through commands, to execute something, only activate the SSH protocol.
If you are going to enable SSH, our recommendation is that you do the following:
- Just enable it on the LAN, to access through the home local network and not through the Internet. If you choose WAN and LAN, the router will have to open a port in the firewall to allow access.
- Change default port 22you can put any port, although our recommendation is that you put a port between 50000 and 60000.
- The simplest thing is to allow login with username and password, specifically the administration one. If you are going to leave the SSH service always enabled, our recommendation is that you select “no”, and just below put the authorized SSH keyto use SSH keys instead of username/password because it is much more secure.
To create an SSH key, you need to do the following steps.
First you create the SSH key, the following command executed on any Linux will generate the keys, although you can also do it on Windows if you use the Linux subsystem for Windows.
ssh-keygen -t rsa -b 4096
Next, you must copy the public key to the router in the “authorized keys” section, the appearance of this key should be like this:
ssh-rsa AAAAB3NzaC1yc2EAAAADAQABAAABAQCQctnA3vtNfRLe47AjOjQO3WMc79iZ2JJdGWixM0OTQDMBxjdbS+2W0haeGuW6WpmvUBQtvHcWP94UpV/iXw1pBAubxNrslez8ATulB2sQGGsdY2j3SwknbYK1nltDZ7J90W8pmoRf7QzfJnl+L2UMBqoDDNKFd4WwgxDbykf6EoEDbbGViDn7Bht6qqIzwp3KfeOaY1I4TML0nhyYNMd1NXuegb7Dzpj+ouBIvwyKYMh72NhdKnm3lvCSYj2CfEUEkF12H6PXJ2tz3hqC4BMC3sNn13yjy/cLa/KJcrzDg2ghhwgs95jZS1fILZJTTHSxRGSfKYn5Cmiqbyg5Y8uH rsa-key-20230505
You will now be able to use the SSH service securely.
Configuring web access securely
In the same menu as before, in the “authentication method«, is where we can choose between HTTP, HTTPS or both protocols. If you want maximum security, our recommendation is that you use the HTTPS protocol, even with a self-signed certificate, since, in this way, you will be able to access the router’s administration through the HTTPS protocol, which is a protocol that provides confidentiality and authenticity of the transmitted data.
Of course, the configuration options of «want to enable web access from WAN» We mark it as «NO», so that the router’s administration website cannot be accessed through the Internet.
Finally, the option of «allow only a specific IP» It will allow us that only one IP from our PC or smartphone can access the router’s administration website. This option is not so important, because if the cybercriminal is inside the network, he can carry out other attacks to falsify his IP address and access the router anyway.
Access from the Internet to the router via the web or to any service
If you need to access the router’s management website, the best thing to do is to configure the ASUS router’s VPN server. Our recommendation is that you use both the OpenVPN and WireGuard protocols, although we can use both simultaneously without any problem, in this way, for certain uses we can use OpenVPN and for other uses we can use WireGuard.

Once we have configured the VPN server, we can access our router through the usual IP address, which on ASUS routers is 192.168.50.1. In this way, we will only have one port open in the firewall that corresponds to the VPN server, which has strong authentication based on public key cryptography.
Adequately protect your WiFi network
If you want to avoid intruders in your WiFi wireless network, you must make a total of three very simple adjustments, with the aim of making it very difficult or almost impossible to hack it:
- Select WPA2 AES security provided as a minimumeither WPA2-Personal or WPA2-Enterprise with authentication to external RADIUS server.
- It is advisable to choose WPA3-Personal or WPA3-Enterprise, without WPA2/WPA3. However, many wireless clients may not connect to the wireless network, so keep this in mind.
- Put a strong access password if you select WPA2-Personal or WPA3-Personal, at least 15 characters and alternating uppercase, lowercase, numbers, and symbols.

If you choose WPA2-Enterprise or WPA3-Enterprise, remember to configure the RADIUS server in the corresponding menu. We will have to choose the frequency band, put the IP address of the external RADIUS server, the server port and also the connection secret. ASUS currently does not have a built-in RADIUS server, so you will need to install it on an external server, be it a NAS, Raspberry Pi, or any other device.

Finally, deactivating WPS (Wi-Fi Protected Setup) is essential to maintain the security of our connections. You should know that the AiMesh system uses WPS to add the different AiMesh nodes to the mesh network, so if you are going to add new nodes, you will have to enable it temporarily, otherwise it will not work. Once the AiMesh nodes are already added, you can deactivate it without any problem.

As you have seen, with some very simple adjustments we will have our router much more protected against external threats. In this way, we will mitigate possible attacks from botnets such as Mirai and many others that exist, and that put home routers at risk.