There are many people who like simplicity in email. And the Mail app on our iPhone stands out for this. Many are those who have all their accounts configured to see them only in Mail. We tell you how to configure mail on the iPhone.
Email: Simplicity
Email It is not one of the apps that stands out the most within the Apple ecosystem. It has been receiving improvements in the different iOS updates that they make it a fast and efficient app to receive and send mail electronic but without many other decorations.
And there are people who do not need a mail service with many more possibilities or more complications, just receive, see and send a response. For that it works like a charm Email.
The simplicity of the messages is sought, among other things to give versatility to mobile devices such as the iPhone or iPad. In addition, for that there are third-party applications that offer many more possibilities and options when it comes to organizing and writing your email, aimed at professionals.
However, Apple’s philosophy in this regard has always been simplicity. See received mail and reply to it in the same simple way without implementing an email inbox organized by type, or with personalized labels, or trying to improve productivity for those who receive non-stop emails, in short, without trying to give it a spin. nut to mail
In Email We have an inbox with the information and preview of the email received very concise, without distractions. There are no named icons, no images, no avatars. The name of the sender pure and simple, the title of the email and three to five lines of the email (to choose the length of the preview in settings).
Sent from my iPhone
This simple and simple signature, which has its history, was quite a statement to the recipient of an email when the iPhone was that desired item that began to break the mold of smartphones. The iconic Sent from my iPhone, gave a distinctive stamp to those who sent or responded to their email with nothing less than an iPhone back in 2007 or 2008.
Today, the fact that everyone reads and responds from a mobile device is normalized, and for the sake of those who seek simplicity in their mail, we are going to see how to configure our mail on the iPhone so that we can see all our email accounts Email.
Set up mail on iPhone
Most popular service accounts
- Let’s go to settings and we access the configuration of Email.
- Once in Emailclick on accounts (the number indicates the number of accounts we have activated in Email)
- Then we click on Add Account and a box will be displayed with several email servers: iCloud, Microsoft Exchange, Google, Yahoo!, aol, outlook.com and other.
If our account is from one of the aforementioned services, we will only have to access it with our email and service password, so that we give Mail permission to read our emails of the service in question that we are using.
From that moment on, our added service email account will have its own inbox and its own folders for its management. We will be able to receive and send emails as if we were using the service itself.
Accounts for other services
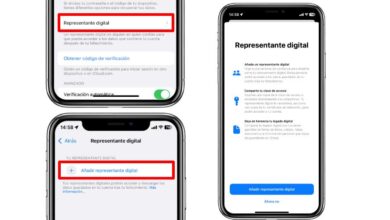
If our email account does not belong to any of the services that we have mentioned beforethe steps to follow are the same as we have seen before, only that in step 3, we will choose Other.
Here a drop-down will open where we will choose Add email account and we will have to enter all the data that is requested. This will be the case of a corporate work account, which will be contracted with a postal service provider and will have its own domain.
We must have all the information of the service provider in relation to the incoming and outgoing mail server, and if the service is POP or IMAP. What is this? I’ll tell you quickly.
POP (Post Office Protocol), it is the oldest mail protocol. It allows us to download our email locally, so it accesses the server, retrieves new emails to the device and deletes them from the server (in the best case, it saves them for X days before deleting them).
This type of protocol is in disuse, since the inconvenience comes when you want to manage an account from several devices, the first one that enters, downloads a new email and that makes it no longer available to others.
IMAP (Internet Message Access Protocol), without a doubt the option to choose when we hire a mail service. It allows us to access email from various devices and if we read an email on one device it will be marked as read on the rest, that is, there is constant updating.
It allows the synchronization of folders (which we can create to classify our emails), and it is designed so that emails are not downloaded so that they are always accessible on the server, even if that requires a lot of space.
Conclusion
Although there are third-party mail applications that we can install on our iPhone to manage our mail in a very professional way, with infinite options, personalized trays, filters, labels and more, those who prefer the simplicity of receiving mail and responding to it without further ado, can set up mail on the iPhone so that they can check their accounts without problems.
Configuration is quick and easy and only requires knowing the access and configuration parameters of the different services. Acquaintances are made automatically, for the rest, it’s a matter of talking to your email provider.
Once the mail is configured on the iPhone, we will have push notifications every time we receive an email, which will be extended to our Apple Watch (if we have one), so that We will not miss a single email, which can be interesting and necessary or a curse. That is up to you.