Currently there are users experiencing problems with Microsoft antivirus. We mean that some users are unable to open Windows Defender settings in both insider and final versions of Windows 11, as well as Windows. Therefore, when trying to access this section, the operating system asks to search for an application to open the Windows Defender links. Needless to say, this is a error because the antivirus is already integrated.
Error starting Windows Defender
Specifically, the main problem is found in that, when clicking on the section of open windows security, a pop-up window is displayed. It asks us to look for an application in the Microsoft store to open the Windows Defender link, despite the fact that it is already integrated into the operating system.
Already in Windows 10 as in the release of Windows 11, both systems have had problems with Windows Defender, which have been changing to a great extent, after sending different versions of the system. For example, it has been reported that users have to manually enable real-time antivirus protection every time the operating system is started. At the same time, another reported issue also concerns the automatic sample submission being disabled after every PC reboot.
Troubleshooting steps
If we have problems starting Windows Defender correctly in both Windows 10 and Windows 11, we can use the following actions to solve it.
Check system files with SFC and DISM
If Windows Defender fails, we can choose to perform a file system scan on the system to check if everything is correct or if there is a corrupt file that prevents it from starting correctly. To do this, we are going to use the SFC tool first and then the DISM tool.
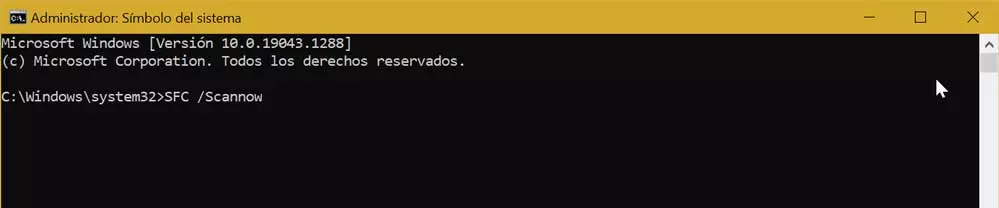
The first thing will be to activate the Command Prompt for which we write cmd in the search box of the Start menu and run it with administrator rights. Then we type the following command and press Enter.
sfc /scannow

Once executed, we wait for the scan to complete, which can take time, so we must be patient. In case of finding any corrupt system file, this tool will repair it so we can verify if Windows Defender is damaged or not.
In case SFC cannot fix the problem, try performing a scan with the DISM tool. To do this, from the Command Prompt window run as administrator, enter the following command and press Enter.
DISM /Online /Cleanup-Image /restoreHealth
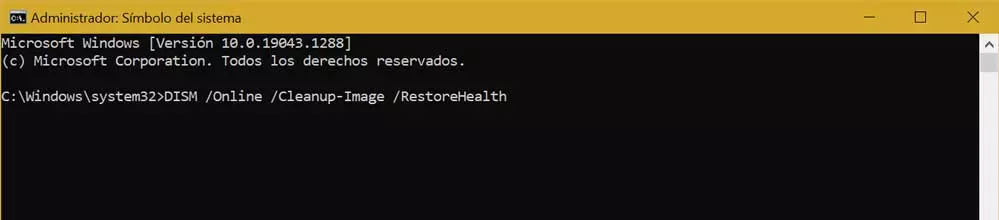
From this moment the scan will begin, which may take up to 20 minutes. Once finished, we verify if the problem persists, otherwise we move on to the next solution.
Using Windows PowerShell
Another possible solution to this annoying Windows Defender issue is to use the PowerShell command line tool. For this we must write power shell in the Start menu search box and run it with administrator rights. Once the window appears, we must write the following command and press Enter:
Get-AppxPackage Microsoft.SecHealthUI -AllUsers | Reset-AppxPackage
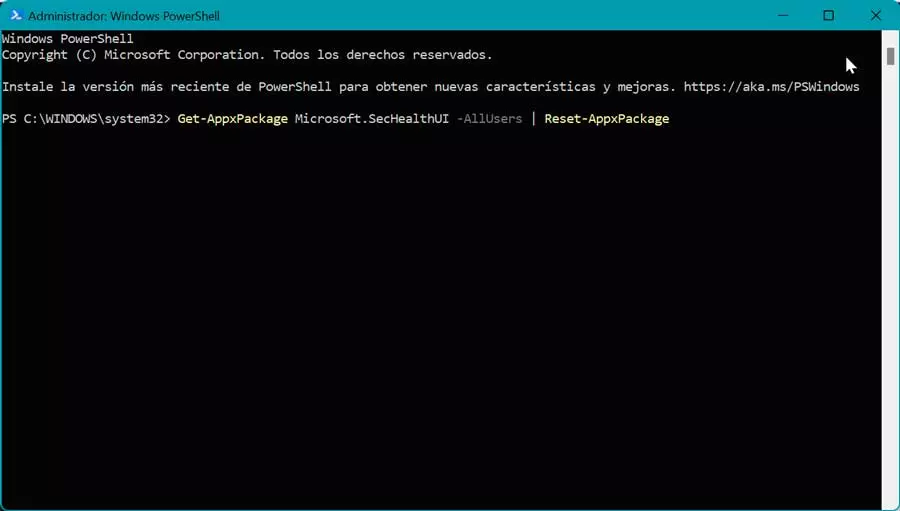
Once this is done, it should solve the problem when opening the Windows antivirus, so we close PowerShell and restart the system to check it. If not, we go to the next option to solve it.
Check Policy Editor settings
Whether we have Windows 11 or the Pro and Enterprise versions of Windows 10, we can make changes to the system using the Local Group Policy Editor. It is possible that Windows Defender does not work because we have made some modification here, so we must check that it is correct.
To do this, press the Windows + R keyboard shortcut to launch the Run command. Here we write gpedit.msc and press Enter or the OK button. Once inside we navigate to the following route:
Configuración del equipo / Plantilla administrativa / Componentes de Windows / Antivirus de Microsoft Defender
Here we double click on the section Disable Microsoft Defender Antivirus.
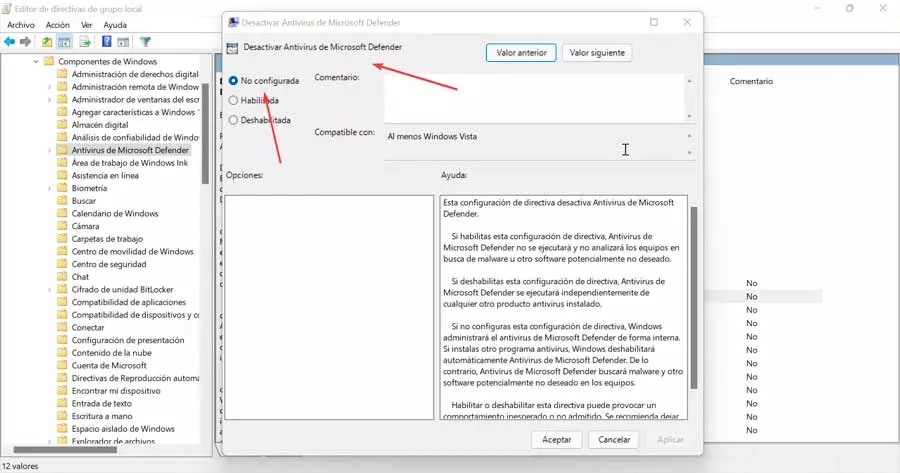
In the new screen we mark the option of not configured and click Apply and OK to save the changes. We restart the PC and check if Windows Defender is already running correctly.
Check registry settings
It will also be necessary to verify that a registry modification has not been made where the use of Windows Defender has been deactivated. This may have been caused by the installation of other antivirus software that, to avoid conflict, disable the Microsoft tool.
To do this, we will press the Windows + R keyboard shortcut to launch the Run command. Here, we type regedit and hit Enter or OK button. Once the registry is open, we must navigate to the following address:
HKEY_LOCAL_MACHINE / SOFTWARE / Policies / Microsoft / Windows Defender
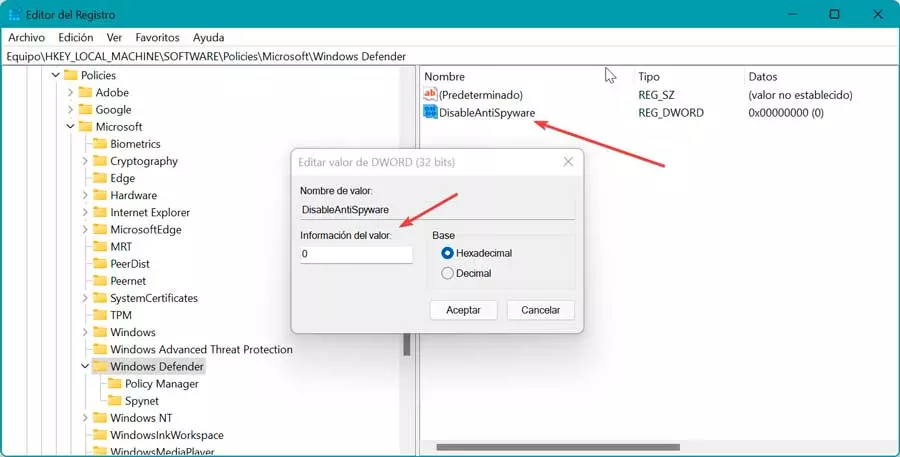
Here we must locate the key DisableAntiSpyware. If it does not exist, we can create it by right-clicking on Windows Defender and selecting New and DWORD Value (32 bits) and giving it the name DisableAntiSpyware. We double click on it and set the value data to 0.
We close the Editor and restart the PC to check if Windows Defender is already running correctly.
Restore Windows to a previous version
If at this point Windows Defender still does not work, we can choose to restore Windows to a previous version that we have saved where the Microsoft antivirus worked perfectly.
To perform the system restore we must access the Control Panel. Later in the upper right part in the “View by” option, we select “small icons”.
![]()
Next, we click on “System” and then on the “Recovery” section, located on the right side. This will open another window where we must click on «Open restore Sistem”. Next, a new window will open where we must click on «Choose a new restore point». We select it and Windows will start the process.

Once finished, we check that Windows Defender is already running correctly.