Why the network card is critical for speed
First of all you have to know that the network card limit it is going to be the limit of the maximum internet speed that we are going to get. That is, if, for example, our card is limited to 100 Mbps and we have contracted a 500 Mbps fiber optic rate, we will not have more than those 100 Mbps limit. With the advent of fiber optics we saw how the speed of the Internet increased considerably. We went from ADSL connections of just 20 Mbps to connections 10-20 times higher or more in some cases. If before the network card did not matter so much, since the speed was less than 100 Mbps, now it is essential.
In order to take advantage of the maximum speed of fiber optics we will need a network card that is 10/100/1000 or what is the same Gigabit Ethernet. It will allow us to achieve speeds of up to 1 Gbps symmetric and not be limited to Fast Ethernet, which would be 100 Mbps. Actually, when we have a Gigabit Ethernet connection, the actual maximum speed that we will achieve is about 940Mbps per issue of headers. different network protocols.
But the fact of having a card that is Fast Ethernet will not only limit web browsing, but also for example the exchange of files through a NAS server. At the end of the day we are going to be limited to those 100 Mbps.
Today most modern computers have a Gigabit Ethernet card. However, they do not always work well or are correctly configured to achieve that speed. Therefore it is convenient to know how can we configure it and how to see the actual capacity.
How to view sync speed
Within the configuration of the card in Windows, something fundamental is the sync speed. It is the speed at which you send and receive files by synchronizing with the router. If that speed is lower than the maximum that we have contracted with our operator, a bottleneck would occur and we would not take advantage of the available resources.
For see the speed of our network card In Windows we have to follow a series of simple steps, as we are going to explain:
- First of all we must go to the Windows taskbar icon, which appears at the bottom right, and click on the Internet icon to later access Network and Internet Settings. We can also go to Start, Settings and Network and Internet.
- Once here you have to click on Change adapter options. The different cards we have will appear, whether they are wireless, wired or virtual.
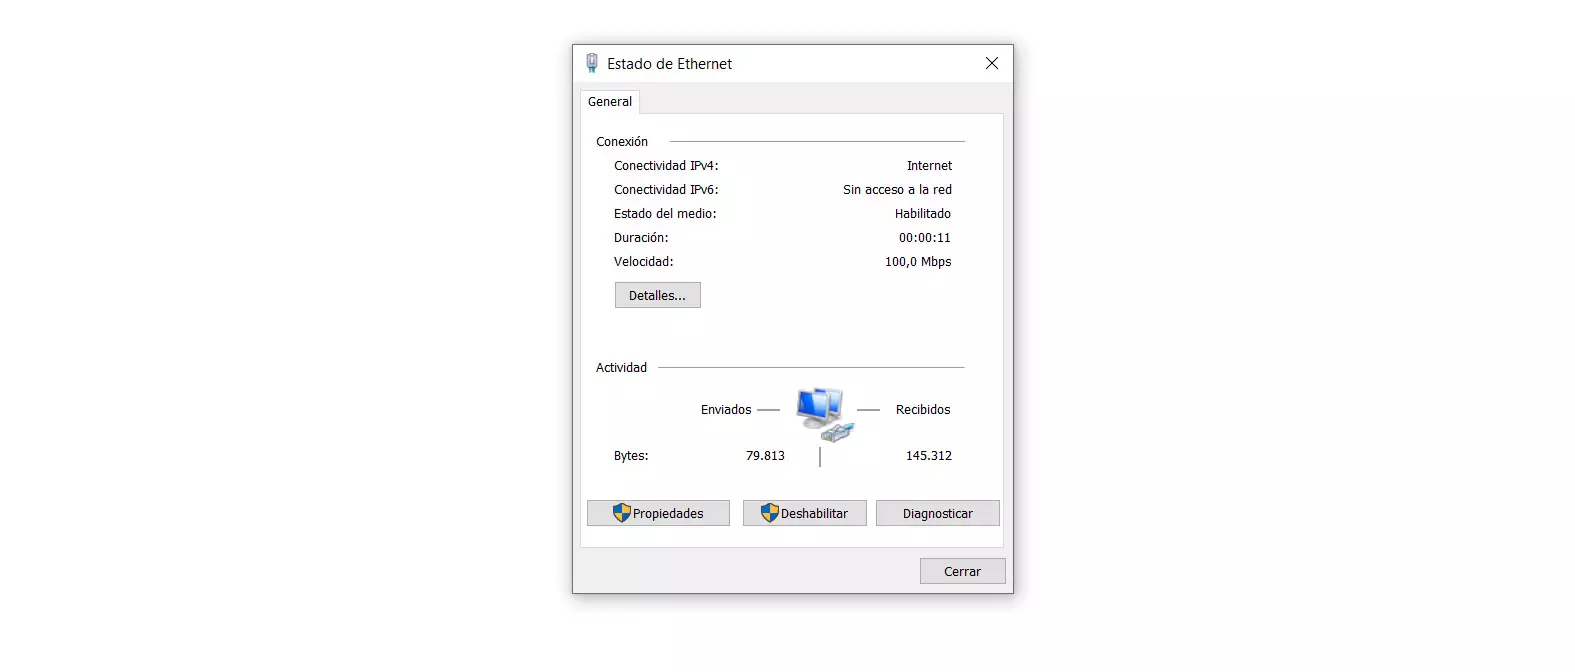
- In this case we would be interested in the Ethernet card, so we double click on it. A new window will automatically open with a series of information, among which is the speed. The normal thing is that it appears 100.00 Mbps or 1 Gbps. If this last option appears, it means that the card is properly configured and we have the maximum speed.
But it may happen that, as we see in the image above, it is synchronizing at 100 Mbps. We could not navigate at the maximum speed. This can be basically due to three reasons:
- The network card is Fast Ethernet and does not support any more
- There is a physical problem with the network adapter or cable
- Ethernet card is misconfigured
Although all three options may be present, the most normal today is that it is due to a bad configuration. It is rare that a current computer is not compatible with Gigabit Ethernet and it is not very normal for physical problems to appear, beyond that we are using an old cable or that the network adapter pins have become loose.
How to set the card to 1 Gbps
In the event that the problem is due to the third option, a bad configuration with the card, we will have to carry out a series of simple steps in Windows. If the problem is not more than that, we can quickly see that the card begins to synchronize at 1 Gbps and thus be able to take full advantage of the fiber optic speed that we have contracted.
Therefore, in the Windows operating system we have to follow these steps shown below to configure the card at 1 Gbps:
- The first thing we have to do is go back to the Network and Internet Settings. We enter Change adapter options and select the Ethernet card.
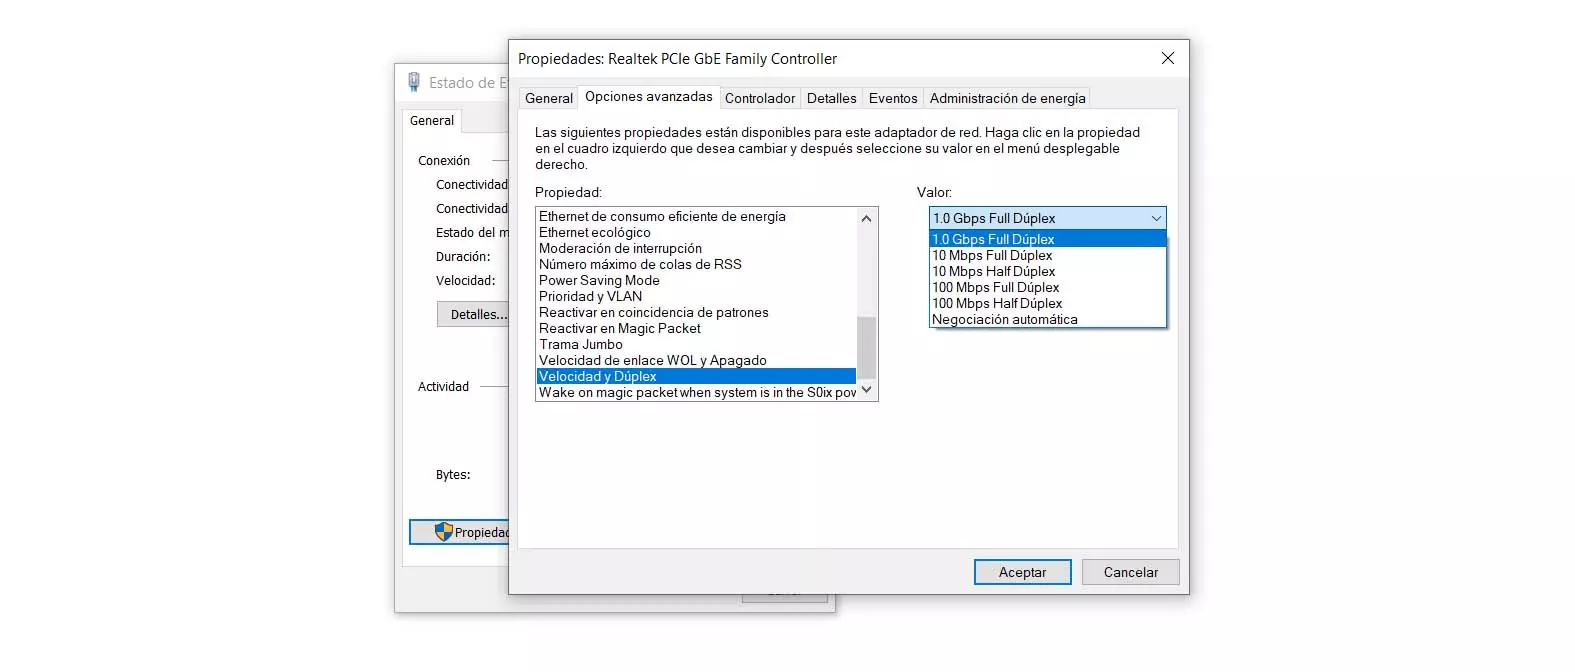
- Once this is done we double click and enter Properties. We click on Settings and we will Advanced Options.
- In this new window we have to select Speed and duplex and we make sure that the option of 1.0 Gbps Full Duplex. The normal thing is that if we had speed problems it is because it was marked at 100 Mbps.
After having configured the network card to 1 Gbps we only have to accept and restart the computer. From that moment on, you should synchronize at that speed with the router and make the most of the available performance of the Internet rate that we have contracted. We can now share files faster with NAS servers that we have connected to the router, as well as download or upload files on the network in the best conditions.
In short, following these steps we can configure the network card to work at 1 Gbps. In this way we will achieve that the contracted fiber optic speed reaches us well and we can navigate taking advantage of both the maximum rise and fall, without there being bottlenecks due to the fact that we are using a card limited to 100 Mbps or even with a lower speed.


