The Visual Organizer is one of the great novelties of macOS Ventura, a new tool that allows you to organize your work in a very efficient and productive way, as well as access advanced functions. Therefore, in this post, we are going to see how we can take advantage of to one of the great news of macOS 13.
How to activate the Visual Organize?
As you already know, the visual organizer allows you to enhance the multitasking options so you can work more comfortably, productively and efficiently, quickly accessing different apps, windows and browsing between them.
Once you know what the new macOS Ventura Visual Organizer consists of, let’s see what they are the steps what you have to do to activate this macOS function.
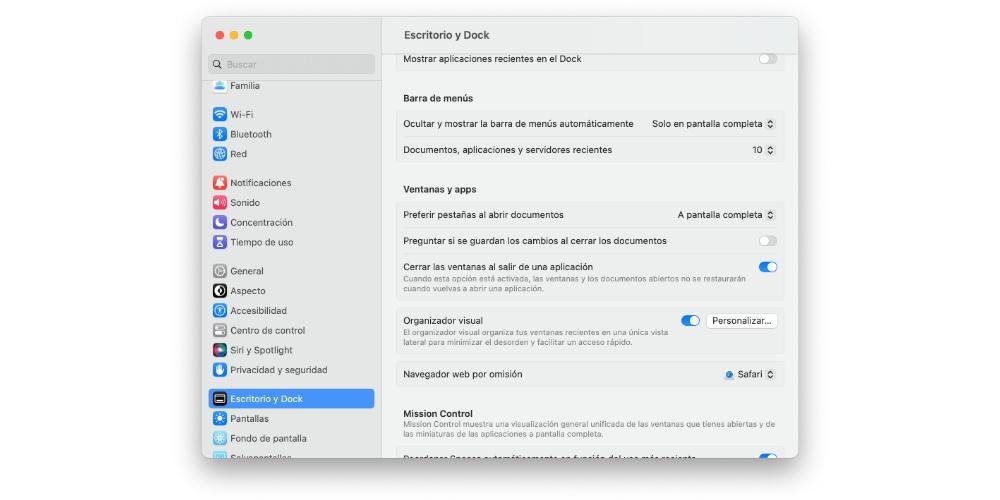
- On your Mac, open System Settings.
- Click on “Desktop and Dock”.
- Once inside, go down the existing menu to where it says “Visual organizer”.
- Activate it.
- Click on “Customize”.
- If you want recent apps to show, turn on “Recent apps”.
- If you want desktop items to be displayed, enable “Desktop Items”.
- When displaying application windows, select one of the following options.
- Everything at once.
- One by one.
- Click OK.
- Mac visual organizer
Once you have followed and completed these simple steps, the Visual Organizer will already be fully activated on your computer, in addition to having been able to personalize to your liking the way it works. Now, keep reading because now we are going to tell you how you can use it to get the most out of it.
Functions of visual organizing
Once we have activated our Visual Organizer, it is located in the top left of our Mac, along with Siri and the search engine. Next, we are going to see some functions that this new tool allows us:
- Switch app: Click on an app on the left side of the screen, where all the applications you have open will appear and you can go directly to it.

- Group and ungroup apps: Drag an app from the left side of the screen to add it to an app group in the center of the screen. On the other side, you can drag the app to the left side of the screen to remove it from the group.
Customize your settings
He visual organizer not only has a single type of specific function, but allows a great customization capabilities. To do this, you have to perform the following steps:
- go to “System settings» and click on “Desktop and Dock” in the sidebar.
- Click on the option “Windows and apps” On the right, click Customize next to Visual Organizer, then turn the following settings on or off:
- Recent Apps: This option allows you to display recently used applications on the left side of our screen. If this option is deactivated, the used apps are hidden, but you can reactivate it by pressing on the left edge of the screen to reactivate it.
- Desk Items: displays items on the desktop quickly and accessible.

- Also, from the visual organizer dropdown menuyou can determine the applications that can appear in the:
- Everything at once: Shows all windows available to an app when you switch to it.
- One by one: Show only the most recently used window for an app when you switch to it.