We also find files that we download or copy to our computer, files that inherit the attributes that they already had when we copied or downloaded them. We can change the attributes of these files without any problem since they are not part of our computer’s system and, if they were part of any other system, we won’t find any limitation to be able to modify them without problems.
Show hidden files and folders in Windows
To find the files that are hidden in the system, regardless of whether our computer is managed by Windows 10 or by Windows 11, we have at our disposal different methods to show them and be able to interact with them, either to copy, delete or move them to other locations.
browser options
Windows File Explorer is set by default not to show hidden files. In this way, Microsoft ensures that users do not delete or edit files that can affect the operation of the operating system.
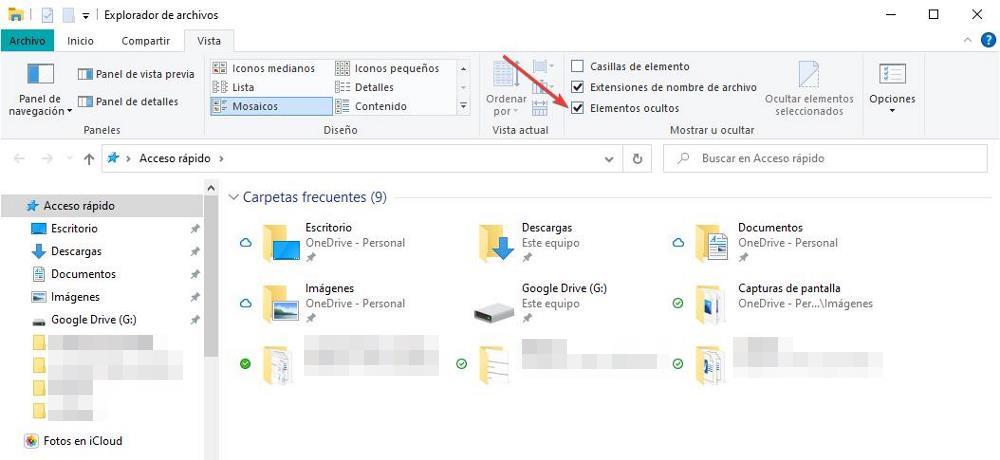
If we want the Windows file explorer to show all the hidden files of the system, we must access the explorer properties by clicking on Archive and then in Change folder and search options.
Next, click on the tab Seein the box Advanced Optionswe check the box Show hidden files folders and drives. Hidden files are shown in a greyish hue, including their name, in order to differentiate them from files that are not hidden in the system.
Via File Explorer
Another, much simpler option to show the hidden files and folders on our computer is found in the file explorer ribbon. The option we are looking for is located on the View ribbon and is called hidden elements. To show all hidden files and folders, we just have to check this box.
From CMD
Unlike the graphical interface, where if files and folders are not shown we cannot access them (there is nowhere to click), from the command prompt we can open and access files and folders that are hidden in the system, although at list these are not shown, since they have the Hidden attribute activated.
if we want to see only the hidden files that are in the directory, we must use the following command:
dir /a:h
Yeah only we want only hidden folders to be shown, the command to use is:
dir /a
If we only want to see both the hidden folders and files we must use this command:
dir /adh
With these commands, the hidden files and folders are shown in the directory where we are, however, these are still hidden in the systemso if we want to access them from the graphic interface we will not be able to do so if we do not previously modify their attributes so that they are no longer hidden.
With PowerShell
Through PowerShell, we can also see all the files that are hidden in Windows. Despite also being a command line, much more powerful than CMD, the commands we must use to display this information are different. To see all the files and directories that are inside a directory, including the hidden ones, we must use the following command:
dir -Force
If we only want to show only the hidden files and folders within a directory, we will use this command:
Get-ChildItem -Filter *.* -Recurse -Force -ErrorAction SilentlyContinue | where { $_.Attributes -match “Hidden”}
Through these two methods, we will only be able to see the hidden files, but these will continue to be hidden.
Prevent files and folders from being hidden
All the methods that we have shown you in the previous section allow us to see the hidden files and folders in the system. However, unless we modify their attributes, they will remain hidden in the system. If we want a file or folder to stop being hidden, we have three options to do it.
From Windows
The easiest and fastest method to make a file unhidden using the Windows interface is very simple. The first thing is to activate the view of the hidden elements as we have shown you in the previous section, from the View ribbon of the file explorer by checking the box hidden elements.
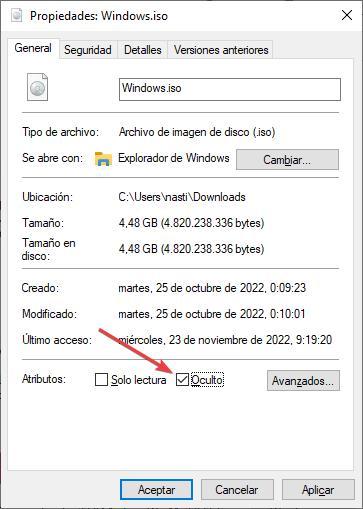
Next, we select with the mouse the file or folder that we want to stop being hidden and, by pressing the right mouse button, we access its properties. in the tab Generalwe go to the section attributes and uncheck the box Hidden. From this moment on, the file will be visible both from Windows Explorer and from CMD and PowerShell.
with cmd
That a file is hidden, the only thing that means in the Windows command line is that it is not visible. It does not mean that we cannot edit it, if it is a file, or access its interior, if it is a folder. From the file explorer we do not have that option anymore, if the file not visiblewe have nowhere to click to open it, edit it, delete it or access its content.
To change the attribute of a file so that it is no longer hidden, we must proceed with this command:
attrib -h nombredelarchivo.extensión
If what we want to change the attributes of a folder so that it is accessible from the file explorer, the command is exactly the same.
attrib -h nombredelacarpeta
If the folder name includes a period followed by letters, we must enter them in the same command, just like if it is a file, otherwise the system will not be able to find it.
Using PowerShell
PowerShell, like CMD, also allows us to modify the attributes of the files so that they are no longer hidden and can be accessed from the graphical interface, since, as we have previously mentioned, both from PowerShell and from CMD we can work with them. , even if they are hidden in the system.
To change the attributes of a file or folder so that it is no longer hidden, we can do it this way:
Set-ItemProperty nombredelarchivo/carpeta -Name “Oculto” -Value False
Hide files and folders in Windows
If we want to hide files or folders so that they are no longer visible on our computer, we can do this through the following methods.
with windows
Hiding a file or folder using the Windows graphical interface is the fastest and easiest process. We just have to select the file that we want to hide, click with the right mouse button to access its properties and, in the tab Generalcheck the box Hidden.
Set-ItemProperty nombredelarchivo/carpeta -Name “Oculto” -Value False
From the command line
If we are used to carrying out this process using CMD or if we simply prefer using commands to perform actions in Windows, to hide files and folders we will use the “attrib” command without the quotes, accompanied by the name of the variable “+h” without the quotes. quotes, to add the hidden attribute (hidden).
atttrib +h nombrearchivo.extensión
If what we want is to hide a directory, we must use the same command, entering the full name of the directory, including the text that can be displayed after the point, since, otherwise, the system will not be able to find it and apply the hide attribute.
atttrib +h nombrecarpeta
Using Powershell
From PowerShell we can also change the attribute of a file or folder so that it is shown as hidden in the system. The first thing we must do is open PowerShell with administrator permissions, something we can do by clicking on the Windows start button with the right mouse button and selecting Windows PowerShell (Administrator).
Next, we go to the location where the file and folder or hide is located and use the following command:
Set-ItemProperty nombredelarchivo/carpeta -Name “Oculto” -Value True
Tricks with hidden files
If we want to get functionality out of this Windows function, we can do it through some of the tricks that we show you below.
Hide all files in a folder
Hiding all the files that are stored in a directory is a long and tedious task if we do it individually. Fortunately, Windows offers us the option to change the attributes of all the files that are inside a directory using the Attrib command. To do it, we just have to use the following command from the directory where all the files we want to hide are located:
attrib +h *.*
By using the parameter *.* we are selecting all the files together with all the possible extensions. If we want to show only a specific file, we must use:
attrib -h nombrearchivo.extensión
If we want all the files to be shown again, we must use the same command that we have used to hide them with the -h parameter
attrib -h *.*
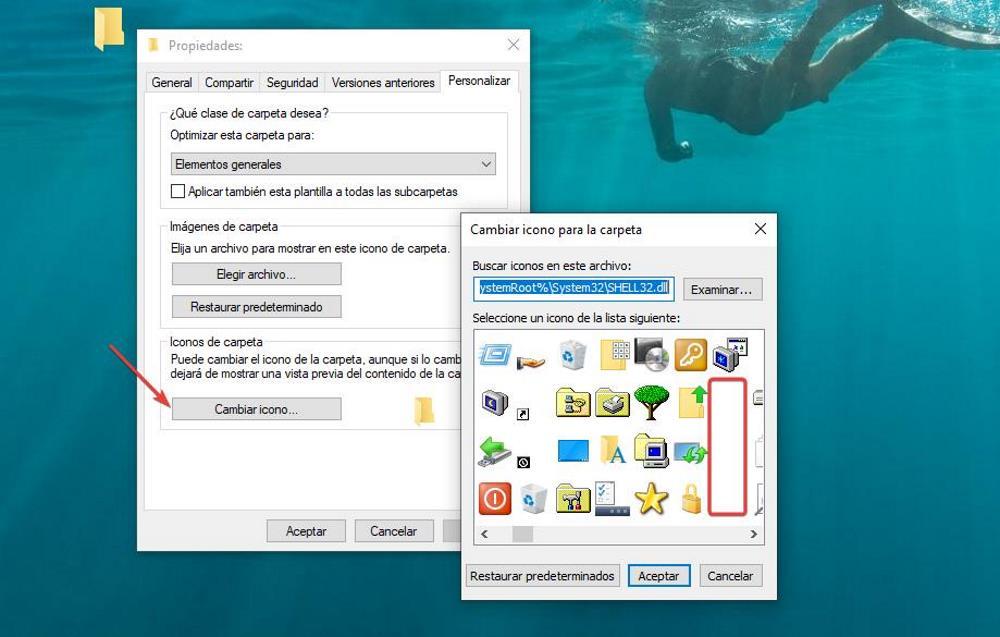
Create a hidden folder on the desktop
If we want to always have a folder at hand on our desktop but neither the name nor the icon of the folder is shown, we can do it by following the steps that we show you below. First of all, we must create a folder on the desktop with the right mouse button. The folder name will be the one displayed after pressing the key alt and without letting go, the number 255.

Next, we access the folder's properties by right-clicking and selecting Change Icon. Next, we look for a blank icon that is shown within the options and we select it. By clicking on Apply and then on OK, we will see how the folder has disappeared from view, but if we click on where we know it is, we will access its content.