These two elements are very important when it comes to scheduling periodic tasks that are executed without us having to be aware of their status. It will allow us not to worry about executing something at a certain moment, leaving it completely automatic in the operating system. We have previously mentioned Cron and Crontab. First of all, we are going to see what differences exist between both elements. Later we will learn to add tasks, and finally, we will delve into the management of Cron jobs.
Differences between Cron and Crontab
Although it may seem that we are talking about the same thing, this is not the case, and two elements could be considered dependent on each other. To be clearer, they are in charge of making task scheduling on Linux systems possible. Currently any Linux-based operating system has both tools, in order to program the different tasks repetitively without us having to take care of it.
What is Cron
Cron is a daemon (background process) that runs from the moment the operating system boots. Cron will be in charge of checking if there is any task (job) to be executed, according to the time configured in the operating system itself. It is very important that the time is correctly configured, and also the time zone, otherwise, the executions made by Cron will not correspond to our settings.
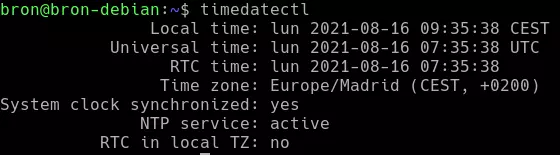
To ensure that our operating system is configured correctly, it is very important that you obtain the time automatically from the existing NTP (Network Time Protocol) servers. To check that we have the correct time in our operating system, in which time zone we are and if the system clock is correctly synchronized with the NTP servers, we can execute the following command:
timedatectl
We should see something like the following:
As you can see, all the hours match perfectly and the time is correct, this is very important, otherwise, the “Crons” will be executed in hours where they should not be executed. In the event that we do not have the time zone correctly configured, we can configure it correctly with the following command:
timedatectl set-timezone Europe/Madrid
With the installation of the Linux operating system, the NTP servers that we want are automatically configured, in case of failure or that we want to change these NTP servers, we can do so by installing the corresponding service and configuring it in /etc/ntp.conf.
Depending on the distribution, Cron starts using the folders /etc/rc.d/ or /etc/init.d and every minute it checks the files / etc / crontab or / var / spool / cron looking for possible executions we have scheduled.
What is Crontab
Crontab is a text file, it is a file with special content and specifically designed to be read correctly by Cron and proceed with the execution that we have programmed. Crontab has a list with all the scripts to be executed, generally each user of the system has their own Crontab file, in this way, each user could schedule their own repetitive tasks independently, without the need for us to always have to go to the administrator user. In this way, any user (including administrators) can schedule repetitive tasks to perform different executions.
To generate their own file, each user must use the command “crontab” (yes, it is the same name).
Add tasks to Crontab
Starting from the fact that we can execute tasks, first of all, we are going to configure a very simple script that we will call query.sh, we will put this script on our «Desktop» or in «Documents», we will be able to directly execute the text editor «nano» in the location where we want to put it:
nano consulta.sh
The content of the script would be the following:
#!/bin/bash
#script de ejemplo
sudo ls -l / > archivoResultado.txt
Once we have programmed the script, which is basically a program that lists the files and directories of the current directory, and exports it to a text file, we have to give it execution permissions to be able to execute it correctly by Cron, otherwise will not have execute permissions:
chmod ugo+x consulta.sh
This aspect is very important, since otherwise the command will never be executed.
The time has come to edit the file that has the tasks. For this we are going to use the crontab -e command. We find the following structure:

5 asterisks and the command to execute. Each of the 5 asterisks means:
- m: minute
- h: hour
- sun: day of the week
- mon: month
- dow: day of the month
The values that each of these variables can adopt are in the image. For example, in the case of the latter, the use of the name of the days written in English is allowed. Although it does not appear in the previous image, it is necessary to indicate between the command and the last asterisk (the day) the owner of the file.
To be clear, we are going to use some examples:
If we want to execute the query script.sh every day at 7 in the afternoon, we will have to indicate a line in the crontab with the following:
00 19 * * * usuario /ubicacion/del/script/consulta.sh
If we want to run every Sunday at 7 in the afternoon:
00 19 * * 0 usuario /ubicacion/del/script/consulta.sh
Run the script every February 4th at 7pm:
00 19 4 2 * usuario /ubicacion/del/script/consulta.sh
It must be said that in Linux there are some text strings reserved to execute processes during certain periods in the Crontab itself, this will be very helpful:
- @reboot: Execute once and as soon as the computer starts.
- @yearly: runs only once a year: 0 0 1 1 *
- @monthly: run once a month and on the first day: 0 0 1 * *
- @weekly: every week, the first minute of the first hour of the week: 0 0 * * 0.
- @daily: every day at 12 at night: 0 0 * * *
- @midnight: It has the same effect as above.
- @hourly: all hours during your first minute: 0 * * * *
Although we have told you what the format would be, when using crontab -e these terms can be used to define the period.
Cron jobs administration
The operation of Crontab is very simple, as we have seen, now we are going to teach you some basic commands to control the operation of Crontab itself in Linux operating systems.
To replace the existing file with another defined by the user, the following command must be used:
crontab archivo
To edit the currently existing file, the command that we have already seen throughout this article is used:
crontab -e
List all existing tasks in the user’s crontab:
crontab -l
Delete the crontab that is configured:
crontab -d
Define the directory where the crontab file will be stored. To carry out this operation, you must have execution permissions on said directory:
crontab -c dir
Instruction to handle the crontab of other existing users in the system:
crontab -u usuario
As you can see, scheduling the execution of tasks is not complicated and can be done quickly if everything mentioned in this tutorial is clear.


