When recording videos with our mobile or camera we must avoid holding it with one hand, and choose to hold it with both hands, as it will cause less distortion and sudden movements. In the same way, it is not convenient to zoom during recording, especially when walking, since this will also cause greater image movement and worse stabilization.
And it is that when we record any video, despite all this, it is inevitable on many occasions that a camera movement is made that could end up spoiling the experience. Therefore, it may be a good idea to carry out certain post-production work with a tool that allows us to correct this effect. That is why we can use an application like Premiere Pro with which we can smooth out unwanted camera movement in a few clicks, getting the desired result.
Warp stabilizer effect in Premiere Pro
Adobe Premiere Pro is a tool for video editing for professionals, especially focused on the audiovisual sector, but which has also become very popular among home users to edit videos. That is why it is usually used to carry out work on videos recorded with mobile phones or digital cameras. This powerful program is capable of supporting almost any video format, being able to export the results to various formats and devices.
When it comes to correcting any sudden movement and vibrations that our videos may contain, Premiere Pro has a powerful tool called Warp stabilizer, which will be responsible for eliminating the variations caused by camera movements. In this way it allows to transform all sequences of motion pictures recorded freehand into stable and smooth shots.
Next, we are going to explain how we can use this effect to stabilize shaky or vibrating videos that we have taken with our mobile or digital camera, improving the final result quickly.
Steps to stabilize vibrating videos
To stabilize our video with Adobe Premiere Pro, the first thing we need is to have the application installed. To be able to use it, you will have to pay a subscription of 24.19 euros per month. As a test, we can download a free version for 7 days from their website.
Subsequently, we must do is open the program from the Adobe Creative Cloud Desktop suite. Once its main menu appears, we will start by clicking on the “File” tab. In the drop-down menu that appears we select «New» and then «Project». We can also choose to use its keyboard shortcut «Ctrl + Alt + N».
Import file and move to timeline
This will open a window called “New project”, where we will be able to give it a name to have it identified, as well as choose the path where this project will be hosted in order to always have it at hand, in case we need to carry out any subsequent modification to it. Once this is done, we click OK at the bottom of the window and our new project will be created.

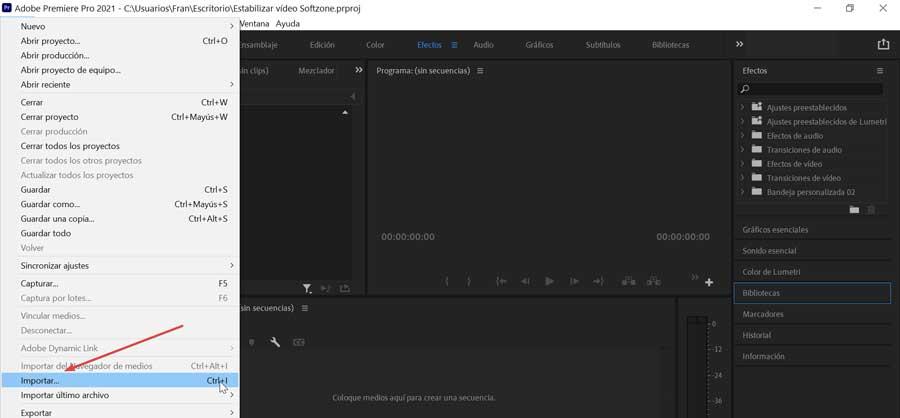
Once we have our new project open, we must import the video file that we want to stabilize. To do this, we must click on “File” and select the “Import” option. We can also use the keyboard shortcut “Ctrl + I”. We select the desired file to be added to our project.
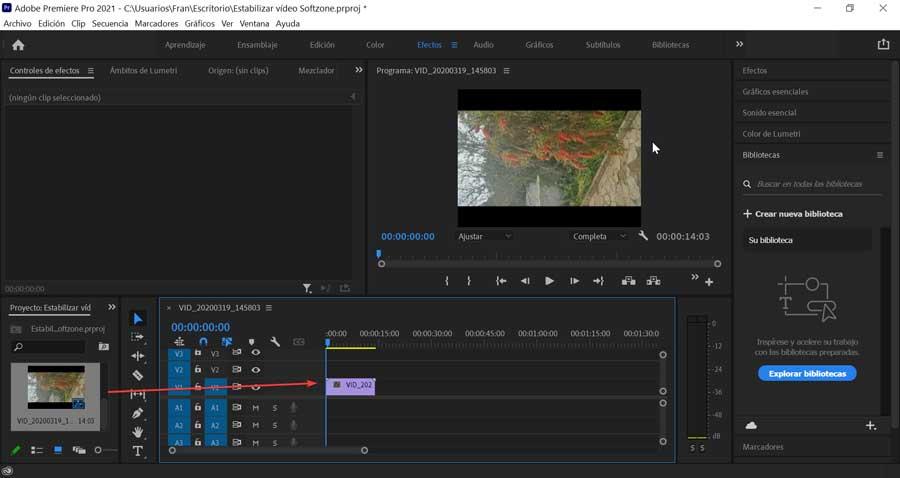
Once the import has been carried out, we will see that the file is inside the project panel in the lower left part. Now, we must drag it to position on the timeline partly right. Once this is done, the video will be added to the timeline panel and we can also see it within the preview panel at the top.
Add Warp Stabilizer from Effects folder
Now in the right column, we unfold the «Effects» panel and look in the search box «Deformation stabilizer», which we will find inside the «Distort» folder. We click on it and we drag to the video timeline. Immediately after, an analysis of the video will start in the background. While this is happening, a first warning is displayed in the Project panel that will indicate that the analysis is being carried out. Upon completion, a second warning will be displayed indicating that stabilization is occurring.
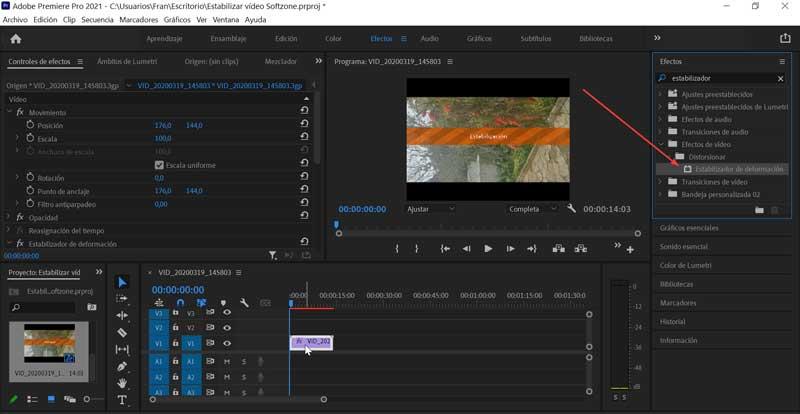
In this way, this effect will analyze the background and foreground of the footage and stabilize it in the best possible way. This process may take a few minutes depending on various factors, such as the length and quality of the footage, as well as the amount of RAM on our PC.
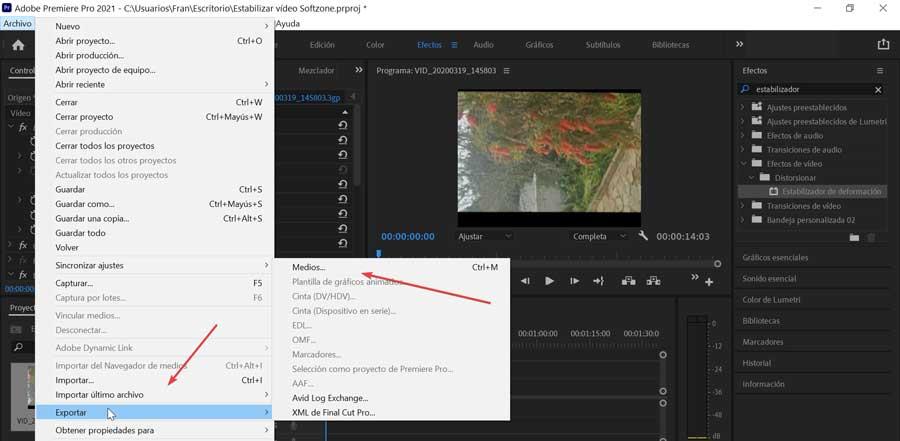
Export stabilized video
After the stabilization process is complete, the video will look normal without the annoying shake effects. Therefore, we can proceed to save the video. To do this, we must click on the “File” tab and select within its options, that of “Export” and then from its export options we choose “Media”. It is also possible to access it directly with its keyboard shortcut, «Ctrl + M».
This will cause a new window to open with “Export Settings”. Here we must establish both the desired quality of the video based on the quality of the original video and the location to save the file. We can choose from a wide variety of formats such as AVI, GIF, MPEG4, etc. We can also adjust both the video and audio codecs, as well as the subtitles in case the video includes them. Finally, we will click on «Export».

This way, the stabilized video will be saved after a period of time, depending on the computer settings and the length and quality of the video.